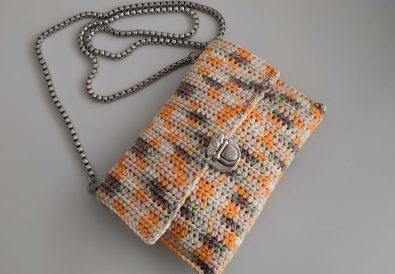
Learn to crochet a chic crossbody bag with a trendy Marshmallow pattern! This DIY crochet bag tutorial uses T-shirt yarn for a unique touch. Easy and quick, perfect for beginners.
Crocheting your own accessories is a fulfilling way to express your style and create one-of-a-kind pieces. If you’re looking for a fun and beginner-friendly project, this Marshmallow pattern crossbody bag is a fantastic choice! Its textured design, versatile size, and trendy appeal make it a must-have addition to your wardrobe.
This guide will walk you through the entire process, from gathering materials to adding the finishing touches. Whether you’re a seasoned crocheter or just starting out, you’ll find clear instructions and helpful tips to create a beautiful, handmade bag.


Materials
- T-shirt Yarn: Choose your favorite color and ensure you have a whole skein (approx. 100 meters). T-shirt yarn is soft, chunky, and often made from recycled materials!
- Crochet Hook: A size 6 hook works прекрасно with this yarn.
- Inner Rings (30mm): These add a professional touch where your strap attaches.
- Briefcase Clasp: Provides a secure, vintage-inspired bag closure.
- Chain (120cm): Forms your bag’s strap.
- Scissors
- Needle (optional): Helpful for weaving in yarn ends.
- Stitch Markers (optional): Can make counting easier.
Difficulty Level: Beginner
Potential Uses
This adorable bag is perfect for carrying essentials on errands, outings with friends, or adding a touch of handmade charm to festival outfits!
Crochet Basics
Not sure where to start? Here’s a quick primer on the stitches you’ll use:
- Chain Stitch (ch): The foundation of many crochet patterns.
- Single Crochet (sc): A basic, versatile stitch.
- Slip Stitch (slst): Used for joining rounds or moving across stitches without adding height.
Crocheting the Marshmallow Pattern
The Marshmallow pattern gives this bag its irresistibly squishy texture! Here’s how to master it:
- Pull up a Long Loop: Insert your hook into a stitch, yarn over, and draw up a loop much taller than usual.
- Repeat: Yarn over and pull up loops in the same stitch until there are 6 loops on your hook.
- Yarn over and Pull Through: Grab yarn and pull it through all the loops on your hook.
- Secure: Yarn over and pull through the final two loops remaining on the hook.


Step by Step Pattern
Let’s break down the bag’s construction phase-by-phase:
Bag Base
- Foundation: Ch 18
- Row 1: Skip the first ch, sc in each of the remaining 17 ch. (17 sc)
- Rows 2-34: Ch 1, sc in each stitch across. (17 sc per row)
Bag Sides (Make 2)
- Attach yarn: Join your yarn with a slst to the short side of the base.
- Row 1: Ch 1, sc in each of the 6 stitches across.
- Rows 2-14: Ch 1, sc in each stitch across. (6 sc per row)
- Fasten Off: Cut the yarn, leaving a tail to weave in later.
Sewing Sides to Base
- Placement: Align one side piece with the base, ensuring the bottom edges match.
- Joining: Starting at a corner, slst through a stitch on the side piece AND a corresponding stitch on the base. Continue with slst around the entire side.
- Repeat: Attach the second side to the opposite side of the base in the same way.
Bag Flap
- Row 1: Ch 1. Sc into the top of the first Marshmallow stitch. In each ‘valley’ between patterns, work 3 sc. At the pattern’s peak, work 1 sc. Continue across, finishing in the top of the last Marshmallow stitch with 1 sc. Ch 1, turn.
- Row 2: Sc into each stitch across. Ch 1, turn.
- Repeat Row 2 until your flap reaches the desired length. The number of rows will depend on how tall you want your bag to be.
Shaping the Flap (Optional):
- Decreasing: For a slightly tapered flap, decrease at the beginning and end of each row: Skip the first sc, sc across, skip the last sc. Sl st as usual.
- Increasing: For a slightly wider flap, increase at the beginning and end of each row: Work 2 sc in the first stitch, sc across, work 2 sc in the last stitch. Sl st as usual
Tips and Tricks
- Stretch your t-shirt yarn before crocheting to prevent twisting.
- YouTube can be your friend! Check out Nitka kz’s channel (https://www.youtube.com/@nitkakz) for a visual tutorial of this pattern.
- Express your creativity! Experiment with colors and add embellishments for a one-of-a-kind bag.


Assembly
- Sewing on the Flap: With the wrong sides facing, line up the flap with the back of your bag. Carefully sew in place using slst or a matching whipstitch with your yarn and needle.
- Attaching the Clasp: Follow the manufacturer’s instructions for your specific clasp to secure it to the flap.
- Attaching the Rings and Chain: Sew or thread the rings onto opposite sides of your bag. Attach your chain to the rings.
Finishing Touches
- Weaving in Ends: Securely weave in all yarn tails.
Join the Community
Share your finished crossbody bags on Instagram (@tubacrochets) and TikTok (@tubacrochet) – I’d love to see them! Leave comments with questions or just to connect with fellow crochet lovers.
Conclusion
Congratulations on creating your very own handmade treasure! Wear your Marshmallow pattern crossbody bag with pride, and don’t be surprised when compliments start pouring in. Happy crocheting!


My spouse and I stumbled over here from a different page and thought I may as well check things out.
I like what I see so i am just following you. Look forward to going over your
web page repeatedly.
Thank you so much for stopping by — we’re really happy you found us!
It means a lot to hear that you like what you see and decided to follow along.
We truly appreciate your support and hope you enjoy exploring the site again and again.
You’re always welcome here — happy crocheting! ✨