

Granny squares! Those colorful, versatile motifs are a beloved classic in the crochet world. But what good is a pile of lovingly crafted squares without a way to bring them together? That’s where crochet square joining comes in.
This technique might seem intimidating at first, but trust me, it’s much simpler than it looks. Whether you’re dreaming of cozy crochet blankets or vibrant bags, learning how to join crochet squares opens up a world of creative possibilities. This blog post will explore different crochet joining methods, focusing on a particularly effective and beginner-friendly technique. Get ready to transform your individual squares into stunning, cohesive projects!
Joining Granny Squares: Essential Techniques for Beginners
Before we dive into the step-by-step guide, let’s familiarize ourselves with some basic crochet terminology:
- Slip Stitch (sl st): This stitch is worked with a single loop on your hook and is often used for joining and finishing. It creates a discreet, almost invisible join.
- Double Crochet (dc): One of the most common crochet stitches, double crochet creates a tighter fabric and works up quickly.
- Chain Stitch (ch): This is the foundation of most crochet projects and is also used to create spaces within a pattern.
Now, let’s gather our materials:
- Granny Squares: Use any granny square pattern you like!
- Yarn: The beauty of granny squares is that they can be made with various yarn weights and colors. For this tutorial, we recommend using the same yarn weight and color for joining as you did for your squares.
- Crochet Hook: Choose a hook size appropriate for your yarn weight.
- Scissors: For neat finishing.
- Yarn Needle: Optional, for weaving in loose ends.
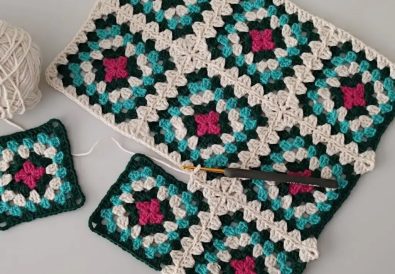
The Easiest Way to Join Granny Squares: A Step by Step Guide
This method, beautifully demonstrated by @TubaCrochet on her YouTube channel (https://www.youtube.com/@TubaCrochet), uses a combination of slip stitches and double crochet stitches to create a seamless crochet join. It’s surprisingly simple, and the result is a flat, almost invisible seam that lets your granny squares shine.
1: Arranging Your Squares
Before you start joining, arrange your squares in the desired layout for your project. This will help you visualize the finished piece and ensure that you join the squares in the correct order.


2: Joining the First Two Squares
- Hold two squares with their right sides facing each other.
- Insert your hook into the top corner stitch of both squares.
- Make a slip stitch, joining the squares at the corner.
- Continue working along the edge of the squares, making one double crochet stitch into each stitch along the edge.
- When you reach the corner, make two double crochet stitches, three chain stitches, and two more double crochet stitches into the corner stitch.
- Continue joining the squares in this manner, working along each edge and creating the corner loops.
3: Adding More Squares
- Lay out your next square, right side facing the last square you joined.
- Join the new square to the previous one by inserting your hook through the corresponding corner stitches and working a sl st.
- Continue working along the edge as before, making one dc into each stitch.
- When you reach a chain-3 space on the previously joined square, work a sl st into the space, then ch-3 and work two dc into the same space to create the corner loop on the new square.
- Continue adding squares in rows until you reach your desired width.
- To start a new row, turn your work and repeat the steps above, joining the first square of the new row to the corresponding chain-3 space of the previous row.


4: Finishing Your Project
Once all the squares are joined, you can add a border if desired. A simple crochet square border can add a polished look and help to even out any slight inconsistencies in tension.
Granny Square Joining Methods: Beyond the Basics
While the method described above is an excellent starting point for beginners, there are many other crochet joining methods to explore as you gain confidence. Some popular options include:
- Slip Stitch Join: This creates a very flat and almost invisible seam.
- Single Crochet Join: A durable join that creates a slightly raised ridge.
- Mattress Stitch: A sewing technique that uses a needle and thread to join squares invisibly.


Invisible Joins for Granny Squares: Tips and Tricks
Sometimes, you want a seamless look with no visible joins at all. A crochet slip stitch join can achieve this, creating an almost invisible seam.
- Choose Your Yarn Wisely: For a truly invisible join, use a yarn color that matches one of the colors in your squares.
- Work in the Back Loops Only: When making slip stitches, insert your hook only through the back loops of the stitches. This creates a flatter, less noticeable seam.
- Place your hook through the loop. Insert your hook through the first loop of the chain space.
- Bring the yarn over. Wrap the yarn around your hook, and draw it through the loop on the hook.
- Pull tight. Pull the loop tight to secure the join.
- Repeat for each square. Continue using this method to join the squares, ensuring the joins are nearly invisible.
- Practice Makes Perfect: Like any crochet technique, joining squares takes practice. Don’t be afraid to experiment and find the method that works best for you.
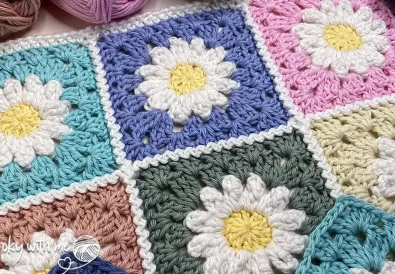
Creative Ways to Join Granny Squares: Design Inspiration
Joining granny squares can be more than just functional. It’s an opportunity to add creative flourishes to your designs. You can:
- Incorporate color changes. Create visual interest by joining squares using a contrasting color.
- Add decorative borders. Enhance your blanket’s edges with a border that complements the colors and textures of your squares.
- Experiment with different stitches. Utilize crochet square edging, crochet square border, or crochet slip stitch join tutorial to create unique designs.
Granny Square Joining for Blankets: Seamless Finishing Techniques
When creating a crochet blanket with joined granny squares, the finishing touches are essential. You can:
- Use a crochet slip stitch to create a clean and professional edge. This technique creates a neat and finished look, ensuring your blanket has a smooth and polished edge.
- Add a decorative border. Consider using a contrasting color or a pattern stitch to enhance the visual appeal of your blanket.
- Block your blanket. Blocking helps shape your blanket and even out the stitches, giving it a polished and refined look.
Troubleshooting Granny Square Joining: Common Mistakes and Fixes
Even experienced crocheters can make mistakes! Here are some common issues and how to fix them:
- Uneven Joins: Ensure your stitches are consistently tight or loose, creating a uniform join.
- Loose Ends: Carefully weave in all loose ends with a tapestry needle.
- Gaps in the Seams: If you notice gaps, try tightening your stitches slightly as you work.
- Bulky Seams: Use a smaller crochet hook for joining or try a flatter join, like a slip stitch join, to minimize bulk.
- Twisted Squares: Pay close attention to the orientation of your squares when joining to avoid accidentally twisting them.
Showcase Your Skills: Showstopping Projects Using Joined Granny Squares
The possibilities are endless when it comes to projects made from joined granny squares. Here are a few ideas to get you started:
- Blankets: Create cozy blankets in a variety of sizes and colors.
- Scarves and Shawls: Make warm and stylish accessories for yourself or as gifts.
- Bags: Design unique bags with personality.
- Home Décor: Craft pillows, table runners, or wall hangings to add a touch of handmade charm to your home.
Join the Crochet Community and Share Your Creations!
Ready to try your hand at crochet square joining? Head over to @TubaCrochet’s YouTube channel and watch her video tutorial: https://www.youtube.com/watch?v=mOi6B0S3iys. You’ll be amazed at how easy it is to create beautiful projects with this simple technique. And don’t forget to share your stunning creations on Instagram using the hashtag #tubacrochet_ or on TikTok @tubacrochet. We can’t wait to see what you make!
Other Crochet Projects You’ll Love
If you’re looking for more crochet inspiration, check out these amazing projects:
- Crochet flower patterns: Add a touch of elegance to your projects.
- Crochet amigurumi patterns: Create adorable stuffed animals.
- Crochet scarves and hats: Stay warm and stylish during the colder months.
In Conclusion, Joining granny squares is an exciting and rewarding aspect of crochet. With practice, you’ll master these techniques and create stunning projects that you’ll cherish for years to come. Remember, the key is to experiment and have fun! Let’s create beautiful things together!


I love this! Thank you!
thank you very much