Discover Simple How-to Guide on Crochet Placemat Pattern for Special Occasions like Thanksgiving & Christmas. DIY & Handmade Table Decor Ideas.
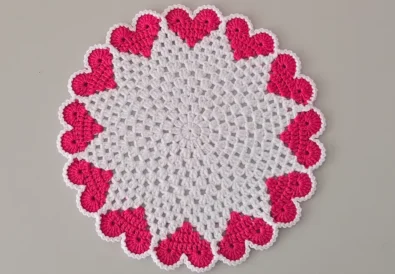
Crocheting is not just a craft; it’s an art form that allows you to create beautiful, functional pieces for your home. Today, we’re diving into a simple, yet elegant crochet plate mat project that’s perfect for beginners. This easy crochet placemat pattern is not only a great way to practice basic stitches but also an excellent addition to your table decor, especially for special occasions like Thanksgiving and Christmas.


Essential Materials
Before diving into the pattern, let’s gather the necessary materials. You’ll need:
- Yarn Type: Cotton or a cotton blend is preferred for placemats due to its durability and ease of cleaning. Choose a medium weight yarn for the best balance between ease of use and detail.
- Color and Thickness: This is up to personal preference and the décor of the dining area. A medium thickness (worsted weight) is recommended for beginners.
- Crochet Hook Size: A 5mm (H-8) hook is a good starting point for medium weight yarn.
- Additional Tools: Scissors for cutting yarn, a yarn needle for weaving in ends, and stitch markers to mark important stitches or rounds.


Getting Started: Basic Techniques
This pattern is great for those just starting their crochet journey. Key techniques include:
- Chain Stitch (ch): The foundation of almost all crochet projects, created by making loops on the hook.
- Slip Stitch (sl st): Used to join stitches together or to move the yarn without creating height.
- Single Crochet (sc): A basic stitch that provides a firm and dense fabric.
- Double Crochet (dc): A taller stitch than the single crochet, used for more open and faster-growing fabric.


Step by Step Pattern:
- Starting Loop: Make a slip knot and place it on your hook.
- Foundation Chain: Chain 30 stitches for the base of the placemat. This will determine the width.
- Row 1: Turn your work, chain 1 (counts as the first sc), then single crochet in each chain across. You will have 30 single crochets.
- Row 2: Chain 3 (counts as the first dc), turn your work, then double crochet in each stitch across.
- Rows 3-20: Repeat Row 2 for the desired length of your placemat.
- Finishing: Once you reach the desired size, cut the yarn, leaving a 6-inch tail. Pull this tail through the last loop on your hook and tighten. Weave in your ends with the yarn needle.


Placemat Pattern Tips and Tricks
- Maintain consistent tension for even stitches.
- Count your stitches at the end of each row to prevent increasing or decreasing unintentionally.
- Use stitch markers to mark the beginning of rounds when working in a circular pattern.


Engage with Our Community
After mastering your placemat, share your creation on Instagram @tubacrochets or TikTok tiktok.com/@tubacrochet. For further inspiration, check out TubaCrochet on YouTube, especially this tutorial video for an in-depth look at crochet techniques.
Conclusion
Crocheting your own placemats is not only a rewarding endeavor but also adds a personalized touch to your home decor. Remember, every stitch counts towards creating something truly special. We encourage you to experiment with colors and yarn textures, making each placemat uniquely yours. Happy crocheting!