
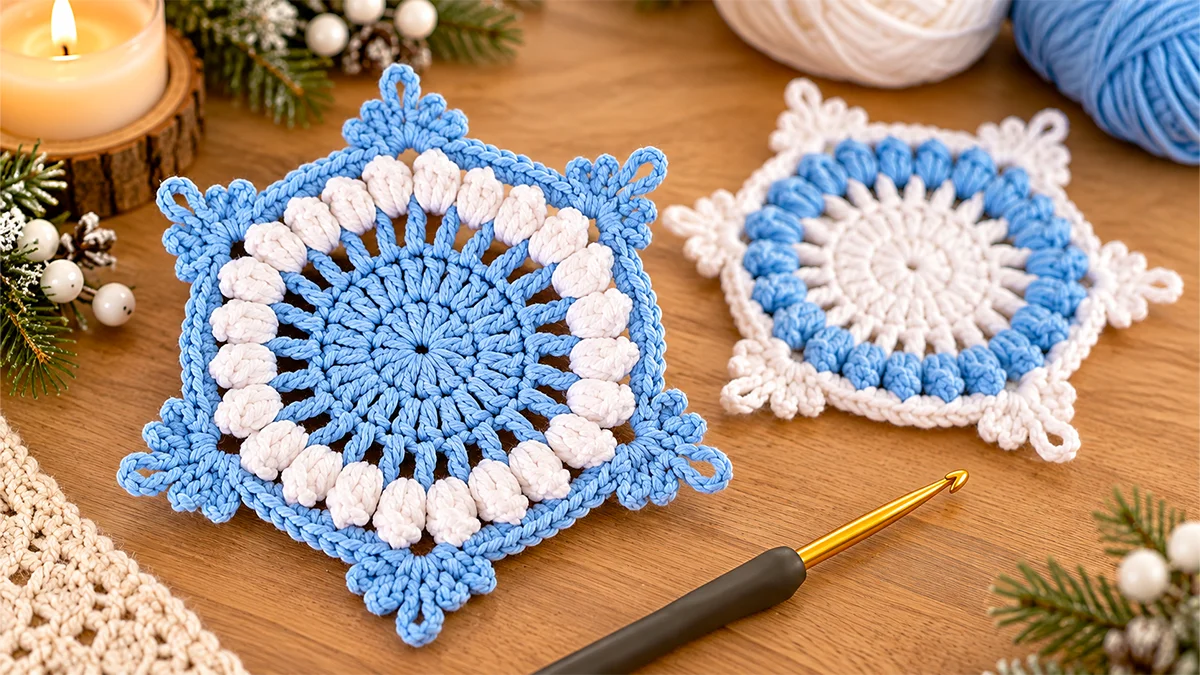
Crochet Snowflake Coaster is a lovely six-round project with a surprise at the end. It starts as a simple circle, then the last round adds the delicate points that turn it into a snowflake.
I used blue and white cotton yarn for this coaster. The raised popcorn stitches give it a soft, textured look. You can also switch the colors to make a matching pair for your winter table.
You can follow the step-by-step video tutorial or use the written pattern below.
Download the Crochet Snowflake Coaster PDF Pattern
What You’ll Love About This Snowflake Crochet Coaster
The best part of this design is watching the shape change. The first few rounds are flat and round. Then, the popcorn stitches add texture. Finally, the chain loops create the snowflake points.
This pattern is a good project to try if you already know the basic crochet stitches. The popcorn round and snowflake edging need a little extra care, but I’ll walk you through them.
The finished coaster also makes a sweet handmade accent for winter or holiday table decor.
For more projects like this, take a look at our Table Decor crochet patterns.
Materials for Your Crochet Snowflake Coaster
You only need a few supplies to make this project.
- Blue cotton yarn
- White cotton yarn
- 2.5 mm crochet hook
- Yarn needle
- Scissors
Colors used: Blue for Rounds 1–4, white for Round 5, and blue again for Round 6.
The exact yarn weight and finished coaster size are not specified in the tutorial.
Crochet Stitches and Abbreviations (US Terms)
This written pattern uses US crochet terminology.
- ch – Chain
- sc – Single crochet
- dc – Double crochet
- sl st – Slip stitch
- Magic ring – An adjustable loop used to start crocheting in the round
- Popcorn stitch – A raised stitch made by bringing a group of double crochets together
- Invisible join – A finishing method that makes the final join less noticeable
A Quick Note About Chain Spaces
A chain space is the open gap made by your chain stitches. When I say to work into a chain space, insert your hook into that opening, not into one of the individual chains.
The starting chain-2 counts as the first double crochet in Rounds 1 and 3.
Crochet Snowflake Coaster Pattern – Step by Step
We’ll work in six rounds, starting in the center and moving outward.
Round 1 – Make the Blue Crochet Center
Start with blue yarn.
Step 1: Make a magic ring.
Step 2: Chain 2. This counts as your first double crochet.
Step 3: Work 11 more double crochets into the magic ring. Count your stitches before moving on. You should have 12 double crochets in total, including the starting chain-2.
Step 4: Pull the yarn tail to tighten the magic ring and close the center.
Step 5: Slip stitch into the top of the starting chain to join the round.
Round 1 stitch count: 12 dc, including the starting ch-2.
Round 2 – Create the Blue Openwork
This round adds little spaces between the double crochets.
Step 1: Chain 5.
Step 2: Find the first double crochet from Round 1. Work one double crochet into the top of that stitch.
Step 3: Chain 1.
4: Work one double crochet into the top of the next double crochet.
Step 5: Continue around, repeating:
- Chain 1.
- Work one double crochet into the top of the next double crochet.
Keep going until you reach the end of the round. You should now see open spaces between the double crochets.
Step 6: Slip stitch into the top of the first chain to join the round, using the joining point shown in the video tutorial.
Round 3 – Increase to 24 Double Crochets
Now we’ll make the circle wider.
Step 1: Chain 2. This counts as the first double crochet of the round.
Step 2: Work one double crochet into that same stitch. The starting chain and the double crochet you just made count as two stitches at the first position.
Step 3: Work two double crochets into the top of each of the remaining 11 double crochets from the previous round. Work into the tops of the double crochets rather than the chain spaces.
Step 4: Check your count:
- Starting chain-2 = 1 dc
- One dc in the same stitch = 1 dc
- Two dc in each of the next 11 stitches = 22 dc
That gives you 24 double crochets in total.
Step 5: Slip stitch into the top of the starting chain to join.
Round 3 stitch count: 24 dc.
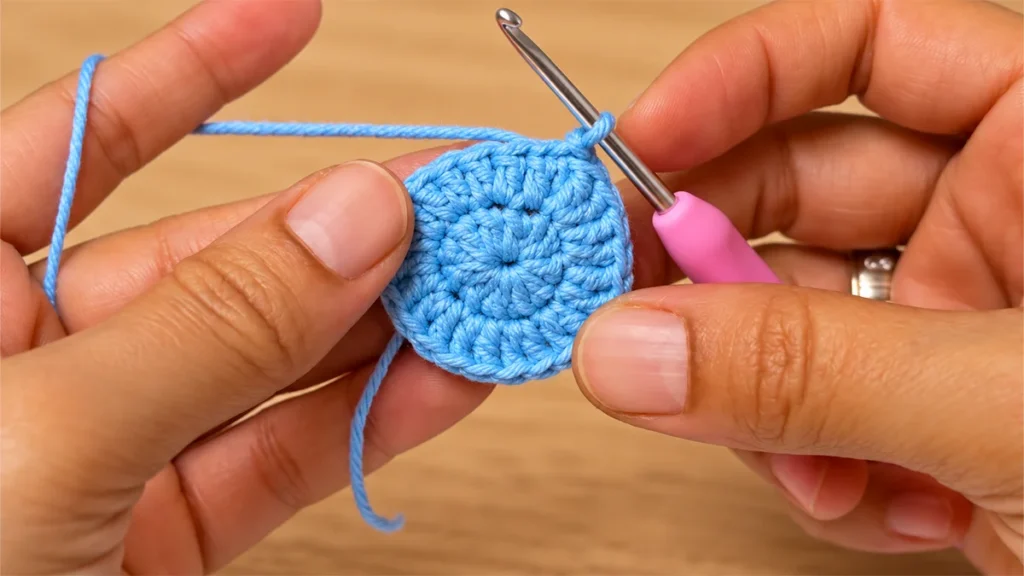
Round 4 – Make 24 Crochet Chain Spaces
This round creates the spaces for our white popcorn stitches.
Step 1: Chain 5.
Step 2: Work one double crochet into the top of the next double crochet.
3: Chain 1.
Step 4: Work one double crochet into the top of the next double crochet.
Step 5: Continue around with the same repeat:
- Chain 1.
- Double crochet into the top of the next double crochet.
Keep one chain between each double crochet.
Step 6: Count the open spaces. You should have 24 chain spaces in total.
Step 7: At the end of the round, chain 1. Then slip stitch into the top of the third chain of the starting chain-5 to join.
Round 4 count: 24 chain spaces.
Step 8: Chain 1 and cut the blue yarn. Now we’ll switch to white.
Round 5 – Make the White Popcorn Stitches
This is the round that adds the raised texture around the center.
Step 1: Attach the white yarn in any chain space from Round 4.
Step 2: Chain 2.
3: Work three double crochets into that same chain space. For the first popcorn, you’ll have the starting chain-2 and three double crochets.
Step 4: Find the first actual double crochet you made after the starting chain. Slip stitch into the top of that double crochet to close the popcorn. Do not use the starting chain-2 as the popcorn’s closing point.
Your first popcorn stitch is complete.
5: Chain 2.
Step 6: Move to the next chain space.
Step 7: Work four double crochets into that space. Bring them together to make the next popcorn stitch, following the same closing technique.
Step 8: Keep repeating around:
- Chain 2.
- Move to the next chain space.
- Make a popcorn stitch using four double crochets.
Take your time with the popcorn stitches. As you work, you’ll see a raised white ring forming around the blue center.
Step 9: After the last popcorn, chain 2. Slip stitch into the top of the first popcorn to join the round.
Step 10: Chain 1 and cut the white yarn. We’re ready for the final blue round.
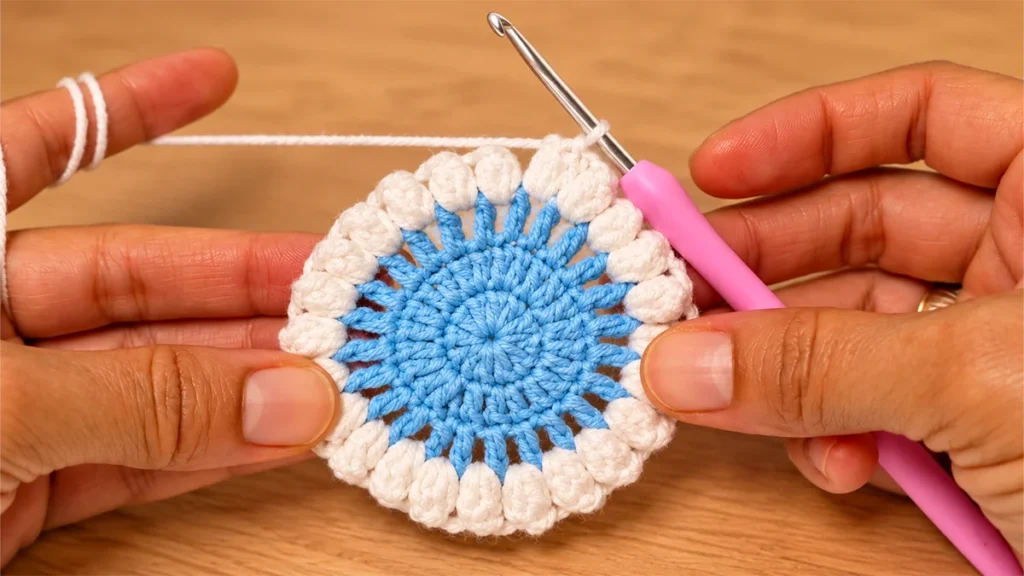
Round 6 – Crochet the Snowflake Points
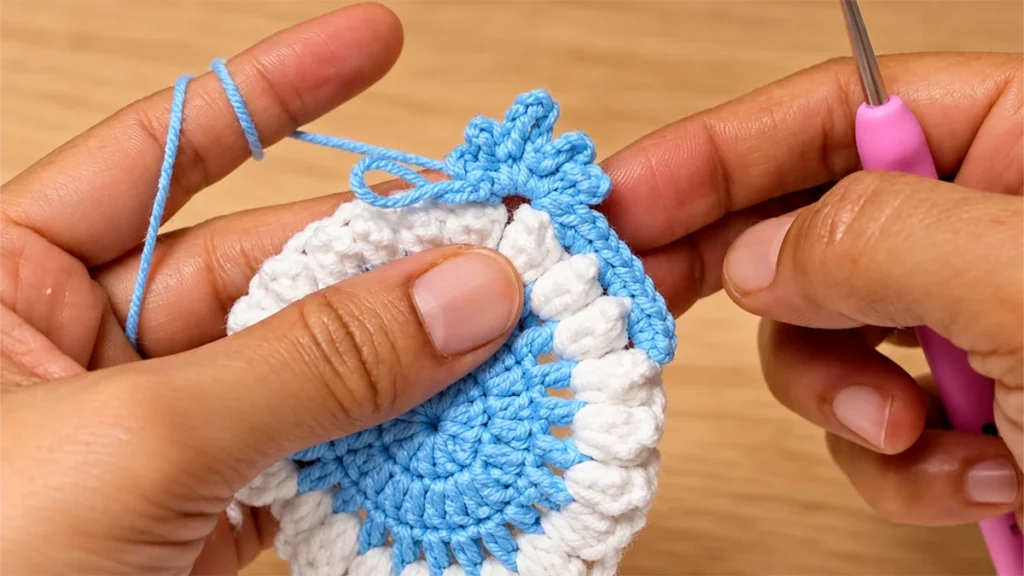
This is where the snowflake takes shape. First, we’ll make groups of single crochets between the popcorns. Then we’ll build each snowflake point with chain loops.
Part 1 – Work the First Blue Edging Section
Step 1: Attach blue yarn in any chain space between two white popcorn stitches.
Step 2: Chain 1.
3: Work three single crochets into that same chain space.
4: Move to the next chain space and work three single crochets.
Step 5: Move to the following chain space and work another three single crochets.
Step 6: Count your stitches. You should have nine single crochets in total: 3 + 3 + 3 = 9 sc.
Part 2 – Make the First Snowflake Point
All the stitches for this point go into the same chain space.
Step 7: Find the next chain space after your nine single crochets. Make a slip stitch into it. Stay in this same space for the whole point.
Step 8: Chain 5. Then work one single crochet into the same space. You’ve made your first small chain loop.
Step 9: Chain 5 again. Work one single crochet into the same space. Now you have two loops.
Step 10: Chain 7. Work one single crochet into the same space. This seven-chain loop makes the tallest part of the snowflake point.
Step 11: Chain 5. Work one single crochet into the same space.
Step 12: Chain 5 once more. Finish with a slip stitch into that same space.
Your first snowflake point is complete! The chain sequence for one point is:
Ch 5, sc – ch 5, sc – ch 7, sc – ch 5, sc – ch 5, sl st.
Work all these stitches into the same chain space. The seven-chain loop sits in the middle. Two shorter five-chain loops are on each side.
Part 3 – Repeat the Snowflake Edging
Step 13: Move to the next chain space and work three single crochets. Repeat in each of the following two chain spaces. You’ll have another group of nine single crochets across three spaces.
Step 14: Move to the following chain space and repeat the snowflake point:
- Slip stitch into the chain space.
- Chain 5, then single crochet into the same space.
- Chain 5, then single crochet into the same space.
- Chain 7, then single crochet into the same space.
- Chain 5, then single crochet into the same space.
- Chain 5, then slip stitch into the same space.
Step 15: Keep alternating the single crochet sections and snowflake points around the coaster.
Remember to work three single crochets into each of the three chain spaces between neighboring snowflake points.
Important: There should be three chain spaces between each pair of snowflake points.
Part 4 – Finish the Final Round
Step 16: After completing the last snowflake point, cut the yarn and leave a tail.
Step 17: Thread the tail onto your yarn needle. Make an invisible join at the top of the very first single crochet from Round 6. Follow the needle placement in the video tutorial, then secure the remaining tail in the stitches.
Your snowflake coaster is complete!
If you enjoy projects where the shape appears near the end, you might also like this easy crochet heart coaster pattern.
How to Shape Your Crochet Snowflake Coaster
Your finished coaster may need a little shaping so the snowflake points sit neatly. You have two options.
Option 1 – Hang It from the Tallest Point
Find the tallest loop of one snowflake point. That’s the loop made with seven chains. Hang the coaster from the tip of that loop to help the snowflake take shape.
Option 2 – Shape It with Steam
You can also use steam from an iron to shape the finished piece. Make sure the heat is suitable for your yarn. Avoid pressing a hot iron directly onto the crochet stitches.
Crochet Snowflake Coaster Color Variations
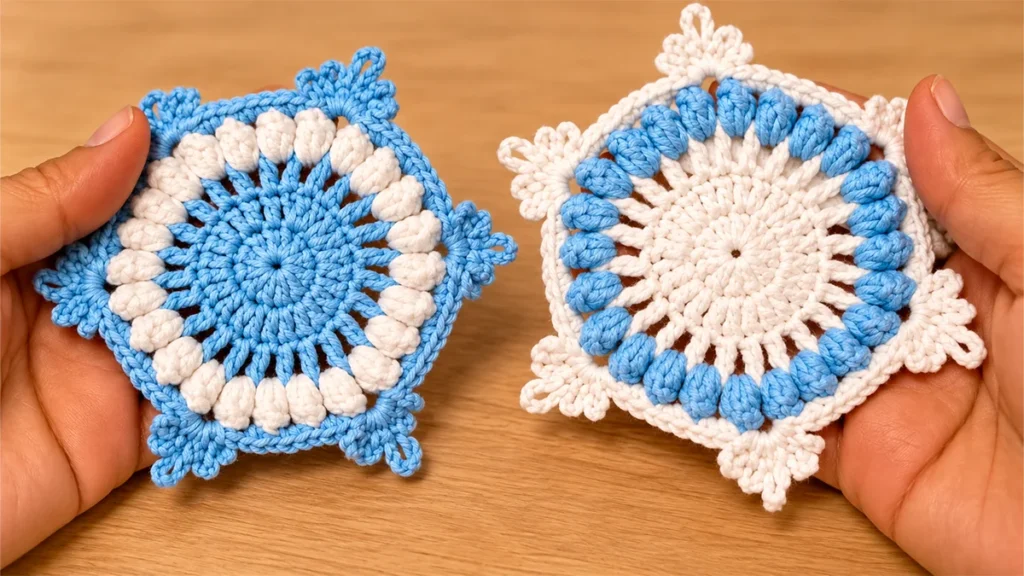
I made two versions of this pattern.
Version 1:
- Blue center
- White popcorn stitches
- Blue snowflake edging
Version 2:
- White center
- Blue popcorn stitches
- White snowflake edging
Both follow the same six rounds. Only the colors change. I like how the two versions look together. You can make a matching set or choose colors that suit your own table decor.
For more handmade table ideas, you can also try our fall pumpkin coaster pattern or this crochet rose coaster pattern.
Crochet Snowflake Coaster Video Tutorial and Free PDF
Need a closer look at a stitch? You can watch the full tutorial and follow the real crochet steps from the magic ring to the final snowflake point.
Watch the Crochet Snowflake Coaster Video
If you’d rather keep a written copy beside you while you crochet, use the PDF version.
Get the Free Snowflake Coaster Written Pattern PDF
Frequently Asked Questions About This Crochet Snowflake Coaster
Is this crochet snowflake coaster beginner-friendly?
Yes, especially if you already know how to make basic crochet stitches. The pattern uses single crochet, double crochet, chains, and slip stitches. The popcorn stitches and snowflake points need a little extra attention, but you can take your time and follow each step.
What yarn and crochet hook do I need?
I used blue and white cotton yarn with a 2.5 mm crochet hook. You’ll also need scissors and a yarn needle for finishing. The exact yarn weight isn’t specified in the tutorial.
Does the starting chain-2 count as a double crochet?
Yes. In Rounds 1 and 3, the starting chain-2 counts as the first double crochet. Round 1 has 12 double crochets in total, including the starting chain, and Round 3 has 24.
How do I make the popcorn stitches in this pattern?
For the first popcorn, chain two and work three double crochets into the same chain space. Close it with a slip stitch into the top of the first actual double crochet, not the starting chain.
The following popcorn stitches each use four double crochets, with two chains between them.
How can I check my stitch counts?
Here are the main stitch counts to check as you work:
- Round 1: 12 double crochets, including the starting chain-2
- Round 3: 24 double crochets, including the starting chain-2
- Round 4: 24 chain spaces
- Round 6: 9 single crochets across the first three chain spaces
These checkpoints can help you catch a missed stitch before moving on.
How many chain spaces should be between the snowflake points?
There should be three chain spaces between each pair of snowflake points. Work three single crochets into each of those spaces before starting the next point.
Each snowflake point uses chain loops of five, five, seven, five, and five, all worked into the same chain space with the required single crochets and slip stitches.
Where do I make the invisible join?
At the end of Round 6, cut the yarn and leave a tail. Thread it onto your yarn needle and make the invisible join at the top of the very first single crochet from that round. The video shows the needle placement if you need a closer look.
Why doesn’t my crochet coaster look like a snowflake yet?
The snowflake shape comes from the chain loops in the final round. First, check that you’ve made the five-chain and seven-chain loops correctly and left three chain spaces between the snowflake points.
If the points still look uneven, you can hang the coaster from the tallest seven-chain loop to help shape it. You can also gently shape it with steam from an iron, as long as the heat is suitable for your yarn. Avoid pressing the hot iron directly onto the stitches.
Your Crochet Snowflake Coaster Is Finished!
And that’s it! You’ve made a textured snowflake coaster in six rounds. The popcorn stitches give the center a raised look, while the last round adds those pretty snowflake points.
Which color combination would you choose? The blue center with white popcorn stitches, or the white center with blue popcorn stitches? Tell me in the comments!
For more step-by-step projects, follow Crochet Craftsman on YouTube, Instagram, Facebook, and Pinterest.
Happy crocheting!