Fall is in the air, and what better way to embrace the season than with some easy crochet placemat patterns for your dining table? Crochet Table Decor is a fun and versatile way to add a touch of warmth and personality to your home. And with this crochet placemat pattern free, you can create beautiful Autumn Crochet Placemat pieces that are perfect for any occasion.
This free crochet placemat pattern is designed for beginners, so you can relax and enjoy the process. In this blog post, we’ll guide you step-by-step through the creation of a stunning crochet placemat that will add a touch of rustic charm to your table.
Introducing the Crochet Placemat Design
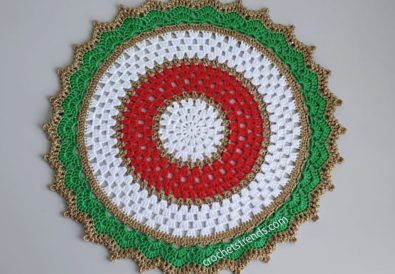
First of all, let’s introduce the crochet placemat pattern we’ll be working on today. It’s a delightful, easy, and free crochet placemat pattern that’s ideal for adding a pop of autumn charm to your home decor. The crochet placemat is created with a simple round crochet pattern and involves a beautiful interplay of textures achieved using cotton yarn and various colors of glitter yarn. The result is a modern crochet placemat pattern that’s both visually appealing and incredibly functional. You can easily use this design to create crochet coasters as well!
Why You’ll Love This Crochet Placemat Pattern
There are many reasons why you’ll fall in love with this crochet placemat pattern. It’s incredibly easy, even for beginners! Specifically, the basic crochet stitches and techniques used make it a perfect choice for those just starting out on their crochet journey. Additionally, you’ll find the crochet placemat pattern free for download in PDF format. So, there’s nothing stopping you from crafting your own charming crochet placemats. This design is equally important for those who want a quick and fun crochet project. In short, you can finish this easy crochet placemat in a single day. The design is very versatile too. For instance, you can use this easy round crochet placemat pattern for various occasions, from Thanksgiving to Halloween or Christmas. You can adapt it to suit your specific needs and color preferences.
The Perfect Fall Crochet Project for Beginners
Undoubtedly, this crochet placemat pattern is ideal for beginners. As a result, it’s a fantastic way to build your confidence in crochet. What’s more, because this pattern is free and easy to follow, it can help you learn valuable techniques. For example, this crochet placemat pattern helps you get a grip on increasing and decreasing stitches. It is also a great way to get familiar with various stitches, such as double crochet and slip stitch. What’s more, you’ll be able to create a stunning crochet table decor piece for your autumn gatherings and enhance your skills at the same time. The project is not only a great way to learn new skills but also a chance to create a handmade gift for friends and family.
Gathering Your Supplies for the Crochet Placemat
Essential Crochet Materials
To get started on your crochet placemat pattern, you’ll need a few basic materials. First of all, you’ll need yarn. The designer of this particular pattern, @TubaCrochet, used Himalaya Himagurumi Cotton Yarn. You can buy this yarn from yarn stores, or order it online.
Yarn Choices for Your Crochet Placemat
The crochet placemat pattern can be made with many different types of yarn. It is designed for a worsted weight cotton yarn. However, you can certainly experiment with other yarn types and weights. You could even use a blend of cotton and acrylic yarn to achieve a softer texture. In addition to the main base yarn, you’ll need several colors of glitter yarn. This yarn adds a lovely sparkle to the crochet placemat and makes it a real eye-catcher. The designer used a thin glitter yarn for this project. However, depending on your preference, you can select thicker yarns too. Furthermore, selecting the right yarn color is crucial to the project’s overall aesthetic. In particular, think about the colors you want to use to create the autumnal feel you want. For example, a nice combination of warm colors, such as brown, beige, yellow, and shades of green, creates a cozy and festive feel that complements the autumn season. In general, when choosing yarn, pay attention to the weight, color, and texture. You should also consider the project’s finished size and aesthetic.
Choosing the Right Crochet Hooks
Next, you’ll need crochet hooks. For this easy crochet placemat pattern, @TubaCrochet used two hook sizes: a 2.50 mm hook for the base placemat and a 2.75 mm hook for some of the glitter yarn rows. The hook size is generally recommended for worsted weight yarn. You can adjust your hook size, depending on your tension and yarn selection. If you are new to crochet, I’d recommend starting with a larger hook size (e.g., 4.00 mm). This will result in a looser fabric that is easier for a beginner to control. In addition to crochet hooks, you will need a few auxiliary materials. The most important of these are a pair of sharp scissors. You will also need a yarn needle for weaving in the ends. Lastly, if you want to draw on the yarn, a felt-tip pen is also a useful material.


Crafting the Crochet Placemat Base
Creating the Magic Ring (or Starting Chain)
To start your crochet placemat pattern, we begin with a magic ring. The magic ring is a technique that lets you create a tight, closed circle at the beginning of your crocheting. This helps create a nice, even foundation for the placemat. If you’re a beginner and the magic ring seems tricky, you can alternatively create a starting chain of 3 and join it into the first chain with a slip stitch. That way, you have a nice closed loop to begin.
Round 1: Building the Foundation
Now that you have created the magic ring (or starting chain), it’s time to start creating the placemat’s base. Chain 3, which will count as your first double crochet (dc). Then, you’ll work 10 double crochet stitches into the magic ring. Lastly, slip stitch into the top of the first chain you made. In essence, you have created the first round of your crochet placemat.
Increasing Stitches: Expanding the Placemat
Increasing stitches in each round is crucial for creating the circular shape of your crochet placemat. In this pattern, the increase is done by working 2 dc in a single stitch from the previous row. That way, the circle gets bigger with each round. It’s important to pay attention to where you’re increasing the stitches.
Understanding the Repeating Pattern
As you continue your crochet placemat pattern, you’ll notice a repeating pattern. This pattern is very simple and easy to follow. The repeating pattern essentially consists of groups of stitches. In each round, you’ll work 2 dc in the first stitch of the group from the previous round, and 2 dc in the last stitch of the group from the previous round. As you continue, you’ll increase the number of stitches within each group.


Completing the Base Placemat
In this tutorial, the base of the crochet placemat consists of a total of 11 rounds. The first round has 10 dc. Then, we increase the number of dc with each round. The second round has 20 dc, the third has 30 dc, and so on. Specifically, in each round, the number of dc in the groups increases by one. Thus, the last round consists of 110 dc. After completing this round, you should complete a slip stitch into the 3rd ch from your hook and continue in the following way:
- Sl st into the top of the first dc of Row 11.
- Ch 3 (counts as 1 dc).
- 4 dc in the same space (this creates 5 dc in total).
- Skip 2 spaces and work 1 sc into the chain space between the group of 5 dc.
- Skip 2 spaces and work 5 dc into the next stitch group (this group was 2 dc before).
- Skip 2 spaces and work 1 sc into the chain space between the groups.
- Continue this pattern working 5 dc into the next stitch group, skipping 2 spaces between the group of 5 dc.
- Repeat until you get to the end of Row 11. Sl st into the first ch. Fasten off.
You can download the complete written pattern in PDF format for free: https://crochetstrends.com/wp-content/uploads/2024/10/Crochet-Placemat-Pattern.pdf.
Adding a Touch of Sparkle: Glitter Yarn Layers
Attaching the Glitter Yarn
Now that you’ve created the base of your crochet placemat, it’s time to add some sparkle! In this section of the project, we will add glitter yarn layers that will add a unique and festive touch to the crochet placemat. To start adding the glitter yarn, attach your first glitter yarn color (e.g., brown) with a single crochet (sc) anywhere in the middle of one of the groups of 5 dc from the previous row.
First Glitter Layer: Anchoring the Yarn
In this first layer of glitter yarn, we will work sc stitches and sl st stitches. First, work 1 sc into the top of the 5 dc. Next, work 1 sl st to the top of the 5 dc, creating a connection between the top of the row and the base of the 5 dc. Then, work 1 sc in the same space as the initial sc into the top of the 5 dc. After that, work 1 sl st to the top of the 5 dc, creating a connection between the top of the row and the base of the 5 dc. Similarly, work 1 sc in the 1-ch space between the groups of 5 dc. Next, work 1 sl st to the top of the 5 dc, creating a connection between the top of the row and the base of the 5 dc. Then, repeat the entire pattern until you’ve gone all the way around the placemat. Finally, slip stitch into the first sc. Fasten off.
Second Glitter Layer: Creating V-Stitches
The second layer adds more dimension to the design through V-stitches. In this layer, you’ll attach the glitter yarn again in any sc from the previous row. After you’ve attached the yarn, ch 8. Then, work 1 dc in the left loop of the same sc to create a V stitch. Similarly, ch 3. Work 1 dc in the right loop of the next sc. Continue to create the V-stitch pattern by working 5 ch and 1 dc in the left loop of the same sc, then 3 ch and 1 dc in the right loop of the next sc, repeating the pattern all the way around. After that, ch 3 and slip stitch into the top of the first ch from the row. Likewise, slip stitch into the next space. Then, ch 3 and work 8 dc in the same space. In the same way, slip stitch into the loop behind the 3rd dc of the previous group of 5 dc in the placemat. Next, ch 3 and work 8 dc in the next space. Repeat this pattern around the placemat. Finally, slip stitch into the first ch of the row and fasten off.
Third Glitter Layer: Finishing with Slip Stitches
The third layer of glitter yarn adds even more texture and a finishing touch to the crochet placemat. You can create this layer by attaching the glitter yarn again in any sl st from the previous row. Once you’ve attached the yarn, work 9 sl st into the top of the 9 dc from the previous row. Repeat this pattern all the way around the placemat. Finally, slip stitch into the first sc and fasten off.
Choosing Glitter Yarn Colors
Choosing glitter yarn colors for your crochet placemat is a very important part of the project. The color choice helps bring your autumnal vision to life. As you know, autumn is associated with a variety of warm colors, including warm browns, shades of yellow, and green tones. Therefore, it’s a good idea to select glitter yarn in colors that complement your base yarn and bring out the autumnal theme. Furthermore, you can use these colors in various combinations to create a truly unique crochet placemat. For instance, if you’re using a cream or beige cotton yarn, you can add touches of brown, mustard yellow, and forest green glitter yarn. If you want to create a placemat with a Halloween theme, you can use black and orange colors. You can also create a Christmas-themed placemat with red and green colors.


Finishing Touches: Creating a Textured Border
Attaching the Border Yarn
Now that you’ve added the glitter yarn layers, we’re almost done with our crochet placemat pattern. The final step is creating a textured border. Attach your desired glitter yarn (or a contrasting color) to the 3rd loop of the previous row.
Textured Border Stitches (dc, tr, qtr)
The textured border uses a combination of different crochet stitches to create visual interest and a finished look. First, ch 6. Then, sl st into the 3rd ch. Next, work 1 dc in the back of the next stitch. Then, ch 3. Sl st into the front 2 stitches. Repeat this pattern all the way around the placemat. Skip 2 spaces from the next group. Continue around the placemat, repeating the first pattern.
Decreasing Stitches for the Border
During the creation of the border, there is a slight decrease in the number of stitches. This helps maintain the overall shape of the placemat. It’s important to follow the instructions carefully when decreasing stitches.
Completing the Final Border
To finish the border, slip stitch into the middle of the ch. Fasten off.
Weaving in Ends and Finishing
The last step in any crochet project is to weave in all the loose ends. This ensures a clean and professional finish for your placemat. Using a yarn needle, weave in each end through the back loops of the stitches. After this, trim the excess yarn and you have completed your project! You can also use a steam iron to steam the placemat to remove any curl from the glitter yarn.
Other Crochet Projects You’ll Love
If you loved this crochet placemat pattern, you’ll also love these other fall-themed projects:
- Crochet Pumpkin Pattern
- Crochet Coaster Pattern
- Crochet Autumn Scarves
- Crochet Leaf Pattern
These projects are sure to inspire your creativity and add warmth and comfort to your home!
Conclusion
I hope this tutorial helps you create a beautiful crochet placemat for your fall decor. If you have any questions or comments about this crochet placemat pattern, leave a comment below. Moreover, you can follow me on Instagram, Facebook, or TikTok to see more of my projects! You can also share your project photos with me. I would love to see your creations. If you found this tutorial helpful, share it with your friends and family. Be sure to check out other fall-themed crochet placemat patterns for even more inspiration!
Instagram: https://www.instagram.com/tubacrochet_
TikTok: tiktok.com/@tubacrochet
Facebook: https://www.facebook.com/tubacrochet/
Youtube: https://www.youtube.com/watch?v=pAPWRfPRpNk
Original Video Source:
If you want to watch the original video for the crochet placemat pattern tutorial, you can find it here: https://www.youtube.com/@TubaCrochet I hope you have a wonderful time crocheting!
Happy crafting!