
Easy Beginner Tutorial with Written Pattern
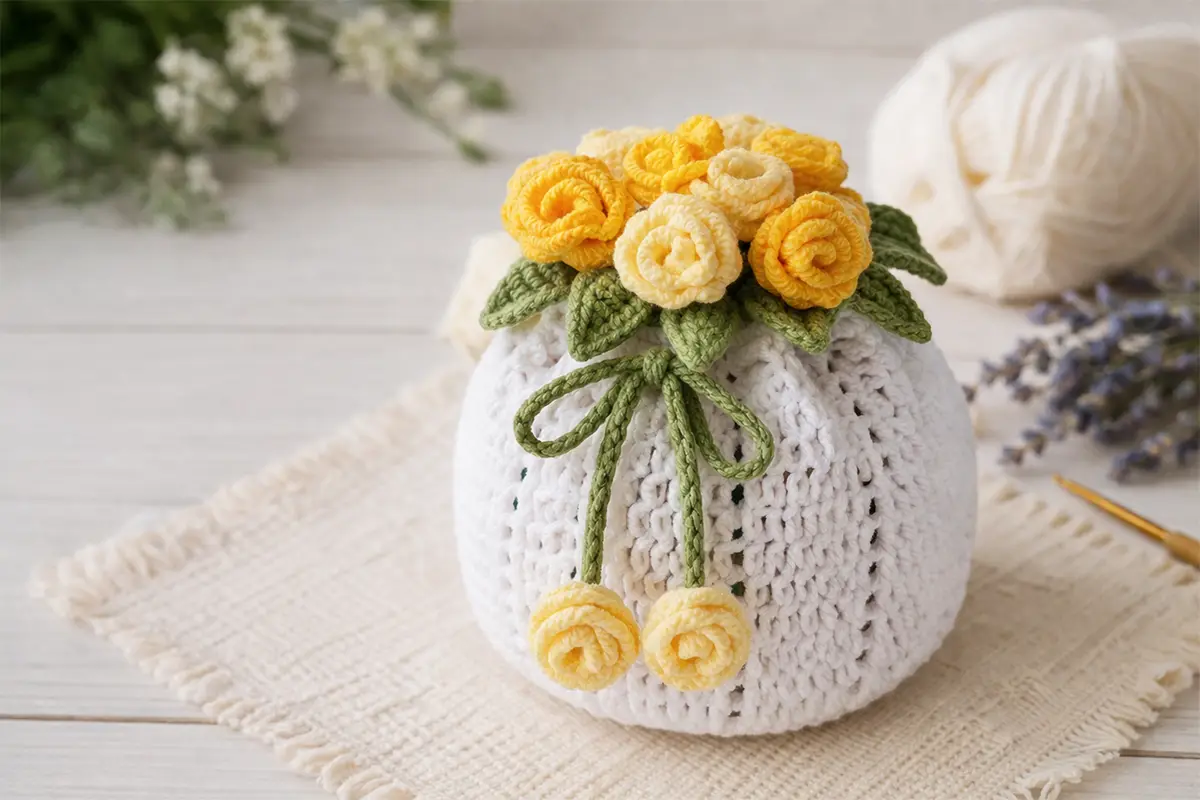
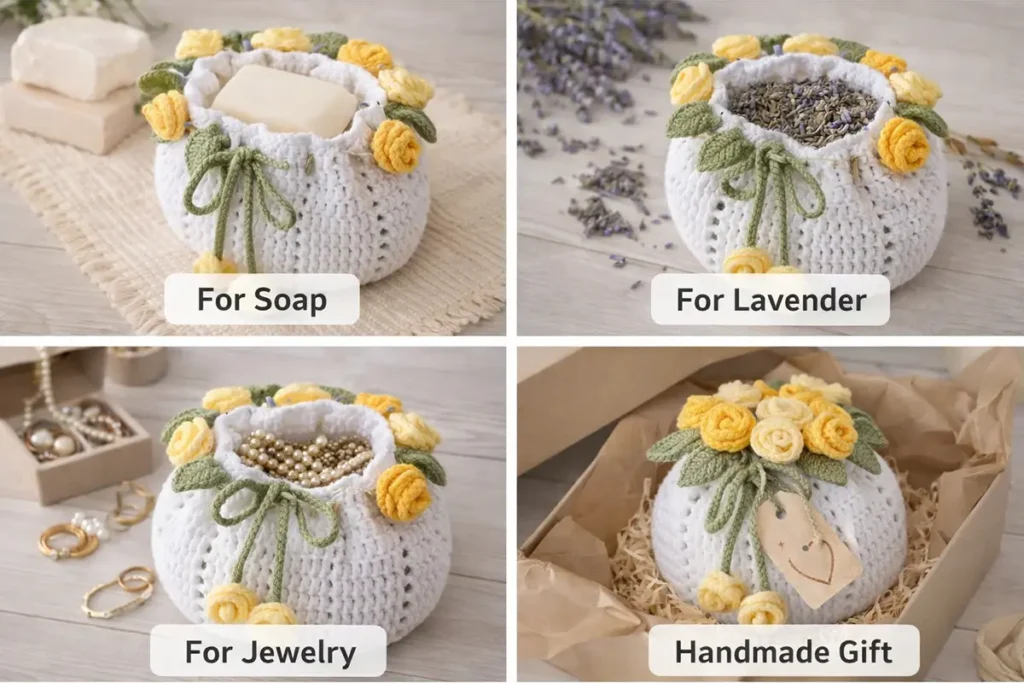
If you’ve been looking for a sweet and useful crochet drawstring pouch, this beginner-friendly project is a lovely one to try. You can follow it easily, customize it in different ways, and use it for small gifts like soap, lavender, or jewelry. Even better, you can make it in one color or two and add leafy edging and tiny roses for a soft handmade finish.
The pouch starts with a round base, grows upward without increases, and closes with a drawstring at the top. This tutorial helps beginners because the stitch pattern grows in a clear and predictable way.
If you enjoy small and giftable crochet projects, you may also like this Tulip Keychain Pattern
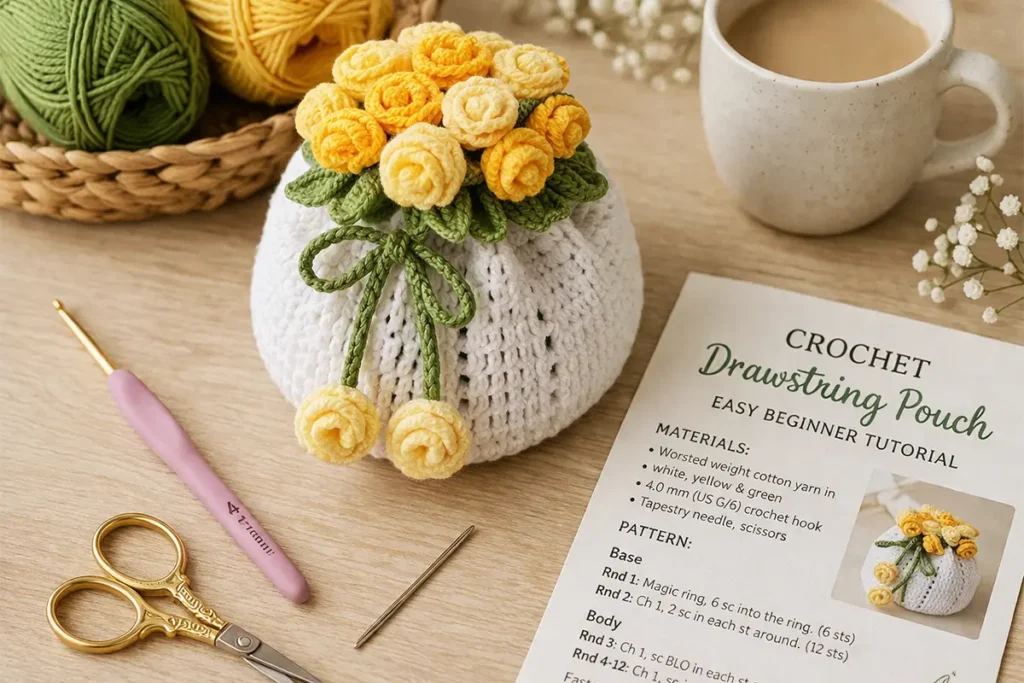
Crochet Drawstring Pouch Materials and Tools
For this crochet drawstring pouch, you’ll need:
- Medium-weight yarn
- 50% cotton / 50% acrylic blend
- 2.20 mm crochet hook
- Scissors
- Tapestry needle
You can choose any color combination you like. The tutorial mentions that both one-color and two-color versions work beautifully, so you can easily match the pouch to your gift theme or home decor style.
What Makes This Pouch Beginner-Friendly?
One reason this project works so well for beginners is the simple growth pattern used for the base. Each new round adds one more double crochet to every group, and the increase always happens in the last stitch of the group. That makes it much easier to track your progress and understand how the shape is growing.
After the base is finished, you stop increasing and crochet straight upward to form the body of the pouch. Then the top is decorated with green pointed edging and small rolled roses. Finally, a long chain drawstring is woven through the top opening to close the pouch.
Crochet Drawstring Pouch PDF Pattern
If you’d like the full step-by-step written version, you can download it here:
PDF Pattern:
Easy Crochet Drawstring Pouch Written Pattern
This written pattern is especially helpful if you want to follow along more slowly, check stitch counts, or print the instructions for later.
Crochet Drawstring Pouch Video Tutorial
You can watch the full tutorial here:
YouTube Video:
Easy Crochet Drawstring Pouch Tutorial
The video walks through the full process, from the magic ring and growing base to the leaf edge, roses, and drawstring finishing steps.
How to Crochet a Drawstring Pouch
1. Crochet Drawstring Pouch Base
The pouch starts with a magic ring, followed by 12 double crochets total in Round 1, including the starting ch-2. From there, the base grows evenly in rounds. In each new round, every group gets one more double crochet, and the increase is always placed in the last stitch.
The sample version in the tutorial uses 8 rounds total for the base, which gives you 8 dc in each group by the last base round. The transcript also notes that you can stop earlier for a smaller pouch or make 9 or 10 rounds for a larger one.
2. Crochet Drawstring Pouch Body
Once the base is wide enough, the pouch body is worked without any more increases. You simply keep the same number of double crochets in each group and continue upward. This is what turns the flat circle into a small pouch shape.
The transcript gives flexible sizing guidance and shows that the body height can be adjusted to your preference. That makes this project easy to adapt for different uses.
3. Crochet Drawstring Pouch Leaf Edge
After finishing the body, green yarn is attached at the top edge. The leaf foundation is made with ch-4 loops and single crochet placements, skipping spaces between sections. Then a second round is worked into those loops to create the pointed triangle-style leaf shapes.
One important note from the tutorial is that the ch-1 space between groups also counts as a space when placing the green edge. This is one of the most important details for beginners to watch carefully.
4. Crochet Drawstring Pouch Roses
The roses are made by chaining 16, then working 3 double crochets into each chain to create a long curled strip. That strip is rolled into a rose shape and secured from the back. The roses are placed along the top edge of the pouch for decoration.
A beginner-friendly layout is to place 1 rose in every other triangle so the top edge looks balanced and not too crowded.
5. Crochet Drawstring Pouch Drawstring
The drawstring is made by chaining 150 with green yarn. Then it is woven through the V-shaped top loops of the double crochet stitches around the pouch opening. This helps the pouch close evenly and slide smoothly when pulled. After that, a small rose is attached to each end of the chain.
Finished Size Tips
Your finished pouch size will depend on your yarn, hook, and tension.
As a simple guide:
- For jewelry or small gifts, a base around 7–9 cm (2.75–3.5 inches) works well.
- For lavender sachets or small soap gifts, a base around 9–11 cm (3.5–4.3 inches) is a nice target.
This makes it easier to adapt the same pattern for different uses.
Why This Project Is Great for Gifts
This crochet drawstring pouch is one of those projects that feels both practical and special. It’s useful, pretty, and easy to personalize with colors and rose placement. Because it can hold soap, lavender, jewelry, or other small gifts, it works beautifully for birthdays, bridal favors, spring gifting, craft fairs, or holiday packaging. The transcript directly highlights these giftable uses as part of the tutorial introduction.
Tips and Variations
- Use one color for a simpler pouch.
- Use two colors for more contrast and a floral look.
- Stop the base earlier for a mini pouch.
- Add more base rounds for a larger gift bag.
- Space the roses farther apart for a cleaner look.
- Make the roses closer together for a fuller decorative edge.
For another decorative and beginner-friendly idea, take a look at this Crochet Wind Spinner Tutorial
Save This Pattern for Later
If you enjoy easy and giftable crochet projects, this crochet drawstring pouch is a great one to save for later. The combination of a simple shape and decorative floral details makes it both beginner-friendly and visually charming.
You can keep both resources handy here:
- PDF Pattern: Easy Crochet Drawstring Pouch Written Pattern
- Video Tutorial: Easy Crochet Drawstring Pouch Tutorial
Crochet Drawstring Pouch FAQ
Is this crochet drawstring pouch beginner-friendly?
Yes, it is. The base grows in a clear pattern, and the rest of the pouch uses a simple repeat that becomes easy to follow once you begin.
What can I use this pouch for?
You can use it for soap, dried lavender, jewelry, or other small handmade gifts. You can also turn it into a decorative gift pouch for markets or special occasions.
Can I make it bigger or smaller?
Yes, you can. Just work fewer or more base rounds, then adjust the body height to fit your needs.
If you love floral crochet projects, don’t miss this Crochet Tulip Pattern
Closing
I hope this crochet drawstring pouch tutorial helps you make something beautiful and useful. It’s a sweet beginner project, and it also makes a lovely handmade gift.
You can follow the full project here:
- Watch the video: Easy Crochet Drawstring Pouch Tutorial
- Download the PDF pattern: Easy Crochet Drawstring Pouch Written Pattern


