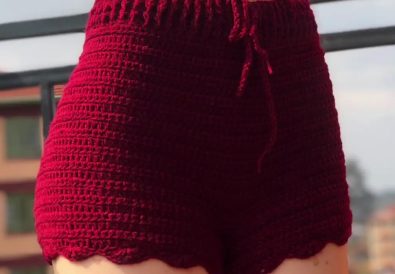
Discover how to make a beautiful crochet skirt with this easy, step-by-step tutorial. Perfect for beginners, this beach crochet skirt pattern is a quick DIY summer project.
Crocheting your own crochet skirt is a fun and rewarding way to add a unique touch to your wardrobe. This pattern is designed with beginners in mind, making it simple to learn a new skill and create something beautiful. Whether you’re dreaming of a breezy beach crochet skirt or a versatile summer crochet skirt, this tutorial will guide you from start to finish.
Gauge: Gauge is not essential for this project, but using a medium-weight yarn and a 5mm crochet hook will result in a light and airy fabric.
Skill: Beginner Friendly
Don’t worry if you’re new to crochet! This pattern relies on basic techniques that anyone can master. You’ll need to know how to:
- Chain Stitch (ch): One of the most fundamental stitches in crochet.
- Double Crochet (dc): A taller stitch that creates a beautiful texture.
- Slip Stitch (sl st): Used for joining rounds and moving across stitches.


Materials
- Yarn: Choose a medium-weight cotton yarn in a color you love. This will give your skirt a light, breathable feel.
- Crochet Hook: A 5mm crochet hook is recommended for this project.
- Scissors
- Stitch Markers
- Tapestry Needle
Pattern Notes:
- The stitch multiple for this pattern is 2 + 2 dc in the corner stitch.
- Stitch markers are helpful for keeping track of your rounds, especially for beginners.
Crochet Skirt Pattern: Your Step-by-Step Guide
Let’s dive into the details of this easy and versatile crochet skirt pattern.
1. Foundation Chain
- Create a chain of 100 stitches (or adjust for your desired size).
- Tip: If you’re unsure of the starting chain length for your waist, measure yourself with the yarn and chain until it reaches your desired waist circumference. Remember to add a few extra chains for ease.
- Securing the Starting Point: Slip stitch into the first chain from your hook to secure the starting point. You can also use a stitch marker here to mark the beginning of your round.


2. Body of the Skirt
Row 1:
- Double crochet (dc) into the second chain from the hook.
- 2 dc in the next chain: This creates our first increase.
- Dc in the next chain, 2 dc in the next chain Repeat this pattern from the asterisks until the end of the row.
- Placement of Stitch Marker (Optional): Place a stitch marker at the end of the row to mark your turning point.
Row 2:
- Chain 1 (this chain counts as your turning chain).
- Dc across the entire row, placing 2 dc in the last stitch of the row. This is how we create increases at the end of each row.
Rows 3-24:
- Continue repeating Rows 1 and 2 for a total of 21 more rounds.
3. Shaping the Waist
Decrease Rows (Rows 25 & 26):
- Ch 1, skip the first stitch, then make 2 dc together.
- Dc across the rest of the row, finishing with 2 dc together in the last stitch.
- Repeat this decrease row one more time (Row 26).
4. Creating the Waistband
Rows 27 and Up:
- Continue working in rows of double crochets until your skirt reaches your desired length.


5. Finishing Touches
- Weaving in Ends: Use a tapestry needle to weave in any loose yarn ends from the starting chain and throughout the project.
- Optional Edging: Feel free to personalize your skirt by adding a decorative border or fringe using crochet stitches or other embellishments.
Customizing Your Skirt
- Color: Explore different yarn colors or create a striped design by switching colors every few rows.
- Length: Make the skirt longer for a maxi style or shorter for a flirty look.
- Texture: Experiment with different crochet stitches to add unique textures to your skirt, like alternating rows of single crochet and double crochet.
Tips and Tricks
- Size Adjustments: To alter the size of your skirt, simply start with more or fewer foundation chains. Remember, 100 chains are suitable for a medium.
- Tension: Keep your stitches consistent for an even look.
- Counting: Stitch markers are your friends! Use them to keep track of your increases and decreases.
Customizing Your Crochet Skirt
The beauty of this pattern is its versatility. Here are ways to add your own flair:
- Colors: Explore different yarn colors or create stripes!
- Length: Make a maxi skirt or a shorter, flirty version.
- Texture: Experiment with different crochet stitches.
Watch and Learn
For detailed visual instructions, check out the YouTube channel “Malulu Knit” and the video “How to Crochet a Skirt | Pattern & Tutorial DIY”: https://www.youtube.com/watch?v=mWZVFWjNBgg
Share Your Creations!
I’d love to see your finished crochet skirts! Share your progress on Instagram: https://www.instagram.com/tubacrochet_ and TikTok: tiktok.com/@tubacrochet [invalid URL removed]
Conclusion
Congratulations on mastering this easy crochet skirt pattern! Finally, don’t hesitate to ask questions or leave comments – crafting is more fun together!


