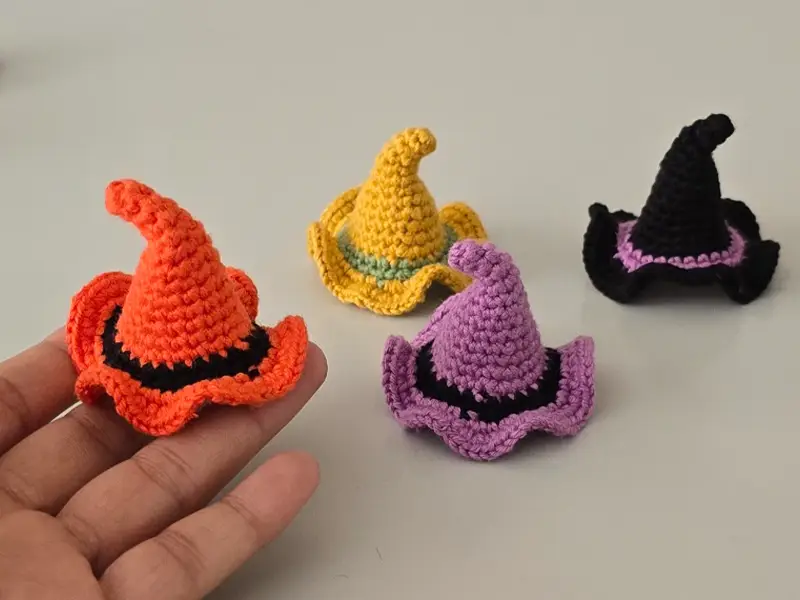
Looking for a fun Halloween crochet project? This easy crochet witch hat pattern is perfect for beginners, works up quickly, and can be used as decorations, keychains, or even sold at craft fairs.
Watch the full step-by-step video here: Crochet Witch Hat Video
Download the free written pattern (PDF): Easy Crochet Witch Hat PDF
Why You’ll Love This Crochet Witch Hat
- Beginner-friendly – only uses single crochet (sc) and slip stitch (sl st).
- Quick to make – perfect for last-minute Halloween décor.
- Adaptable – change the colors and size as you wish.
- Multi-purpose – use as ornament, party decoration, keychain, or handmade gift.

Materials for Easy Crochet Witch Hat Pattern
- Yarn: 5-ply medium thickness, 50% cotton & 50% acrylic (two colors recommended).
- Hook: 2.20 mm crochet hook.
- Notions: Scissors, tapestry/yarn needle, stitch marker (optional).
Abbreviations (US Crochet Terms)
- mr = magic ring
- ch = chain
- sc = single crochet
- inc = increase (2 sc in same stitch)
- sl st = slip stitch
- st(s) = stitch(es)
- Rnd = round
Note: Work in joined rounds. At the start of each round, ch 1 (does NOT count as a stitch). At the end of each round, sl st to the first sc to join.
Step-by-Step Easy Crochet Witch Hat Pattern (Beginner-Friendly)
Cone (Hat Point)
Rnd 1: Make a magic ring, ch 1, work 4 sc into the ring. Join with sl st. (4 sts)
Rnd 2: Sc in each stitch around. Join. (4)
Rnd 3: Ch 1, [inc, sc] ×2. Join. (6)
Rnd 4: Sc in each stitch around. Join. (6)
Rnd 5: Ch 1, [inc, sc] repeat around. Join. (9)
Rnd 6: Sc in each stitch around. Join. (9)
Shaping the Cone
Rnd 7: Ch 1, [inc, sc in next 2 sts] ×3. Join. (12)
Rnd 8: Sc in each stitch around. Join. (12)
Rnd 9: Ch 1, [inc, sc in next 3 sts] ×3. Join. (15)
Rnd 10: Sc in each stitch around. Join. (15)
Rnd 11: Ch 1, [inc, sc in next 4 sts] ×3. Join. (18)
Rnd 12: Ch 1, [inc, sc in next 5 sts] ×3. Join. (21)
Rnd 13: Ch 1, [inc, sc in next 6 sts] ×3. Join while switching to Color B. (24)
Adding the Stripe
Rnd 14 (Color B): Sc in each stitch around. Join. (24)
Rnd 15 (Back to Color A): Ch 1, [inc, sc in next 3 sts] repeat around. Join. (30)
Brim of the Witch Hat
Rnd 16: Ch 1, [inc, sc in next st] repeat around. Join. (45)
Rnd 17: Ch 1, 2 sc in each st around. Join. (90)
Fasten off and weave in the ends. For a neat finish, use an invisible join.
Final Touch
Shape the brim flat and adjust the cone to stand tall. Add a keyring, ribbon, or extra embellishments if you’d like. Now your easy crochet witch hat is ready for Halloween!
Creative Ways to Use Your Easy Crochet Witch Hat
- Table or mantel Halloween decorations.
- Cute ornaments for party favors or trick-or-treat bags.
- Keychains or bag charms – attach a keyring.
- Sell them at craft fairs or Etsy shops as handmade gifts.
Beginner Tips for Crocheting a Witch Hat
- If the cone looks too flat or wavy → double-check your stitch counts.
- If the brim curls up → add one extra round of plain sc with no increases.
- For a larger hat → keep repeating the increase sequence on the cone before starting the brim.
Video Tutorial
Follow along step by step with my YouTube video:
Watch the Witch Hat Tutorial
Don’t forget to subscribe to my channel: @TubaCrochet
Free PDF Pattern
Want a printable version?
Download the Easy Crochet Witch Hat PDF
Stay Connected
Share your finished witch hats with me – I’d love to see your Halloween crochet projects!
- YouTube: @TubaCrochet
- Instagram: tubacrochet_
- Pinterest: tubacrochet
Final Words
I hope you enjoyed this easy crochet witch hat tutorial
If you liked this project, please like, comment, and share.
Pin this pattern on Pinterest to save it for later.
Try it with different colors and make a whole set of mini witch hats for your Halloween décor!