
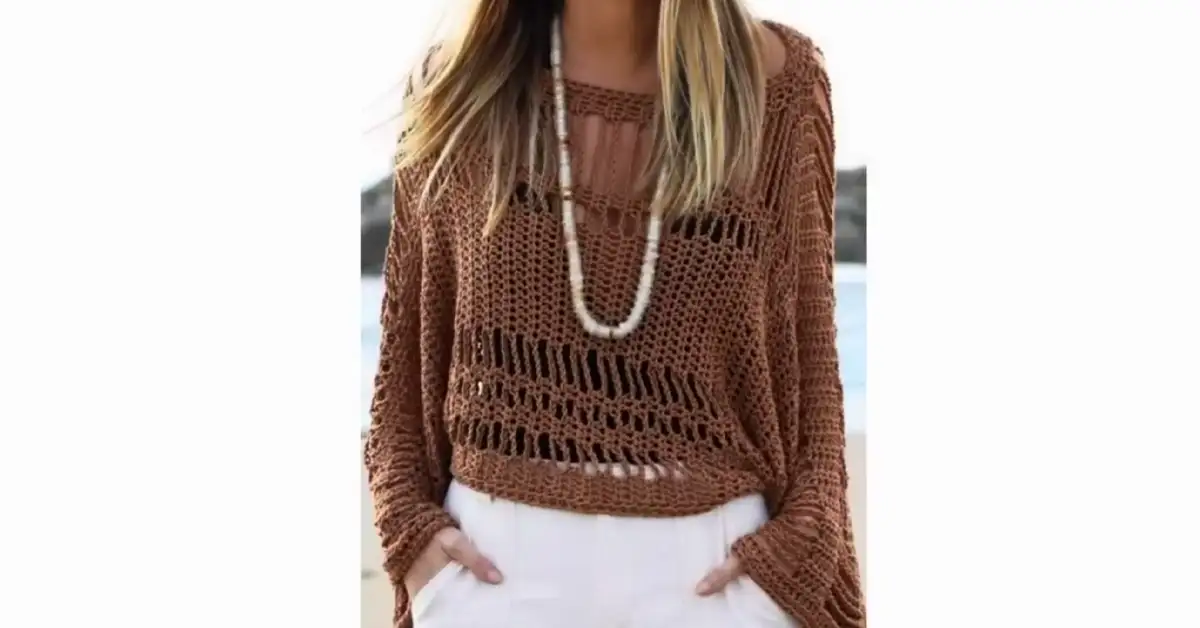
Get ready for warm weather with this stunning and airy crochet tunic! This breezy garment is perfect for throwing over your swimsuit or pairing with jeans and a tank top. In this tutorial, we’ll explore how to create this gorgeous crochet tunic top using lace-weight yarn, giving it an ethereal and delicate feel. Initially, it might seem daunting, but with our step-by-step guide, you’ll be surprised at how easy it is. To begin, let’s dive into the details of this beautiful crochet tunic top pattern!
Crochet Tunic Pattern: A Summer Essential
This crochet tunic is the perfect addition to your summer wardrobe. Firstly, it’s incredibly versatile. Secondly, it’s lightweight and breathable, making it ideal for hot days. Thirdly, the lace-weight yarn adds a touch of elegance. This crochet tunic pattern free design is perfect for beginners looking to expand their skills. In this tutorial, you’ll learn basic stitches and shaping techniques. Undoubtedly, you’ll be rocking this stylish crochet tunic cover up in no time!
Choosing the Right Yarn for Your Crochet Tunic
The choice of yarn is crucial for the success of your crochet tunic sweater. For this project, we recommend a lace-weight yarn, which gives the tunic its airy, delicate texture. You might choose a cotton or bamboo blend for a lightweight, breathable finish.
Materials Needed for Your Crochet Tunic Project
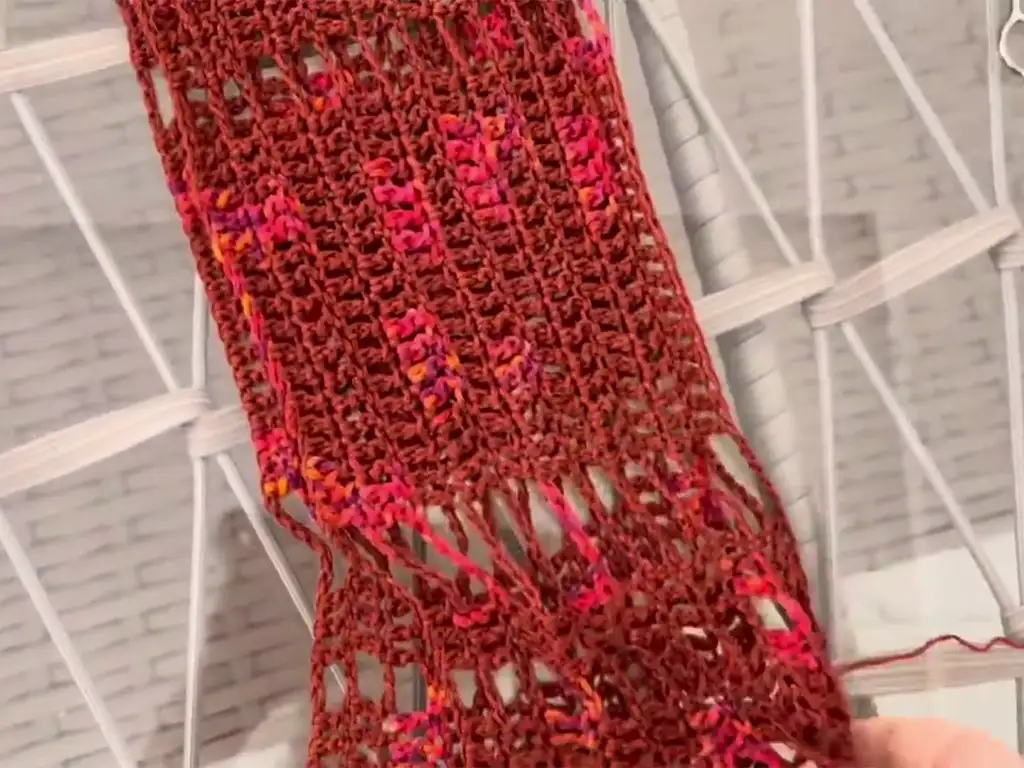
The key to a beautiful crochet tunic sweater lies in choosing the right yarn. For this tutorial, we recommend a lace-weight yarn with a beautiful drape. In fact, the video tutorial from @NatalyMasters (https://www.youtube.com/@NatalyMasters) uses Rocaki Du Multicolor yarn, a blend of viscose and cotton. This yarn has a subtle sheen and creates a stunning fabric. Also,
- Yarn: The main yarn used is a beautiful, flowing, multi-colored, cord-like yarn called “Du Multicolor” by the brand “Rocaki.”
- It’s a blend of 70% viscose and 30% cotton.
- It comes in 50g balls with 120 meters of yarn per ball.
- The specific color used in the video is number 12.
- The yarn is described as having a subtle woven-in thread of a slightly different color, creating a beautiful effect.
- Crochet Hook: The recommended hook size is a number 4. The video uses a Clover Amour hook.
- Optional Materials: The video mentions other yarns and materials that would work well for this design:
- Lurex Yarn: A shiny, metallic yarn that would add sparkle and glamour.
- Sequin Yarn: A yarn with sequins attached, adding even more sparkle.
- Ribbon Yarn: A flat, ribbon-like yarn that would also work well with this design.
- “Giada Redda” Yarn: Another yarn by the same brand, Rocaki, with similar properties to the “Du Multicolor.” This yarn was used in a previous video to make a knitted top.
Understanding the Crochet Tunic Pattern
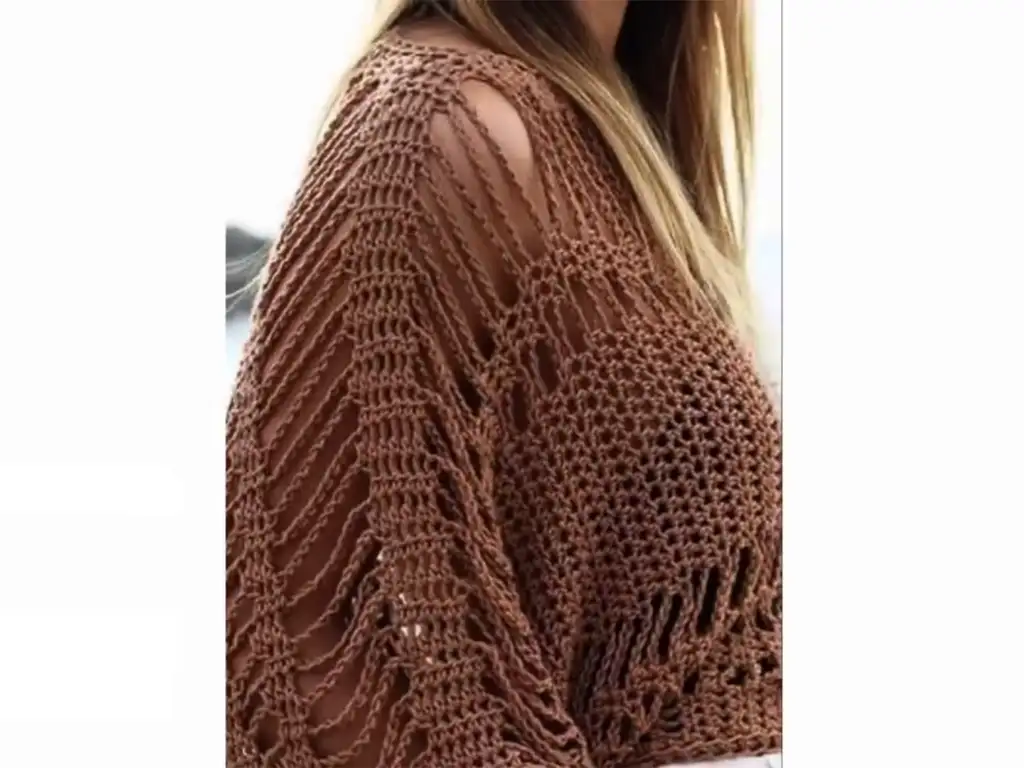
To begin with, the pattern might seem a bit unusual because this crochet tunic is worked sideways. However, this construction method creates a unique and flattering silhouette. Most importantly, it allows for easy customization of the length and width. Notably, the pattern utilizes the patent stitch, which creates a beautiful texture and drape. To illustrate, watch the video tutorial here: https://www.youtube.com/watch?v=_PCqt6kKlTI.
Tips and Tricks for Crocheting with Lace-Weight Yarn
Crocheting with lace-weight yarn can be a bit different from working with thicker yarns. Here are some tips to ensure a smooth and enjoyable experience:
- Choose a hook with a smooth finish: This will prevent the delicate yarn from catching or splitting.
- Work in good lighting: Lace-weight yarn can be difficult to see, so ample lighting is essential.
- Use stitch markers: Clearly mark your stitches, especially when working on the foundation row, to avoid miscounting.
- Be patient: It’s normal for lace-weight projects to take a bit longer. Enjoy the process and the beautiful fabric you’re creating.
- Block your finished piece: Blocking will even out your stitches and enhance the drape of the lace.
Step-by-Step Guide to Crochet a Lace-Weight Tunic
Creating a Crochet Beachwear Tunic with a Personal Touch
To put it another way, don’t be afraid to get creative! Specifically, you can add your own personal touch to this crochet tunic sweater pattern. For instance, you can change the yarn color, add fringe, or embellish it with beads. Ultimately, the possibilities are endless!
Styling Your Crochet Tunic for Summer Days
Different Ways to Wear Your Crochet Tunic
Let’s get started with styling! This versatile crochet tunic can be worn in countless ways. In this tutorial, we’ll explore a few ideas. To begin with, it’s perfect as a crochet beach tunic over your swimsuit. Additionally, you can pair it with jeans or shorts for a casual daytime look. Furthermore, dress it up with heels and accessories for a night out. Consequently, this crochet tunic will become your go-to summer staple!
Gauge and Sizing for Your Crochet Tunic
Because of this, gauge isn’t critical for this project, but a foundation chain of approximately 123 stitches should measure around 45cm in length. Due to this, adjust your hook size as needed to achieve a fabric you like. In other words, the beauty of this crochet tunic pattern is its adaptability. Specifically, you can easily adjust the length and width by adding or subtracting stitches. Moreover, you can customize the sleeve length to your preference. Therefore, this pattern is perfect for all shapes and sizes!
Abbreviations Used in the Crochet Tunic Pattern
Now that you know the basics, let’s dive into the pattern itself. To start, we’ll use the following abbreviations:
- Crochet: The entire garment is crocheted.
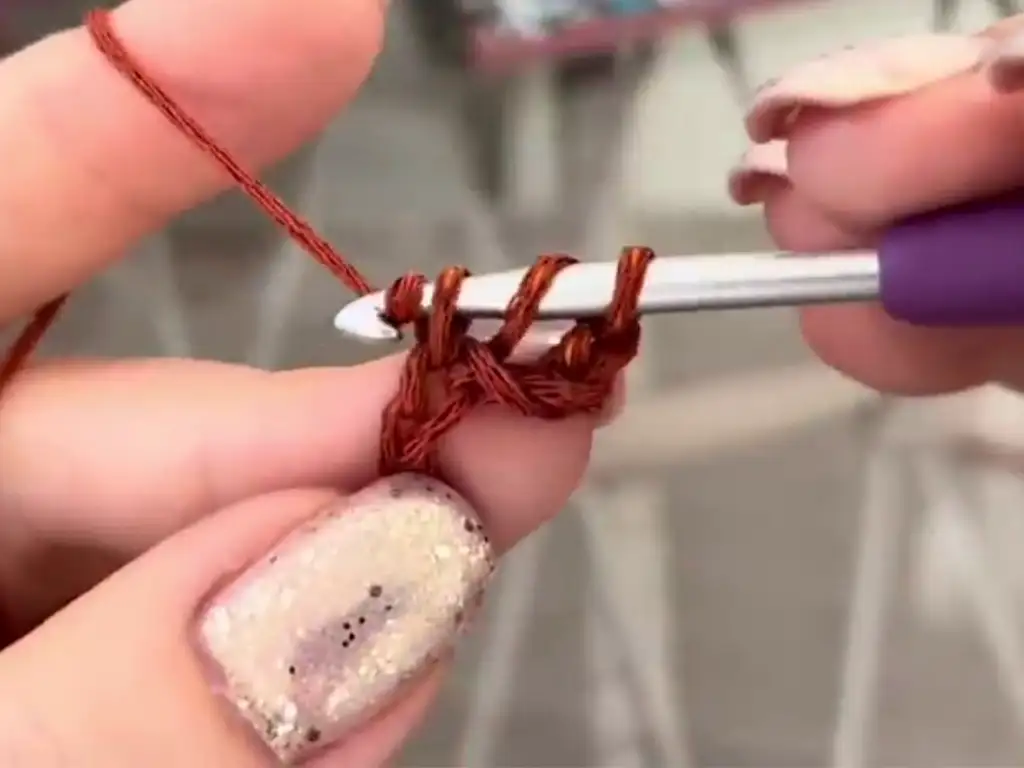
- Pat St – Patent Stitch (also known as the waistcoat stitch): This stitch is used throughout the design to create a textured, slightly raised fabric. It’s worked as a single crochet, but instead of inserting the hook into the top of the stitch, you insert it into the “post” of the stitch from the previous row.
- Working in Rows: The piece starts with a long foundation chain and is worked in rows back and forth.
- Working in the Round: After the initial rows, the piece is divided for the front and back and worked separately. Then the pieces are rejoined and worked in the round to create the sleeves.
Troubleshooting Common Crochet Tunic Issues
As you can see, crocheting can sometimes be tricky. Therefore, we’ve included a section on troubleshooting common issues. For example, if your crochet tunic is too wide, you can decrease stitches. Conversely, if it’s too narrow, you can increase stitches. Hence, it’s important to check your gauge and make adjustments as needed.
Accessorizing Your Crochet Tunic for a Complete Summer Look
Lastly, let’s talk about accessories! As a result of this, a simple belt can cinch in the waist and create a more defined silhouette. Because of this, you can add a pop of color with a bright scarf or statement necklace. Since this crochet tunic is so versatile, you can dress it up or down with ease. For example, you can wear it with sandals for a casual look or with wedges for a more dressed-up occasion.
The Crochet Tunic Pattern (Inspired by @NatalyMasters):
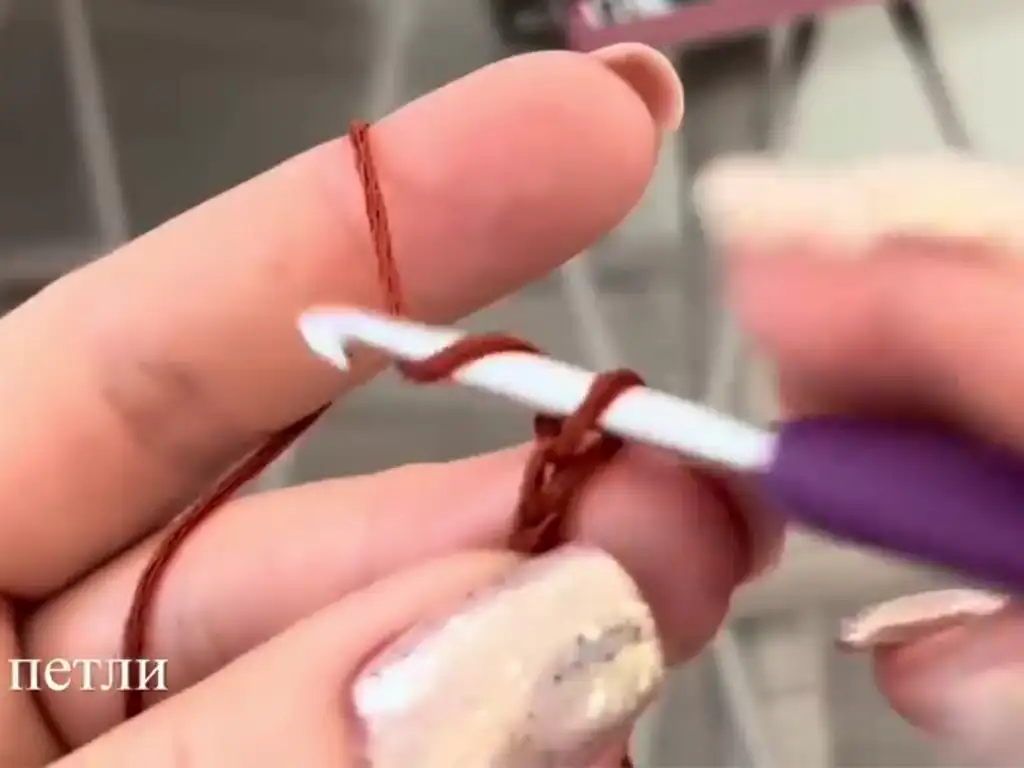
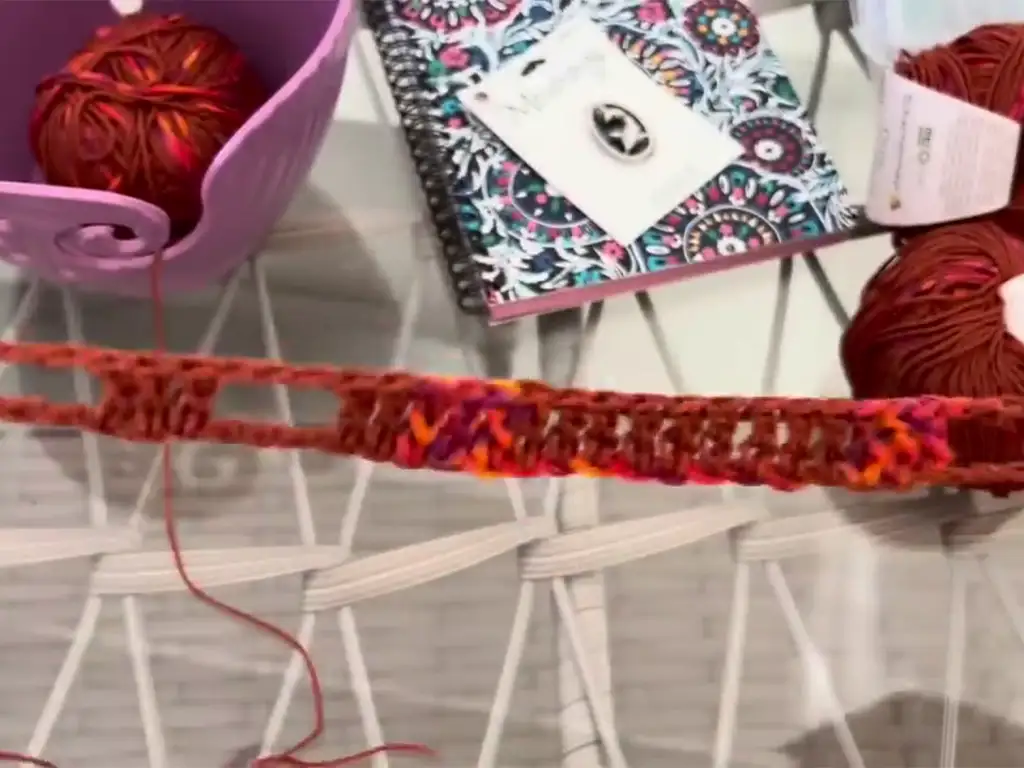
Row 1 (Foundation Chain & First Row of Stitches):
- Make a foundation chain of 123 chains (or the number needed for your desired length from shoulder to hem).
- Ch 2 (counts as first psc).
- Psc in the 4th ch from the hook.
- Psc in each of the next 4 ch (5 psc total).
- Skip next 5 ch.
- Psc in the next ch.
- Repeat step 6 three more times (4 psc total).
- Skip next 2 ch.
- Psc in the next ch.
- Repeat step 9 two more times (3 psc total).
- Skip next 6 ch.
- Psc in the next ch.
- Repeat step 12 sixteen more times (17 psc total).
- Skip next 3 ch.
- Psc in the next ch.
- Repeat step 15 two more times (3 psc total).
- Skip next 10 ch.
- Psc in the next ch.
- Repeat step 18 six more times (7 psc total).
- Work steps 17-19 in reverse order (skip 10 ch, 3 psc, skip 3 ch, 17 psc, etc.) to complete the row.
Rows 2 onwards (Body & Sleeve):
- Ch 3 (counts as first psc).
- Psc in each psc across the row.
- Repeat step 2 until you reach your desired sleeve length.
Shaping the Neckline (Front & Back Separation):
- At the end of a row, stop before reaching the central 7 psc.
- Turn your work.
- Continue working in psc across only the front or back section, leaving the other section unworked for now.
- Repeat steps 2-3 for the desired depth of the boat neckline.
Joining Front & Back for Second Sleeve:
- With the right sides facing, carefully join the last row of the front and back sections together using a slip stitch.
- Ch 3 (counts as first psc).
- Continue working in psc across the joined rows, creating the second sleeve.
- Repeat steps 2-3 until the second sleeve reaches the desired length.
Finishing:
Fasten off and weave in ends.
Sizing Tips:
- Length: Adjust the length of the foundation chain for your desired tunic length. Remember to account for the extra length that will be added by the ribbing.
- Sleeve Length: Adjust the number of rows worked for the sleeves for your desired sleeve length.
- Larger Sizes: If you need a larger size, add more chains in multiples of the repeat pattern (which is roughly 25 chains) to your foundation chain. You may also need to add more rows for the sleeves and body.
- Smaller Sizes: For a smaller size, remove chains from the foundation chain in multiples of the repeat pattern. You may also need to work fewer rows for the sleeves and body.
Other Crochet Projects You’ll Love:
- Easy Crochet Summer Tops: Explore more lightweight and breezy crochet top patterns perfect for warm weather.
- Beginner-Friendly Crochet Patterns: Find easy and fun crochet projects perfect for those just starting out.
- Crochet Beachwear Essentials: Discover a collection of crochet patterns for beach cover-ups, bags, and more.
Conclusion
This crochet tunic pattern free provides a wonderful opportunity to create a stylish and versatile garment for your summer wardrobe. We encourage you to give it a try and share your creations with us on Instagram @tubacrochet_, TikTok @tubacrochet, and Facebook Tuba Crochet. We can’t wait to see your beautiful crochet tunic tops! To wrap up, crocheting offers a world of creativity. Don’t be afraid to experiment and make this pattern your own! Happy crocheting!


