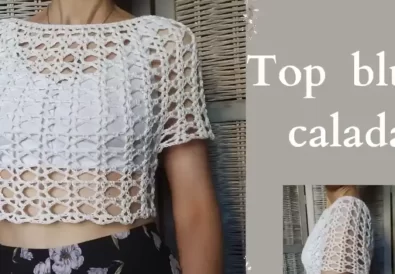
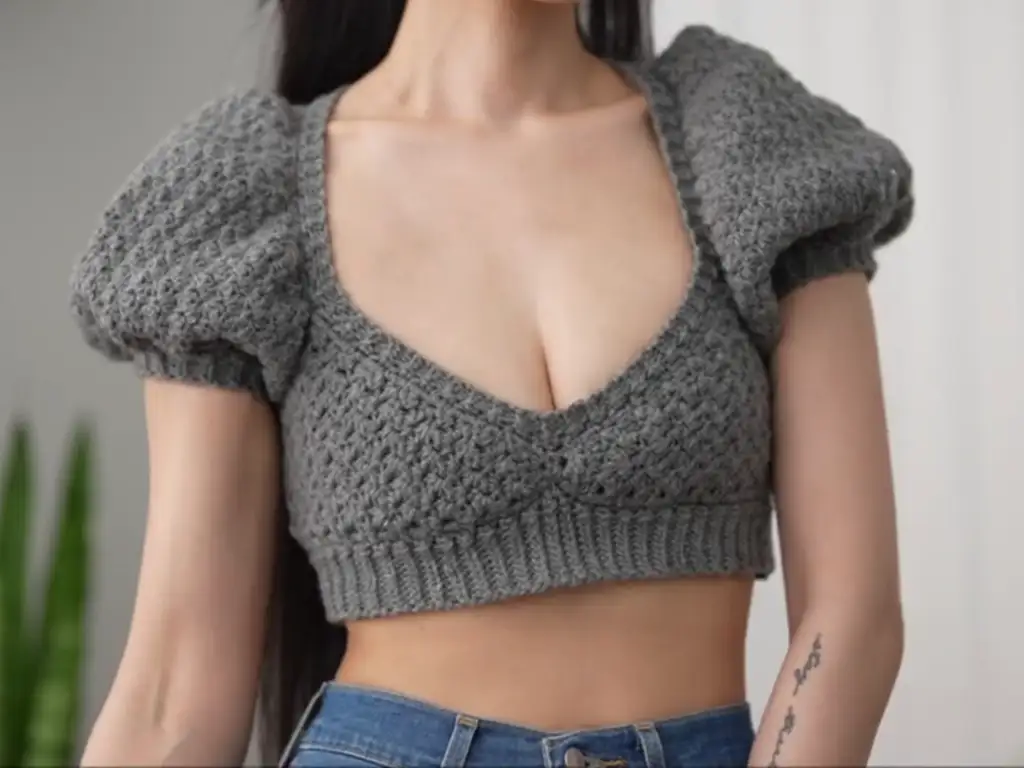
Are you ready to embrace the trendy and elegant world of crochet puff sleeve crop tops? This easy-to-follow pattern is perfect for beginners and seasoned crocheters alike, allowing you to create a stunning crochet puff sleeve top that will turn heads. Imagine yourself rocking this breezy, stylish piece, whether you’re strolling through a bustling city or lounging on a sunny beach. This crochet crop top is the epitome of summer chic, and the best part is, you can make it yourself!
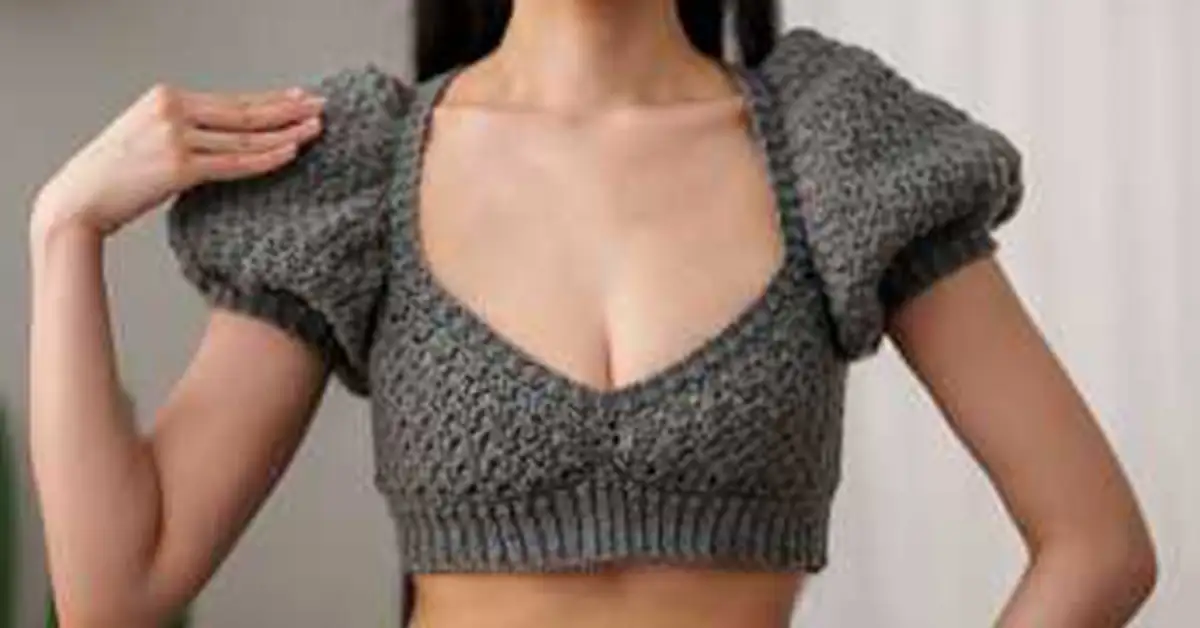
The Perfect Puff Sleeve Crop Top: A Crochet Dream
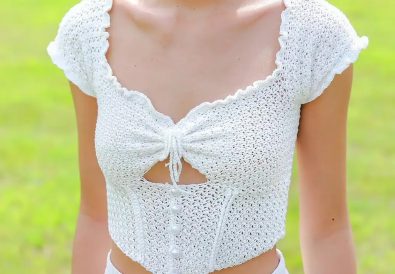
Let’s dive into the delightful world of crochet and create a trendy crochet top that’s perfect for warm summer days! This puff sleeve crop top is the epitome of chic comfort, offering a touch of bohemian charm with its statement sleeves. Specifically, this beginner crochet top is surprisingly easy to make, even if you’re new to the craft. Overall, you’ll be amazed at how quickly you can whip up this stunning piece. Lastly, imagine yourself strolling along the beach or enjoying a picnic in the park, looking effortlessly stylish in your handmade creation. In this tutorial, we’ll guide you through every step of crafting your very own puff sleeve crop top.
This easy crochet crop top pattern is perfect for beginners because it uses basic stitches and simple shaping techniques. In fact, it’s a fantastic project for practicing your crochet skills and building confidence. In addition, the finished crochet top is incredibly versatile. For instance, dress it up with high-waisted jeans and sandals or keep it casual with shorts and sneakers. The possibilities are endless!
Get Started: Materials for Your Puff Sleeve Crop Top
Choosing the Right Yarn for Your Puff Sleeve Crop Top
Most importantly, you’ll need the right yarn. We recommend a category 4 yarn, such as a worsted weight cotton or cotton blend. Notably, cotton is breathable and comfortable for warm weather. The original pattern used 285g (approximately 505 yards) of yarn. Feel free to experiment with colors! A vibrant jewel tone or a classic neutral will both look fantastic.
Yarn Weight and Fiber Considerations:
Category 4 yarn, often called worsted weight, is a great choice for this project. It provides a nice balance between drape and structure. Opt for a natural fiber like cotton or a cotton blend for breathability and comfort, especially during warmer months.
Recommended Yarn Brands for Puff Sleeve Crop Tops:
Some popular and reliable yarn brands for this project include Lion Brand’s Coboo (a cotton and bamboo blend), Paintbox Yarns Simply Aran, and WeCrochet’s Brava Worsted. Ultimately, the choice of yarn is up to you and your preferences!
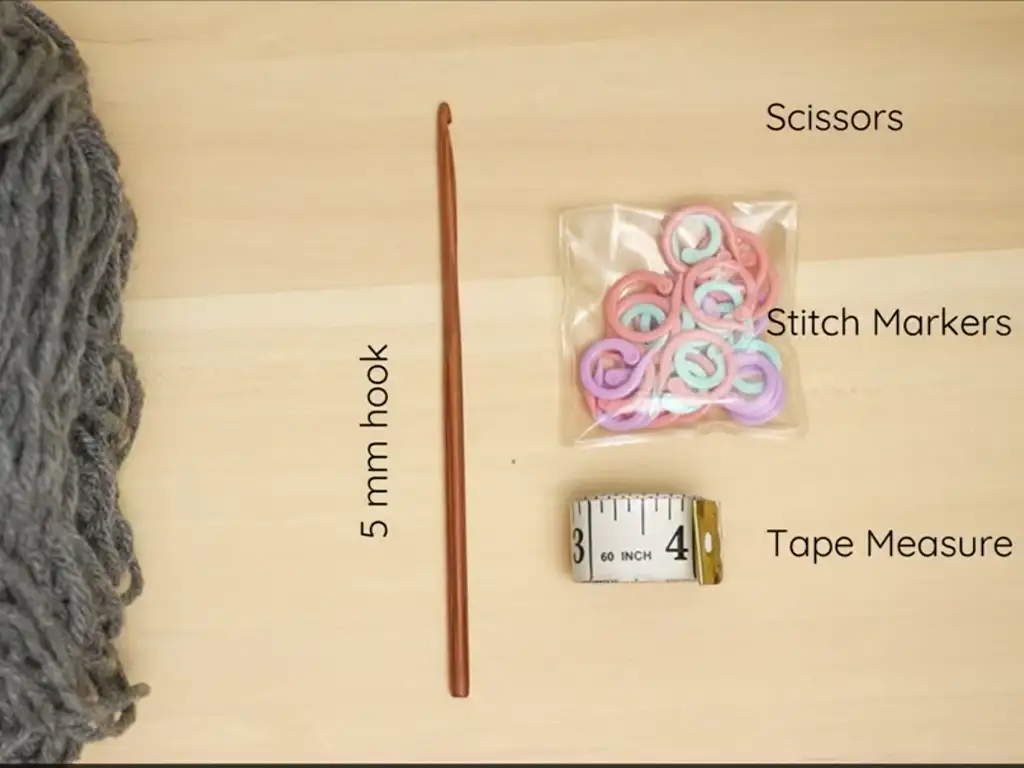
Essential Crochet Hooks and Tools for Success
Besides the yarn, you’ll need a 5mm crochet hook, scissors, and stitch markers. A tape measure is also handy for checking your gauge and ensuring the crochet top fits perfectly.
Step-by-Step Guide: Crochet Your Own Puff Sleeve Crop Top
Creating the Foundation: Puff Sleeve Crop Top Base
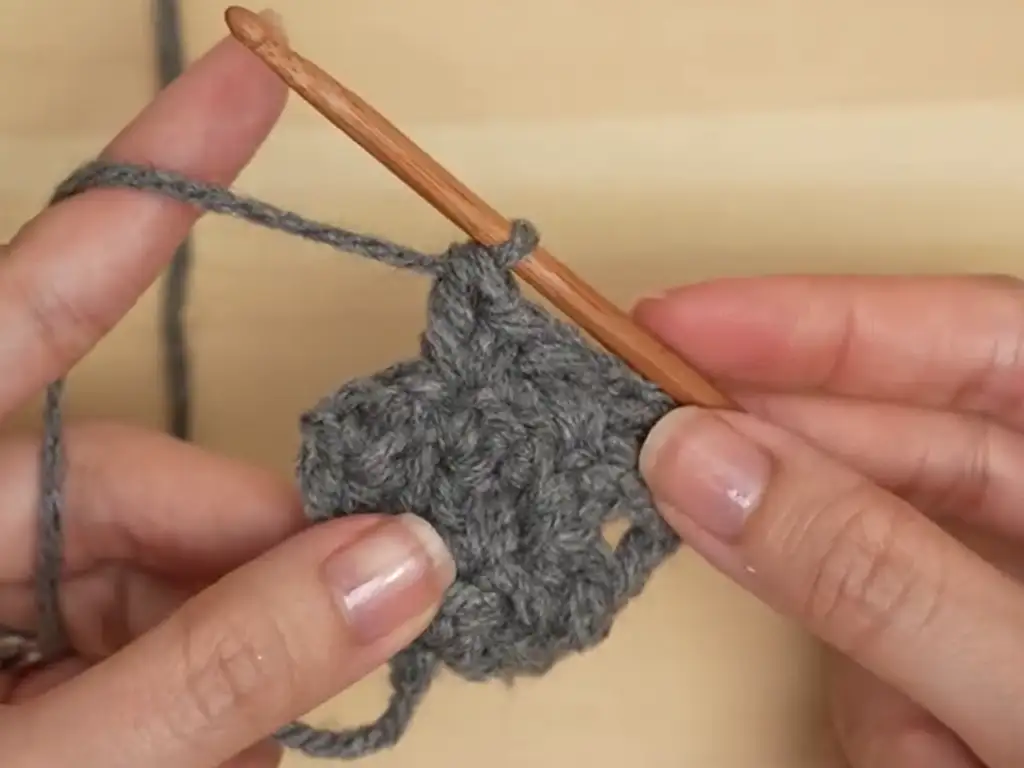
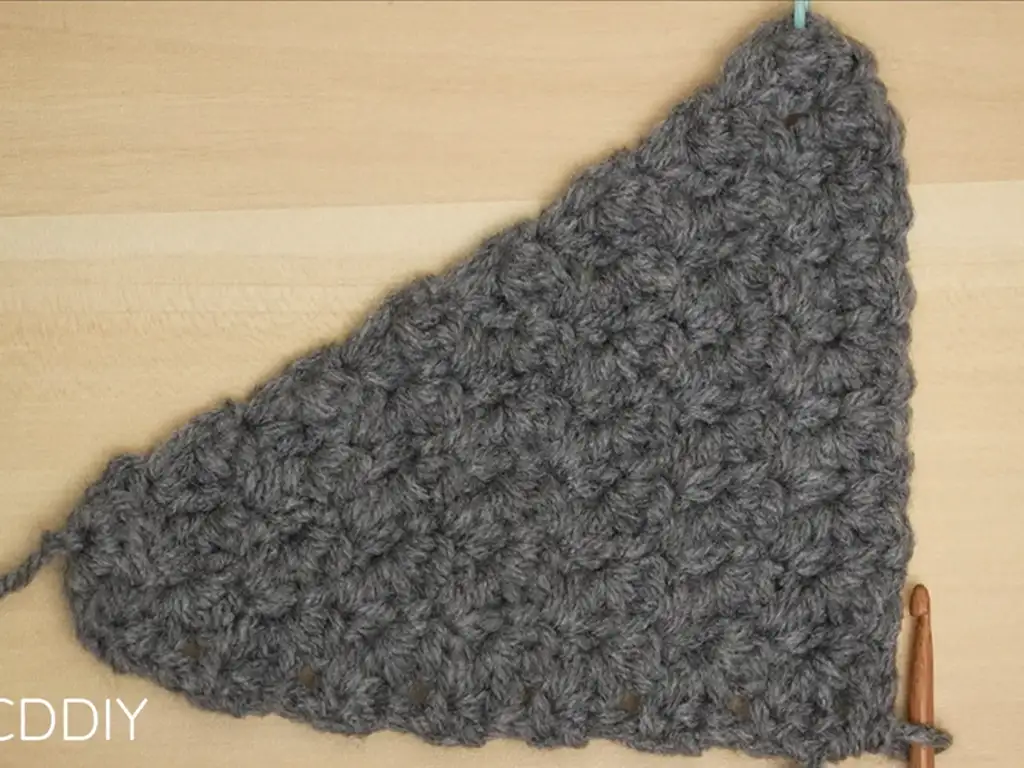
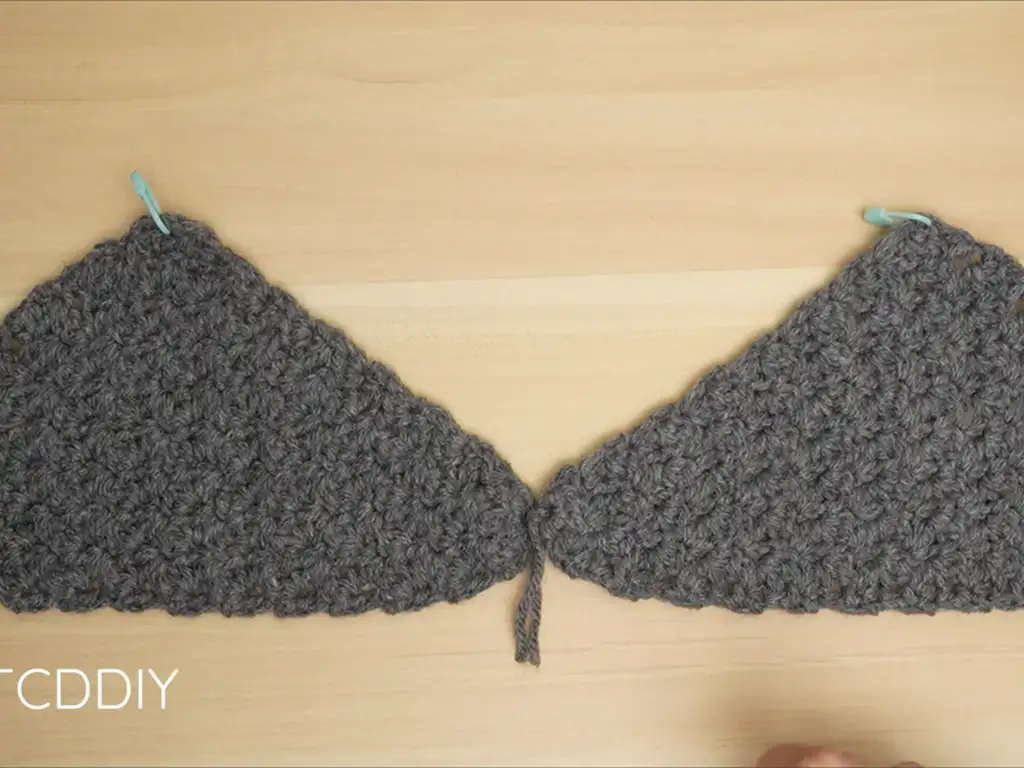
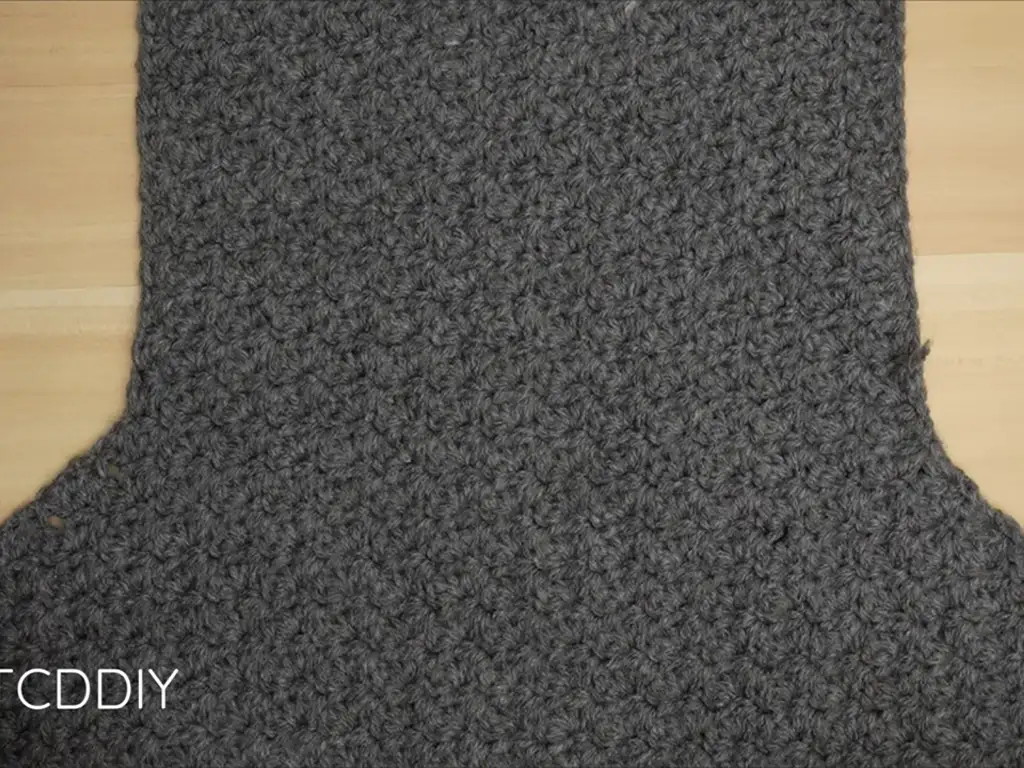
We’ll start by crocheting the two cups of the crop top. To begin with, you’ll create a small chain and work in half double crochet (hdc) stitches to form a circular shape. Then, you’ll gradually increase stitches to shape the cup.
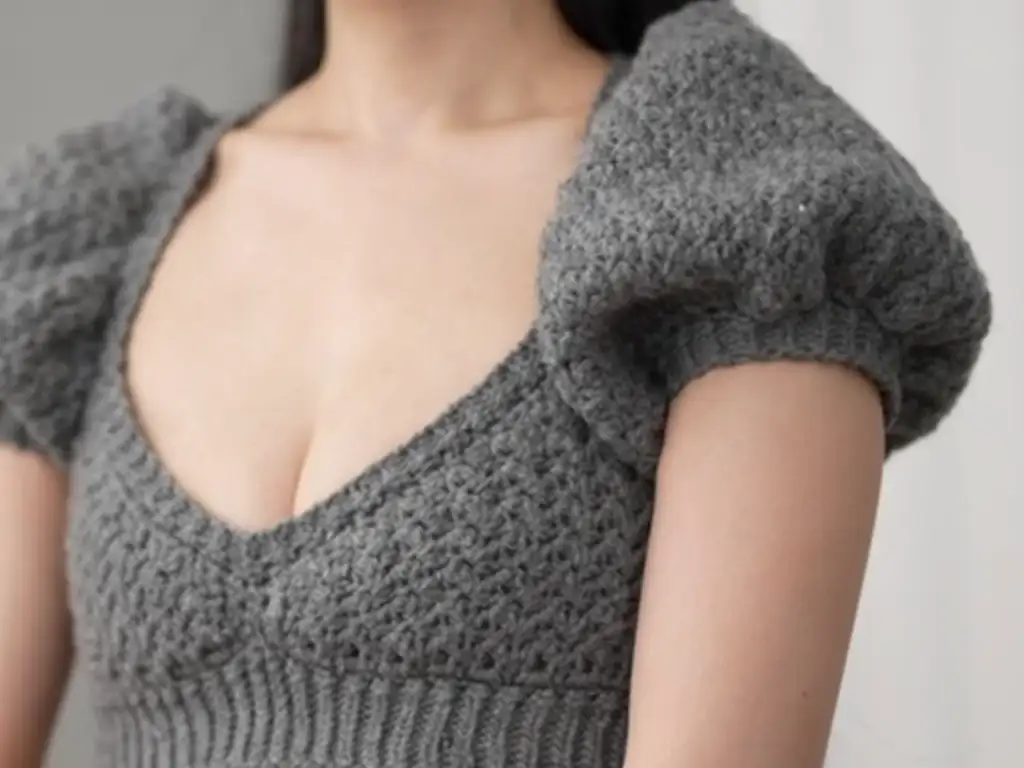
Shaping the Sleeves: The Puff Takes Form
Moving on to the sleeves, this is where the magic happens! We’ll use a combination of increases and decreases to create the signature puff. Don’t worry, it’s easier than it sounds!
Increasing Techniques for Puffy Sleeves:
The key to achieving those voluminous puff sleeves lies in strategic increases. We’ll be working increases at the beginning and end of rows, gradually adding stitches to create the desired fullness.
Decreasing Techniques for a Fitted Puff Sleeve Crop Top:
Afterward, we’ll use decreases to shape the sleeves and create a more fitted look around the wrists. This creates a beautiful balance between the puffiness and a more streamlined silhouette.
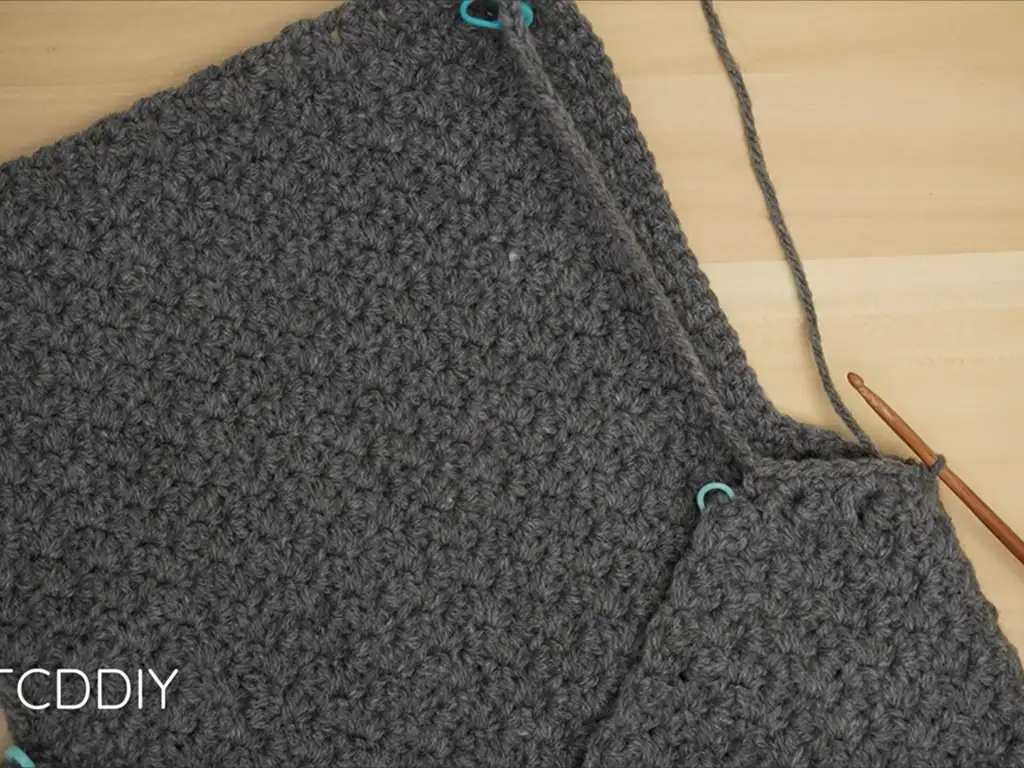
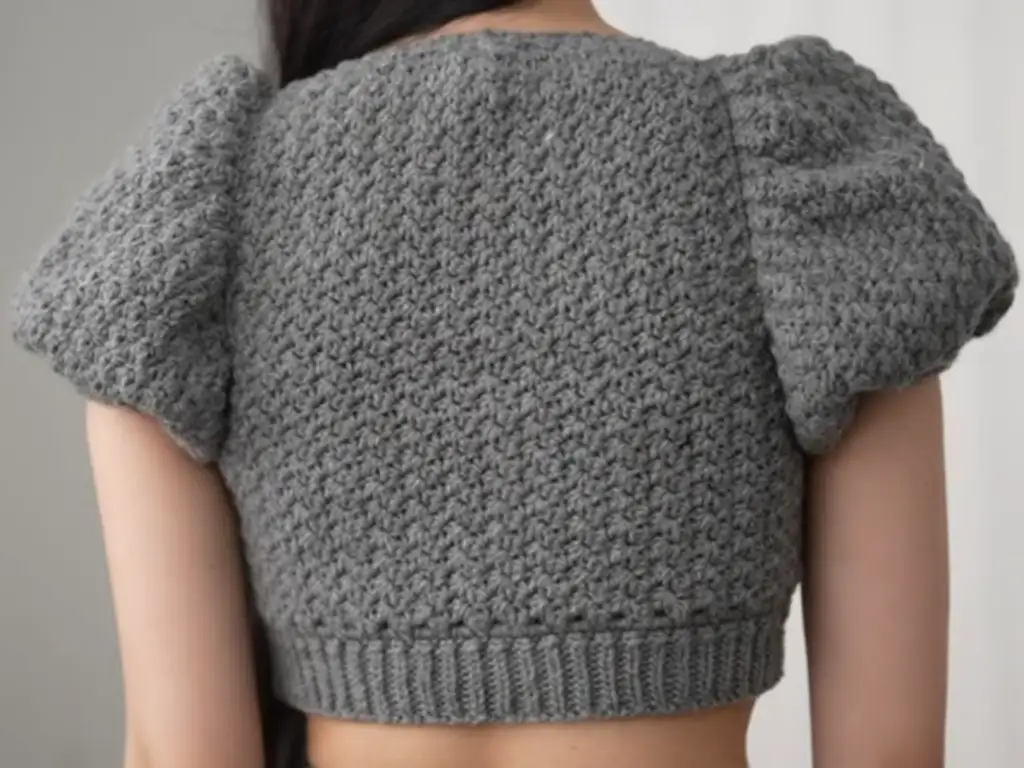
Joining the Pieces: Seamless Puff Sleeve Crop Top Construction
Once the cups and sleeves are complete, we’ll join them together with a simple seam.Consequently, you’ll have the main body of your puff sleeve crop top!
Puff Sleeve Crop Top Pattern: Explained for Beginners
Understanding the Pattern Abbreviations and Terms
Before we dive into the puff sleeve crop top pattern, let’s quickly go over some common crochet abbreviations. Undoubtedly, understanding these abbreviations will make following the pattern much easier.
- ch: Chain (to create a starting loop of yarn)
- sl st: Slip stitch (used to join stitches)
- sc: Single crochet (a basic stitch creating a tight fabric)
- hdc: Half double crochet (a taller stitch than sc, creating a slightly looser fabric)
- dc: Double crochet (the tallest stitch, creating a more open fabric)
- Rep: Repeat (repeating a sequence of stitches)
- Su st (Suzette Stitch): 1 sc and 1 dc in the same stitch
- Increase: 3 hdc in the same stitch
- Decrease: skip next stitch, dc3tog (double crochet three together)
Row-by-Row Instructions: Crafting the Puff Sleeve Crop Top
Now, let’s get to the heart of the matter – the puff sleeve crop top pattern! In this section, you’ll find detailed instructions for each row, including stitch counts and specific techniques.
You can find the detailed row-by-row instructions for this crochet puff sleeve crop top pattern in the tutorial video by @TCDDIY (https://www.youtube.com/@TCDDIY).
Crochet Puff Sleeve Crop Top Pattern:
(This pattern is written for a size Small. Adjust as needed for different sizes.)
Cups (Make 2):
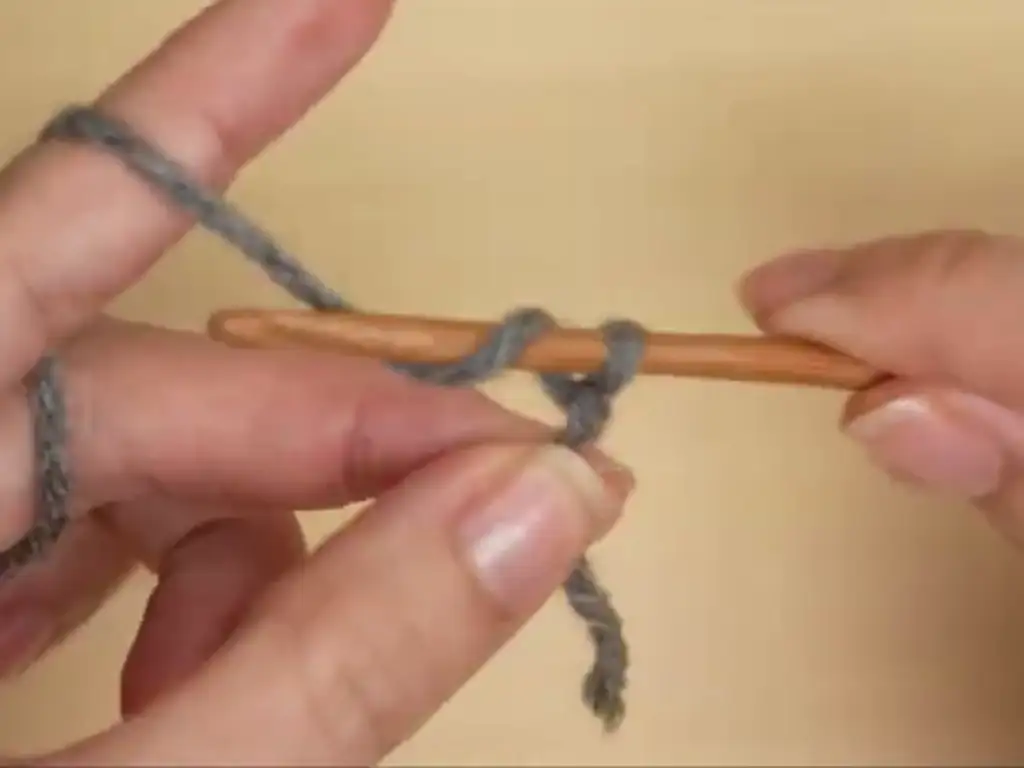
- Row 1: Ch 1, block off ch 1, ch 2 (does not count as a stitch), 5 hdc in the blocked-off ch. (5 sts)
- Row 2: Ch 1, turn, Su st in first st, skip next st, Su st in next st, skip next st, Su st in next st, skip next st, 3 hdc in last st. (7 sts)
- Row 3: Ch 1, turn, Su st in first st, skip next st, Su st in next st, skip next st, Su st in next st, skip next st, hdc in last st. (7 sts)
- Row 4: Repeat Row 2. (9 sts)
- Row 5: Repeat Row 3. (9 sts)
- Rows 6 – X: Repeat Rows 2 and 3 until work stretches from mid-chest across chest where you want the strap. (Count your rows! You’ll need this number later.)
Underarm:
- Row 1: Ch 1, turn, Su st across until 4 sts remain, decrease 3 dc (see instructions below).
- Row 2: Ch 1, turn, Su st across, hdc in last st.
- Row 3: Repeat Row 1.
- Rows 4 – Y: Repeat Rows 1 and 2 until the underarm portion stretches from mid-chest down underarm. (Count your underarm rows! You’ll need this number later.)
Decreasing 3 Double Crochets:
- Yarn over, skip next st, insert hook in next st, pull up a loop, insert hook in next st, pull up a loop, insert hook in last st, pull up a loop (5 loops on hook).
- Yarn over, pull through first 4 loops, yarn over, pull through last 2 loops.
Back Panel:
- Row 1: Ch the same number of sts as your last underarm row, ch 1, turn, Su st across leaving the last 2 chs, 3 hdc in last ch.
- Row 2: Ch 1, turn, Su st across, hdc in last st.
- Rows 3 – Z: Repeat Rows 1 and 2 for the same number of rows as your underarm portion.
Shoulder and Body Width:
- Row 1: Ch an even number that reaches from your underarm (at eye-bust level) up your shoulder. (Count your chains! You’ll need this number later). Ch 1, turn, Su st across chain and into body of work, leaving last 2 sts, hdc in last st.
- Rows 2 – AA: Repeat Row 1 until the back panel reaches the desired width (approximately where the point of the opposite cup is).
Back Panel Underarm:
- Row 1: Place a stitch marker in the same number of sts as your shoulder chain. Ch 1, turn, Su st across leaving 4 sts before the stitch marker, decrease 3 dc (see instructions above).
- Row 2: Ch 1, turn, Su st across, hdc in last st.
- Rows 3 – BB: Repeat Rows 1 and 2 for the same number of rows as the front underarm portion.
Seaming:
Seam the sides of the front panels and back panel together using single crochet.
Sleeves (Make 2):
- Joining Round: With right side facing, insert hook in the stitch closest the side seam within the armhole. Alternate between 1 and 2 sc in each side row of the underarm, working up towards the shoulder. When working towards the front, stop at the side row before the stitch marker. When working towards the back, stop at the corner.
- Shoulder Chain: Make a chain equal the number of chains you made for the shoulder of the back panel. Sc this chain into the top corner stitch of the opposite panel. Place a stitch marker in the last chain.
- Continue Joining Round: Continue single crocheting around, alternating between 1 and 2 sc in each side row. Sl st into the chain space where you began.
Sleeve Body:
- Row 1: Ch an odd number for the desired sleeve length. Ch 1, turn, Su st across leaving last 2 chs, 3 hdc in last ch, sl st into the next available st of the joining round (the base). Sl st in the next st of the base to move up.
- Row 2: Ch 1, turn, Su st across, hdc in last st.
- Rows 3 – CC: Repeat Row 1, increasing at the end of each odd-numbered row, and working a Su st row without increases on each even-numbered row. Continue until you reach the stitch marker.
Decreasing Side:
- Row 1: Sl st into next st of the base, sl st into next st of the base to move up. Ch 1, turn, Su st across.
- Row 2: Ch 1, turn, Su st across leaving last 4 sts, decrease 3 dc (see instructions above), sl st into the next available st of the base. Sl st into the next st of the base to move up.
- Rows 3 – DD: Repeat Row 2, decreasing at the end of each even-numbered row, and working a Su st row without decreases on each odd-numbered row. Continue until you have no more stitches remaining.
Seaming:
Seam the sleeve closed using single crochet.
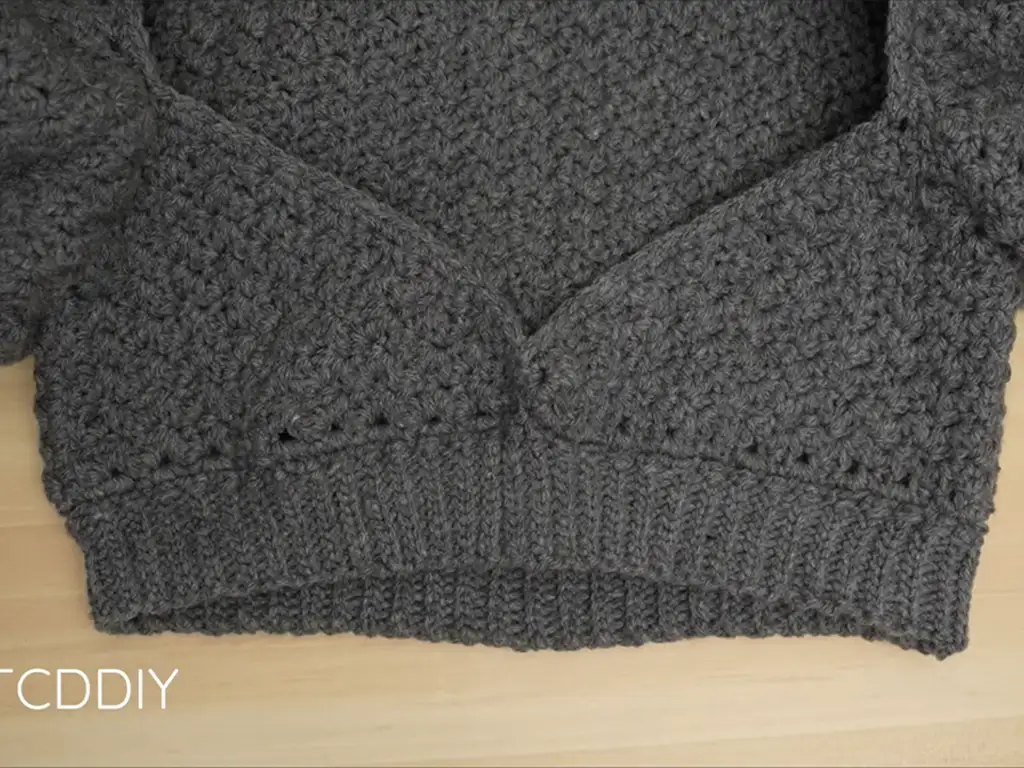
Cuffs and Bands:
Cuffs (Make 2):
- Attach yarn the edge of the sleeve.
- Round 1: Sc in every other side row around the sleeve.
- Round 2: Ch the desired cuff length, sl st in each ch, sl st into the next available st of the single crochet round (the base), sl st into the next st of the base to move up.
- Round 3: Back loop slip stitch (bl sl st) in each st around.
- Rounds 4 – EE: Repeat Round 3 until the cuff reaches the desired width.
- Seam the cuff closed using an outside loop slip stitch seam (see instructions below).
Bottom Band:
- Attach yarn the bottom edge of the top.
- Work the same as the cuffs, adjusting the chain length for the desired band width.
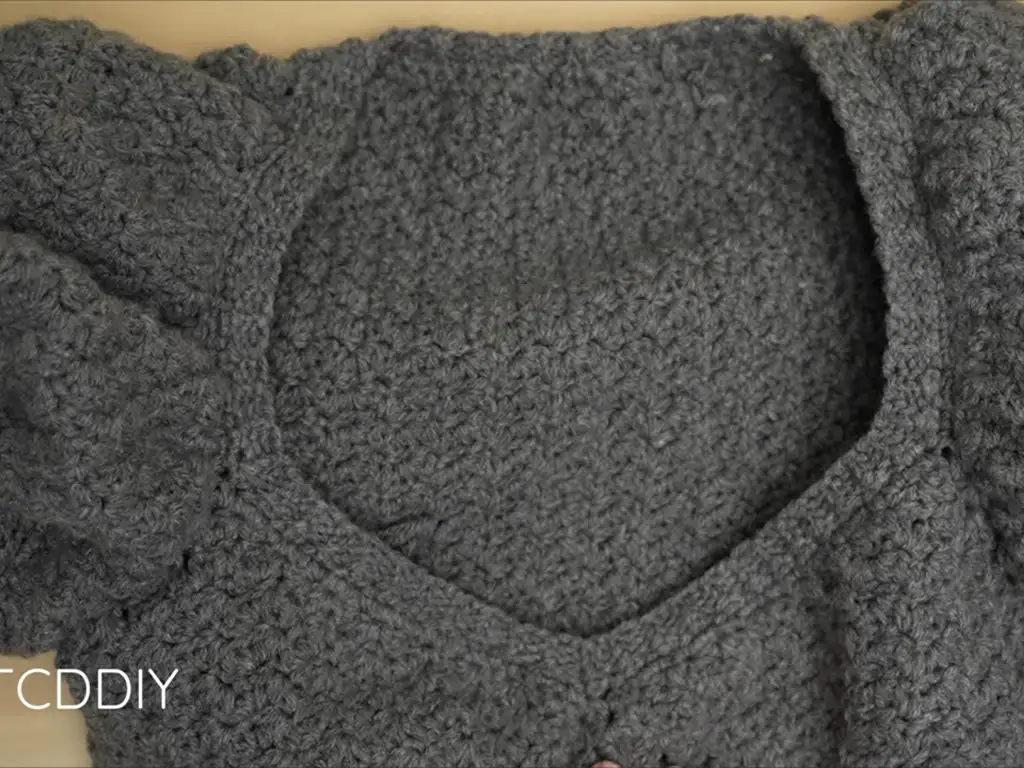
Neckline:
- Attach yarn the back of the neckline.
- Round 1: Sc in each side row around the neckline.
- Round 2: Ch the desired collar length, sl st in each ch, sl st into the next available st of the single crochet round (the base), sl st into the next st of the base to move up.
- Round 3: Bl sl st in each st around.
- Rounds 4 – FF: Repeat Round 3 until the collar reaches the desired width.
- Seam the collar closed using an outside loop slip stitch seam.
Outside Loop Slip Stitch Seam:
- With right side facing, insert hook in the corner stitch of both the front and back pieces.
- Pull the working yarn through.
- Next Stitch: Insert hook into the front loop of the next st on the front piece, and the back loop of the next st on the back piece.
- Yarn over and pull through all 3 loops on the hook.
- Repeat the Next Stitch instructions until no more stitches remain.
Finishing:
Weave in all ends.
Troubleshooting Common Puff Sleeve Crop Top Pattern Issues
Definitely, even experienced crocheters encounter hiccups from time to time. In this section, we’ll address some common issues and offer helpful solutions.
Tips and Tricks for a Stunning Puff Sleeve Crop Top
Now that you know the basics, let’s elevate your puff sleeve crop top with some extra tips and tricks! In other words, we’ll share insights on achieving a polished and professional finish.
Customization Ideas: Make Your Puff Sleeve Crop Top Unique
Add a Personal Touch: Embellishing Your Puff Sleeve Crop Top
Likewise, feel free to add your own creative flair! For example, consider adding delicate embroidery, beads, or even crocheted flowers to personalize your puff sleeve crop top.
Color Play: Choosing Yarn Colors for Your Puff Sleeve Crop Top
Certainly, the color of your yarn can dramatically impact the final look of your puff sleeve crop top. Due to its versatility, this pattern works well with a wide range of colors, from bold and vibrant hues to soft pastels and classic neutrals.
Different Sleeve Lengths: Adapt the Puff Sleeve Crop Top Pattern
To put it another way, you can customize the sleeve length to suit your preference. In conclusion, whether you prefer a short and flirty puff sleeve or a more dramatic, elongated puff, the choice is yours!
Show Off Your Style: Styling Your Puff Sleeve Crop Top
As you can see, this crochet puff sleeve crop top is a versatile piece that can be dressed up or down. In summary, pair it with high-waisted jeans or a flowy skirt for a boho-chic look. To summarize, accessorize with statement jewelry and your favorite sandals or sneakers.
Other Crochet Projects You’ll Love
This crochet puff sleeve crop top is a great start for your crochet journey. And, if you’re looking for more inspiration, check out these other crochet projects!
- Crochet Beach Bag: Perfect for carrying all your summer essentials.
- Crochet Blanket: Cozy up with a handmade blanket for chilly evenings.
- Crochet Scarf: Add a touch of color and warmth to your winter wardrobe.
Conclusion
Crafting your own puff sleeve crop top is a rewarding experience that allows you to express your creativity and create a unique garment you’ll cherish. We hope this crochet puff sleeve top tutorial has inspired you to pick up your hook and create something beautiful. Don’t forget to share your finished projects with us on Instagram (https://www.instagram.com/tubacrochet_/), TikTok (tiktok.com/@tubacrochet), and Facebook (https://www.facebook.com/tubacrochet/)! We can’t wait to see your stunning creations! Also, feel free to leave a comment below and share your thoughts or ask any questions you may have. We love hearing from our crochet community! Happy crocheting!
download file
Here’s the video link: