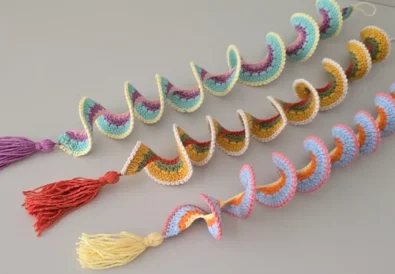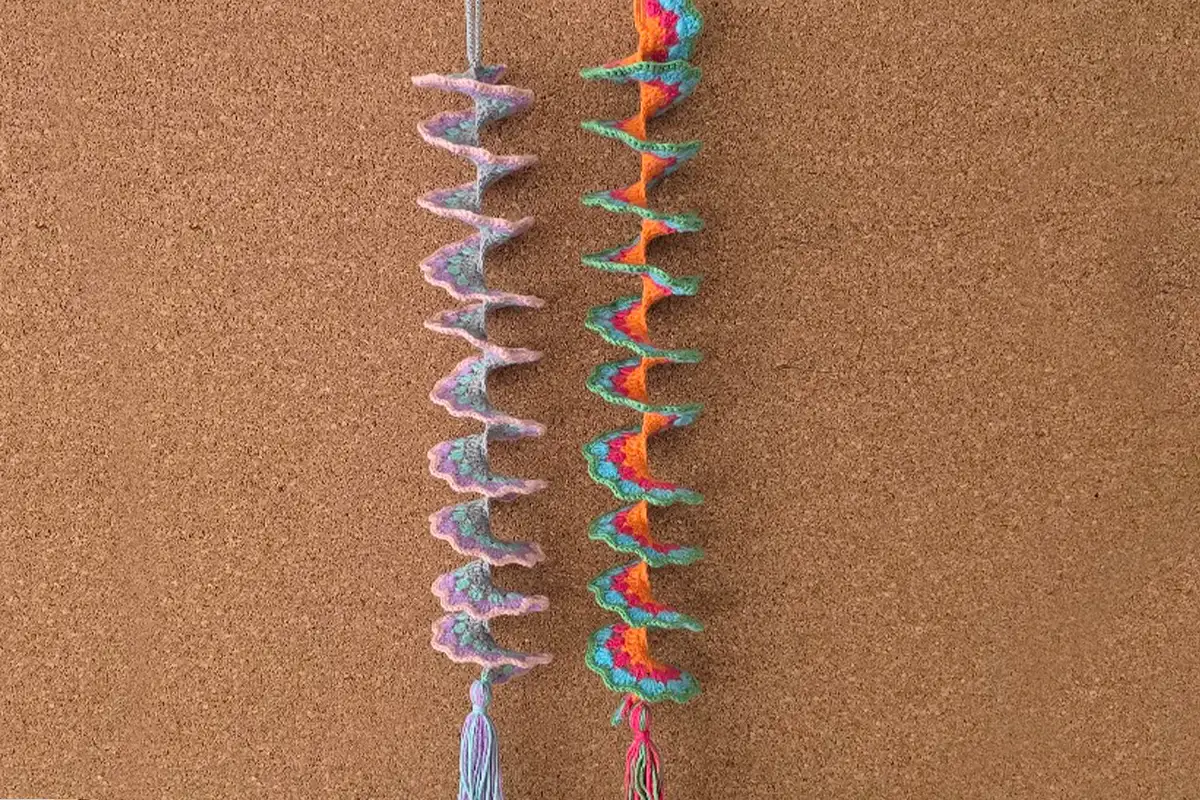
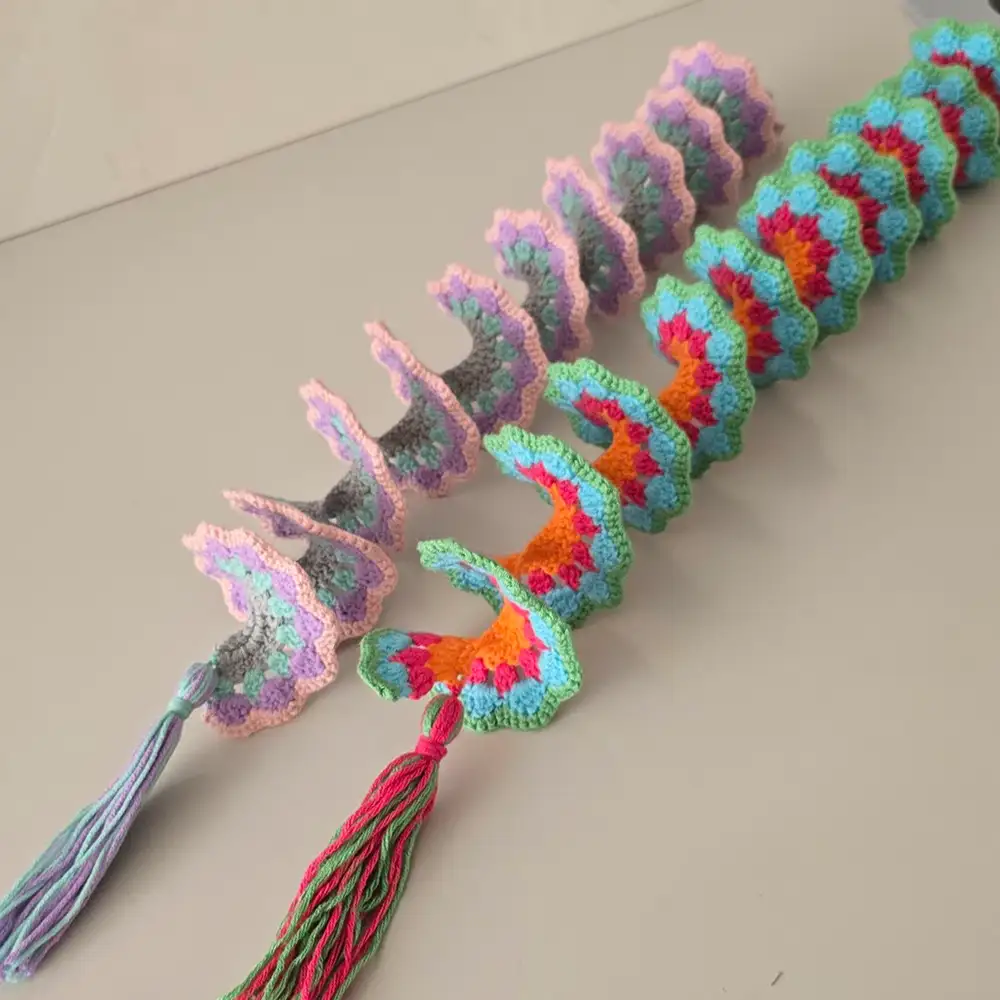
Looking for a creative and decorative summer crochet project? This crochet wind spinner is the perfect choice for adding charm to your garden, balcony, or backyard! In this tutorial, you’ll learn how to make your own decorative wind spinner with just a few basic stitches. Let’s bring motion and color to your space—one spin at a time.

What is a Wind Spinner in Crochet?
A crochet wind spinner is a spiral-shaped mobile that twists beautifully in the wind. It’s a lightweight and eye-catching ornament often used in gardens, balconies, and yards. This version uses simple stitches and color changes to create a vibrant, spinning effect.
Materials You’ll Need for This Crochet Wind Spinner
To get started, gather the following materials:
- 5-ply yarn: 50% acrylic, 50% cotton
- At least 3–4 colors of medium-weight yarn
- 2.50 mm crochet hook (2.20 mm for the hanging loop)
- Yarn needle and scissors
- Optional: tassel for extra flair
You can find the yarn brand mentioned in the YouTube comments for this project.

Step-by-Step Crochet Wind Spinner Instructions
This spinner is worked in 5 easy rows:
- Chain Row: Chain 100 (or more). This will determine your spinner’s length.
- Single Crochet Base: Make 1 single crochet into each chain.
- Double Crochet Increases: Work 2 double crochets into every stitch.
- Granny Groups: Create 3 double crochets, ch 1, skip 1, repeat.
- Fan Stitch Detail: In each chain space, work (hdc, dc, tr, dc, hdc).
- Final Row: Make single crochets across, with 2 sc on every treble crochet.
Add a hanging chain and a tassel at the ends to complete your spinner!
For the full written pattern with row-by-row instructions, download the free PDF
How to Customize the Size and Colors
You can easily adjust the spinner length by making a longer or shorter foundation chain. For a 33 cm spinner, chain 100. For a 40–45 cm version, chain 120–130.
Feel free to mix and match yarn colors! Bright shades look great in outdoor spaces, while neutral tones work well indoors.
Where to Hang Your Garden Wind Spinner
These yard wind spinners look great:
- Hanging from tree branches
- Decorating your front porch
- Twisting from your balcony railing
- Near windows for an indoor breeze effect
They catch the wind beautifully and create a soft spiral movement that’s both relaxing and stylish.
Free PDF Pattern for Your Yard Wind Spinner
Prefer a printable version?
Click here to download the PDF pattern
It includes all instructions in a simple format for offline use. Great for printing or adding to your crochet binder!
Tips for a Perfect Twisting Effect
- Use a mix of stiff and soft yarns for structure
- Always place 2 sc on top of every treble crochet in the final row
- Twist the finished spinner gently before hanging to form the spiral
- Add a tassel for weight and better spinning in outdoor air
Watch the Full Crochet Wind Spinner Tutorial
Prefer to follow along with video?
Watch the step-by-step tutorial on YouTube
Don’t forget to like, comment, and subscribe to support the channel:
@TubaCrochet
Other Summer Crochet Projects You’ll Love
- [Crochet Tulip Flower Coaster – Quick and Easy for Summer]
- [Colorful Wind Spinner]
- [Easy Crochet Tulip Coaster]
- [Beautiful DIY Bouquet – Crochet Tulip Flower]
Frequently Asked Questions (FAQ)
What type of yarn works best for outdoor use?
Cotton or cotton-blend yarns are ideal. They hold shape well and are more weather-resistant than pure acrylic.
Can I make this spinner larger?
Absolutely! Just increase the starting chain and follow the same stitch pattern.
Will it twist properly if I use only one color?
Yes, but using 2–3 colors enhances the spiral effect dramatically.
We hope you enjoyed this summer project!
Got questions or finished your wind spinner?
Share it with us on social media:
Don’t forget to watch the full video, download the free pattern, and subscribe for more beginner-friendly tutorials!