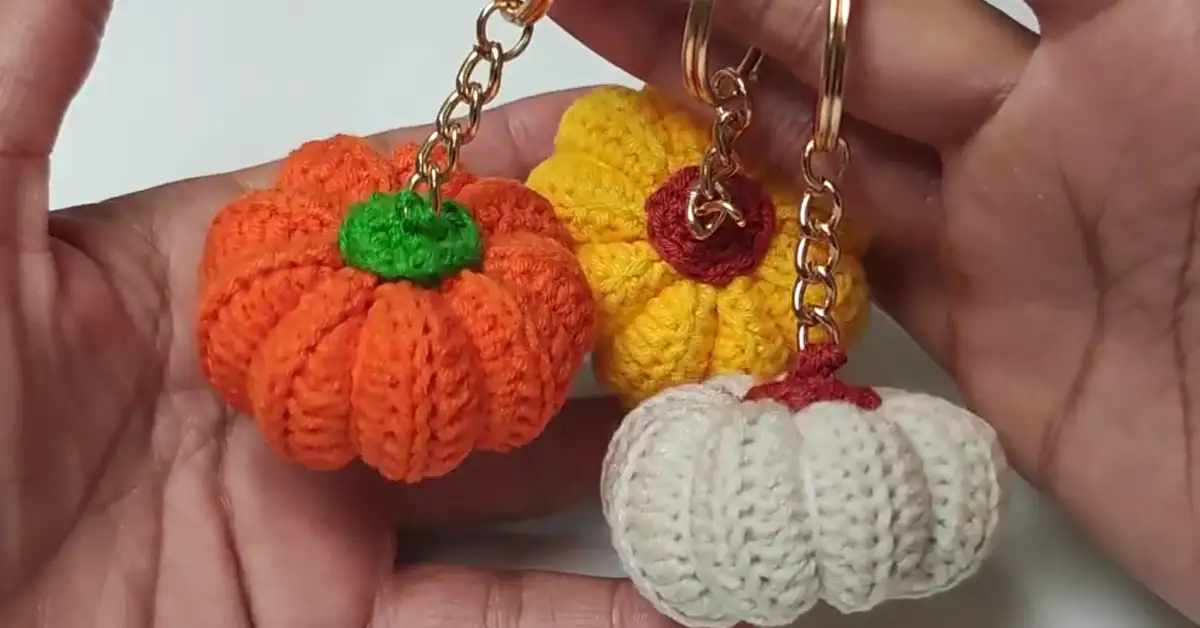
Hey there, fellow crocheters! As you can see, fall is in the air, and what better way to celebrate than with a handmade touch of autumnal charm? In this tutorial, we’re diving into a super cute and easy project: a DIY pumpkin keychain! This beginner crochet project is perfect for adding a pop of seasonal color your bag, keys, or even as a cute little gift for friends and family. Let’s get started!
Introducing this adorable crochet pumpkin keychain! It’s a small, squishy pumpkin, typically made with easy crochet stitches and adorned with a tiny stem. Specifically, its appeal lies in its charming simplicity and versatility. As a result, it’s a great project for beginners who are just starting out with crochet keychain patterns. Moreover, you can easily customize it with different yarn colors create unique variations.
Overall, this crochet pumpkin amigurumi can be used as a keychain, bag charm, or even incorporated into larger fall crochet patterns like garlands or appliqués. The possibilities are endless!
Materials You’ll Need
To begin with, let’s gather our supplies. Specifically, you will need just a few basic materials for this project:
Essential Tools for Your Crochet Pumpkin Keychain
- Crochet Hook: We will be using a 2.5mm crochet hook for this crochet pumpkin keychain pattern. However, you can adjust the hook size if you want a larger or smaller pumpkin.
- Scissors: A sharp pair of scissors is essential for snipping yarn.
- Tapestry Needle: You’ll need a tapestry needle weave in the ends and sew the pumpkin pieces together.
Yarn Choices for a Perfect Crochet Pumpkin Keychain
- Main Color Yarn: We recommend using worsted weight yarn in a cream or orange color for a classic pumpkin look. However, feel free to get creative with your color choices! For instance, you could use a variegated yarn for a unique effect or choose a different color that matches your personal style. Specifically, the yarn used in the video tutorial by @Crochet_Craftsman on their YouTube channel is a cream-colored worsted weight acrylic yarn.
- Stem Color Yarn: A small amount of brown or dark green worsted weight yarn is perfect for the pumpkin stem. In particular, coffee-colored yarn is used in the video tutorial.
- Fiberfill Stuffing: You’ll need some fiberfill stuffing give your pumpkin its shape and make it nice and squishy.


Easy Crochet Pumpkin Keychain Pattern: Step-by-Step Guide
Now that you know what materials you need, let’s dive into the crochet pumpkin keychain pattern! In this tutorial, we will break it down into easy-to-follow steps.
Getting Started:
- Make a Slip Knot: To start, make a slip knot with your main color yarn and place it on your crochet hook.
- Chain 18: After that, chain 18, making sure your chains are not too tight. As you continue, you will work your first row into these chains.
Creating the Pumpkin Shape: Crochet Rows & Stitches
Now, we’ll start building the body of the crochet pumpkin using half double crochet (hdc) stitches. To begin with, let’s define what an hdc stitch is:
Half Double Crochet (hdc): An hdc stitch is a basic crochet stitch that creates a slightly taller stitch than a single crochet (sc). It’s a great stitch for creating texture and is often used in amigurumi projects.
Row 1: Hdc in the 3rd ch from the hook and in each ch across. (16 hdc)
Row 2: Ch 2 (counts as a hdc). Turn your work. Hdc in the back loop only of each st across. (16 hdc)
Rows 3-18: Repeat Row 2. (16 hdc per row)
Finishing Touches: Assembling Your Crochet Pumpkin Keychain
Once you’ve done that, you’ll have a long, flat piece of crocheted fabric. Now, it’s time to transform it into a pumpkin!
- Sew the Ends Together: Ch 1. Cut the yarn, leaving a long tail for sewing. Thread the tail onto your tapestry needle. Sew the ends of the crocheted piece together using the back loops of the hdc stitches form the top of the pumpkin.
- Turn Inside Out & Stuff: Turn the pumpkin inside out so the seams are on the inside. After, stuff the pumpkin with fiberfill.
- Cinch & Close: Cinch the top closed by sewing in a zig-zag pattern across the opening. Similarly, cinch the bottom closed.
- Create the Segments: Finally, use your tapestry needle and yarn tail sew through the rows of hdc, creating the classic pumpkin indentations.
How to Crochet a Pumpkin Keychain: Tips & Tricks
In this section, we will discuss some helpful tips and tricks for making your crochet pumpkin keychain even better!
Troubleshooting Your Crochet Pumpkin Keychain
- Uneven Stitches: If your stitches are uneven, try using a consistent tension throughout your work. Specifically, make sure you are not pulling your yarn too tight or too loose.
- Pumpkin Not Round Enough: If your pumpkin is not round enough, try stuffing it more firmly with fiberfill. Alternatively, you can try using a smaller crochet hook.
Making a Neater Crochet Pumpkin Keychain
- Weaving in Ends: Definitely, take your time weaving in the ends neatly so they don’t show. This will give your crochet pumpkin a more polished look.
- Seamless Join: Moreover, when sewing the ends of the pumpkin together, try use a seamless join for a professional finish.
Customizing Your Crochet Pumpkin Keychain Colors
- Seasonal Colors: For example, you can use traditional orange or cream for a classic pumpkin look. Alternatively, you can use shades of brown, green, or even white for a unique twist.
- Fun Stripes: As you can see, you can create stripes by changing colors every few rows. In other words, this can add a fun and playful touch your crochet pumpkin keychain.
- Spooky Faces: Lastly, you can add embroidered faces or details with black yarn create spooky Halloween-themed pumpkins.


Crochet Pumpkin Keychain Variations & Ideas
Now that you know the basics, let’s explore some fun variations and ideas for your crochet pumpkin keychain!
Mini Crochet Pumpkin Keychain: Adorable Charm
To illustrate, you can create a mini crochet pumpkin by using a smaller crochet hook and fewer rows. These tiny pumpkins make adorable charms for zipper pulls or earrings.
Crochet Pumpkin Keychain with a Face: Spooky Fun
Indeed, you can add a spooky or cute face your crochet pumpkin keychain by embroidering features with black yarn. For instance, you can add eyes, a nose, and a mouth for a Jack-o’-lantern look.
Fall Decoration
Lastly, consider making multiple crochet pumpkin keychains and stringing them together create a festive fall garland. In fact, this is a great way add a handmade touch your home décor.
Show Off Your Crochet Pumpkin Keychain: Sharing & Gifting
Moving on, let’s talk about ways showcase your beautiful crochet pumpkin keychain!
Photographing Your Crochet Pumpkin Keychain
To begin, take some beautiful photos of your finished crochet pumpkin keychain. Undoubtedly, good lighting and a simple background will help your creation shine.
Giving a Handmade Crochet Pumpkin Keychain as a Gift
To put it another way, these crochet pumpkin amigurumi make wonderful handmade gifts for friends and family. As a result of this, you can personalize them by choosing colors that match the recipient’s preferences.
Selling Your Crochet Pumpkin Keychain Creations
Certainly, if you’re feeling entrepreneurial, you can even sell your crochet pumpkin keychains online or at craft fairs. In conclusion, these adorable little pumpkins are sure be a hit!
Crochet Pumpkin Keychain Pattern (Written Instructions)
To sum up, here’s a written version of the crochet pumpkin keychain pattern for easy reference. You can also download a free PDF version of this pattern at “https://crochetstrends.com/wp-content/uploads/2024/09/Crochet-Pumpkin-Keychain.pdf“.
Pumpkin Body:
Row 1: Make a slip knot with cream yarn. Ch 18. (Make sure your chains aren’t too tight.) Hdc in the 3rd ch from the hook and in each ch across. (16 hdc)
Row 2: Ch 2 (counts as a hdc). Turn your work. Hdc in the back loop only of each st across. (16 hdc)
Rows 3-18: Repeat Row 2. (16 hdc per row)
Finishing the Body:
- Ch 1. Cut the yarn, leaving a long tail for sewing.
- Thread the tail onto a tapestry needle.
- Sew the ends together using the back loops of the hdc stitches form the top of the pumpkin.
- Turn the pumpkin inside out.
- Weave in the yarn tail and hide it.
- Cinch the top closed by sewing in a zig-zag pattern across the opening.
- Stuff the pumpkin with fiberfill.
- Cinch the bottom closed, again working in a zig-zag pattern.
- Create the pumpkin segments by sewing over and under each row with your tapestry needle and yarn tail.
Pumpkin Stem:
Round 1: Make a magic circle with coffee-colored yarn. Ch 1. 8 sc in the circle. Pull the magic circle tail cinch it closed. Sl st in the first sc.
Round 2: Ch 1. 2 sc in the next st. Sc in the next st, 2 sc in the next st. Repeat from * around. (12 sc)
Finishing the Stem:
- Sl st in the first ch.
- Ch 1.
- Cut the yarn, leaving a long tail for sewing.
Attaching the Stem:
- Thread the yarn tail onto your tapestry needle.
- Sew the stem the top (or bottom, if you prefer) of the pumpkin.
Attaching the Keychain Clip:
- Insert the tapestry needle through the center of the stem, bringing it out through the bottom of the pumpkin.
- Attach the keychain clip the yarn loop.
- Weave the yarn tail through the stitches at the bottom of the pumpkin hide it.
Sizing Tips & Variations:
- Larger Pumpkin: Besides following the basic pattern, you can increase the starting chain and add more rows continue increasing until you reach your desired size. Equally important, remember keep the stitch count consistent in each row after the initial chain.
- Smaller Pumpkin: Furthermore, you can decrease the starting chain and work fewer rows make a smaller pumpkin. Additionally, you can also use a smaller crochet hook.
- Color Variations: Finally, get creative with your yarn colors! For example, try using variegated yarn, stripes, or different colors for the stem and body.
Note on Increasing and Decreasing:
While this pattern doesn’t require traditional increasing or decreasing, you can modify it make pumpkins of different shapes.
- Increasing: Work 2 hdc in one stitch add stitches.
- Decreasing: Work an invisible decrease (combine two stitches into one) remove stitches.
Watch the Video Tutorial
To wrap up, we highly recommend watching the video tutorial by @Crochet_Craftsman for a visual guide this crochet pumpkin keychain pattern: “https://www.youtube.com/watch?v=GTWzIWlQYj0“. First of all, it’s a great way see the stitches and techniques in action.
Connect With Us!
To wrap up, don’t forget to share your completed crochet pumpkin keychain on Instagram at @tubacrochet_, TikTok at tiktok.com/@tubacrochet, and Facebook at tubacrochet. We love seeing your creations and hearing about your crafting experiences!
Other Crochet Projects You’ll Love:
If you enjoyed making this crochet pumpkin keychain, be sure to check out some of our other crochet projects:
Conclusion
To sum up, this crochet pumpkin keychain is a fun and easy project that’s perfect for fall.In general, it’s a great way add a handmade touch your everyday items or create thoughtful gifts. In summary, with its simple design and endless customization options, this pattern is sure become a favorite among crocheters of all levels. In short, happy crocheting!


