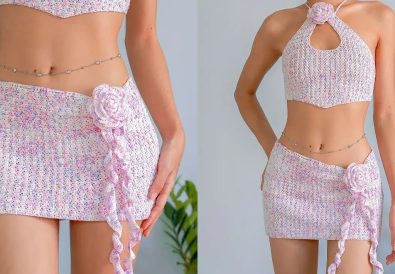
Summer is the perfect time for breezy, comfortable clothing, and what could be better than a pair of chic crochet shorts you made yourself? This free crochet shorts pattern is surprisingly beginner-friendly and allows for tons of customization. Whether you dream of relaxed beachwear or fashion-forward high waisted shorts, this pattern is your key to summer style. Let’s dive in!
Gather Your Supplies: Choosing the Perfect Crochet Shorts Pattern
Before we start crocheting, let’s gather our tools:
- Yarn: Choose a soft, lightweight yarn in your desired color. Acrylic or cotton blends work beautifully for summer.
- Crochet hook: A 3mm hook is recommended for this project, but check your yarn label.
- Scissors: For finishing your shorts.
- Tape Measure: To ensure proper sizing.
- Stitch markers: Helpful for keeping track of rows and stitches.
- Weaving needle: For seamlessly finishing off your crochet project.
Crochet Shorts Pattern Basics: Stitches and Techniques
This pattern uses basic crochet stitches, perfect for beginners! Here’s a quick refresher:
- Chain stitch (ch): The foundation of most crochet projects.
- Slip stitch (sl st): Used to join rounds or move across stitches.
- Single crochet (sc): Creates a dense, sturdy fabric.
- Double crochet (dc): Adds height and creates an airy pattern.
Feeling Rusty?
If you need a refresher on these stitches, there are tons of helpful online tutorials!
Step by Step Crochet Shorts Pattern: Front and Back Panels
The shorts are constructed in two panels (front and back), then joined. Follow the detailed written pattern below. Remember, customization is key! Measure as you go for the perfect fit.
Written Pattern:
Gauge:
- A gauge swatch is recommended to ensure your finished project matches the desired size. Make a 4” x 4” square using double crochet stitches. Count the number of stitches and rows per inch, and use the information to calculate how many chains you’ll need for your starting chain.
Waistband:
- Chain (ch) a multiple of 4, plus 3 (refer to the gauge notes below).
- Dc in each ch across. Turn.
- Repeat row 2 for 2-3 more rows (or until you reach your desired waistband width). Turn.
Gauge Notes: To figure out how many chains to start with, make a test swatch of 4 inches using dc stitches. Measure the number of stitches per inch and multiply that by your desired waist size. Add 3 chains. Example: 4 stitches/inch x 28-inch waist = 112 + 3 = 115 starting chains.


Body:
Front Panel:
- Row 1: Ch 3 (counts as the first dc), dc in each st across. Turn.
- Row 2: Ch 3, dc in each st across. Turn.
- Repeat row 2 until the panel reaches the desired length (hold it up to yourself to measure).
Back Panel
- Repeat the instructions for the front panel.


Shaping the Hips (Optional):
- Next Row (Front & Back): Ch 3, dc across until the last 3 sts, skip 1 st, dc in the last 2 sts. Turn.
- Repeat: Continuing decreasing 1 st at the end of each row until you reach the desired hip width. Then continue with straight dc rows until the panels reach the desired leg opening length.
Leg Openings:
- Decrease Row: Ch 3, dc across all but the last 3 sts, slip stitch (sl st) the last 3 sts together. Turn.
- Continue decreasing 1 st at the end of each row until you reach the desired leg opening width.
Finishing:
- Fasten off the yarn and weave in all ends.
- Optional Edging: Add a row of sc around the leg openings and waistband for a polished finish.
- Optional Drawstring: Leave the first row of dc stitches slightly loose at the waistband to create a casing. Thread a drawstring or ribbon through the casing.


Customizing Your Crochet Shorts Pattern: It’s All in the Details
- Length: Adjust the number of rows.
- Fit: Increase/decrease more gradually for shaping.
- Color: Experiment with stripes, blocks, or different colors for panels
- Details: Add fringe, lace edging, buttons – get creative!
- Lace: Add a delicate lace edging for a feminine touch.
Tips:
- Use stitch markers to track the beginning/end of rows and center stitches.
- Measure as you go! Customize the fit based on your measurements.
- Embrace your creativity and personalize this pattern to express your style!
Crochet Shorts Pattern: Mastering Basic Stitches
Check out the wonderful tutorial on the Yarns and Fins Youtube channel ([https://www.youtube.com/@YarnsandFins]) for a fantastic visual guide alongside this written pattern. The video’s clear demonstrations are perfect if you want to see the stitches in action! Here’s the direct link: https://www.youtube.com/watch?v=gdzc3SlD7Gc
Share Your Creations!
I’d love to see how your crochet shorts turn out! Share your finished projects on Instagram (@tubacrochet_) and TikTok (tiktok.com/@tubacrochet) – let’s inspire each other!
Community Corner
Got questions or want to show off your progress? Leave a comment below and join our crochet community!
Other Crochet Projects You’ll Love
Inspired to create more? Try these crochet patterns:
- Crochet crop tops: Perfect for pairing with your new shorts!
- Summery crochet bags: Complete your beachy ensemble.
- Crochet hats: Protect yourself from the sun in style.
Congratulations on creating your very own pair of crochet shorts! Their comfort and unique charm are sure to make them your new favorites. I hope this pattern has ignited your passion for crochet and inspired you to explore endless creative possibilities. Happy crocheting!


