
Crochet sleeves are a trendy and versatile addition to any wardrobe, and for beginners looking for a rewarding project, this is it!
Crafting the Perfect Crochet Sleeves: A Beginner’s Guide
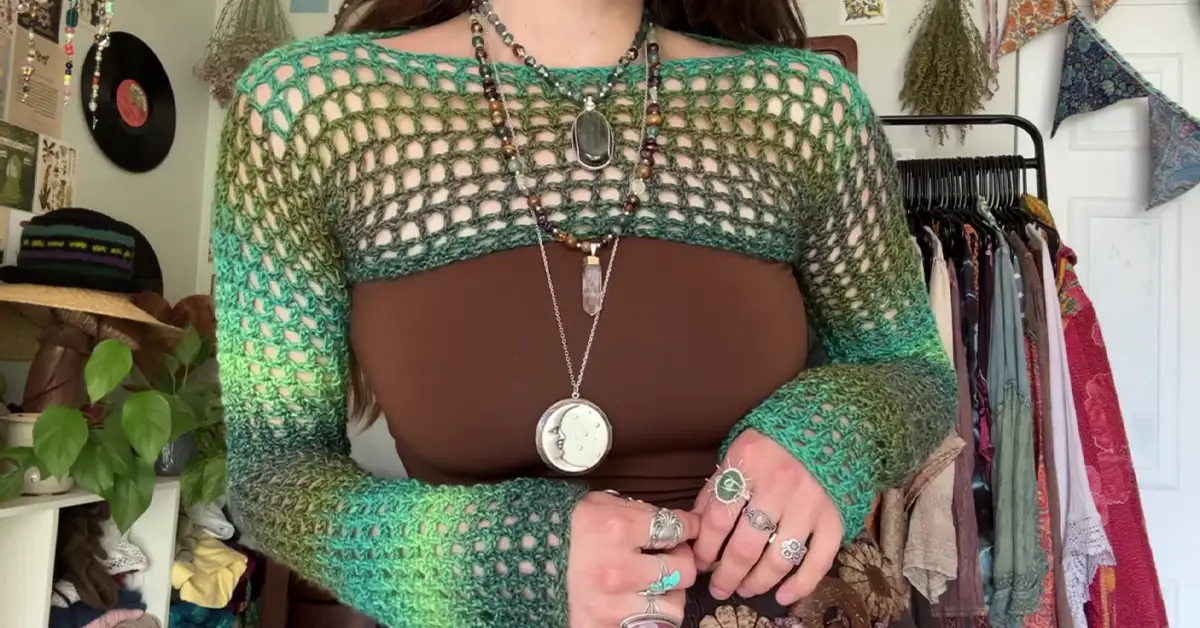
Crochet sleeves offer a unique way to add a touch of handmade charm to your outfits. Whether you’re layering them over a tank top or adding them to a dress, they instantly elevate your style. This easy crochet sleeve pattern is perfect for those just starting their crochet journey, and in this tutorial, we’ll guide you through each step. To begin with, let’s talk about the appeal of crochet sleeves for women. They’re lightweight, breathable, and can be customized to fit your personal style. Plus, they’re a fantastic way to use up leftover yarn! To start, let’s gather our supplies.
Easy Crochet Sleeves for Women: A Step-by-Step Tutorial
Firstly, let’s dive into the crochet sleeves pattern. This beginner crochet sleeves project is surprisingly simple, even if you’ve never picked up a crochet hook before. In fact, with a little patience and practice, you’ll be amazed at what you can create. Initially, it might seem a bit daunting, but as you can see from the detailed crochet sleeve instructions, it’s quite manageable. Specifically, we’ll focus on creating crochet mesh sleeves, which offer a beautiful, airy texture. Likewise, you can adapt this pattern for crochet lace sleeves with a few modifications. Undoubtedly, this tutorial will empower you to create unique crochet sleeve designs for women.
No Sewing Required!
One of the best things about this crochet sleeves free pattern is that it requires absolutely no sewing! Therefore, it’s a fantastic option for those who prefer to avoid needles and thread. As a result, you can enjoy the satisfaction of creating a completely handmade garment from start to finish. Consequently, you’ll have a pair of stylish crochet sleeves that are truly one-of-a-kind. Because of this, you’ll be able to express your creativity and personalize your wardrobe.
Crochet Sleeve Pattern: Free and Easy to Follow
We’re excited to offer you this free crochet sleeve pattern, designed to be both stylish and accessible. Moreover, the instructions are clear and concise, making it easy to follow along. Furthermore, we’ve included helpful images to guide you through each step. In addition, we’ll provide tips for adjusting the pattern to create different sizes and styles of crochet sleeves. First of all, let’s talk about the materials you’ll need.
Gathering Your Supplies: What You Need for Crochet Sleeves
- Yarn: Approximately 270 yards of worsted weight yarn. We recommend Lion Brand Ferris Wheel, as seen in the video by @HannahDrapinski (https://www.youtube.com/@HannahDrapinski). This yarn comes in beautiful color variations and is perfect for creating crochet summer sleeves. You can also experiment with different colors and textures.
- Crochet Hook: Size 5 (H/8) – or a size that works best with your chosen yarn.
- Scissors
- Tapestry Needle: For weaving in ends.
Choosing the Right Yarn for Your Crochet Sleeves
The type of yarn you choose will affect the overall look and feel of your crochet sleeves. For instance, a lighter weight yarn will create a more delicate and airy fabric, while a heavier yarn will result in a warmer and more substantial garment. To illustrate, you could use a cotton yarn for crochet summer sleeves or a wool blend for crochet arm warmers. Indeed, experimenting with different yarns is a great way to add your personal touch to the design.
Understanding the Crochet Stitches
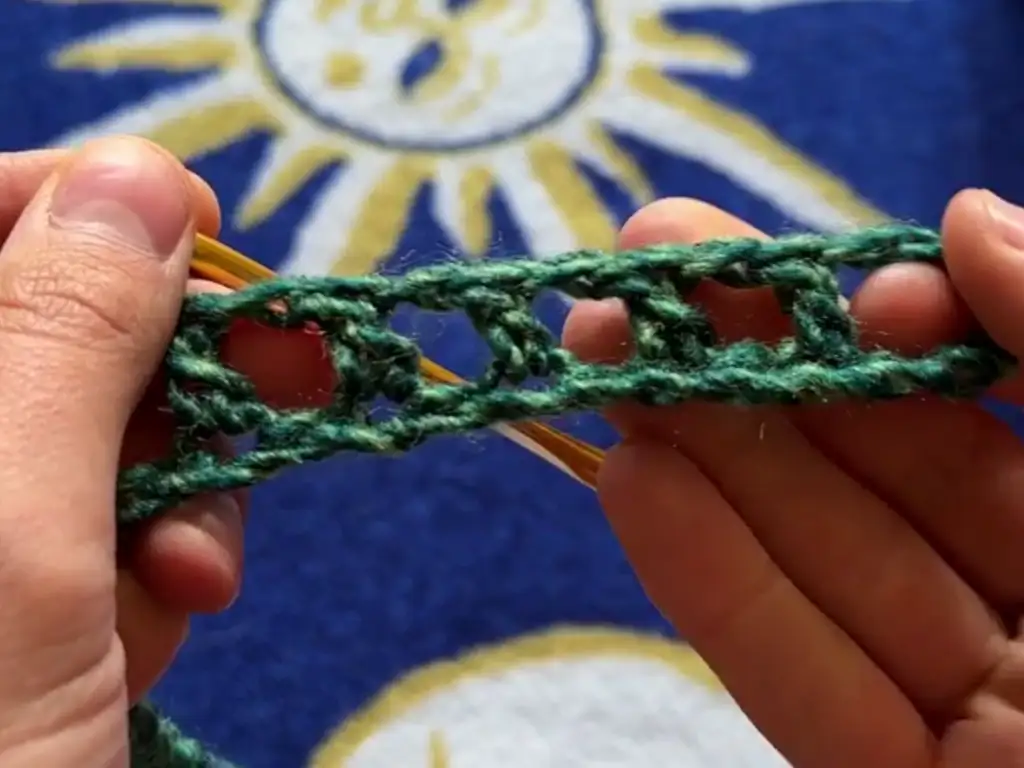
This crochet sleeves pattern primarily uses the double crochet (dc) stitch. Most importantly, practice this stitch before starting the project if you’re new to crochet. Notably, the pattern also includes chain stitches (ch) for spacing and creating the mesh design. Nevertheless, even with just these two basic stitches, you can create beautiful and intricate crochet sleeves.
Ideas for Every Occasion
Crochet sleeves are incredibly versatile and can be styled for a variety of occasions. Despite this, many people don’t realize their potential. Introducing some ideas to inspire you! In addition to the classic crochet shrug pattern, you can create crochet sleeves patterns for summer tops, adding a touch of bohemian flair to your warm-weather outfits. To sum it up, crochet sleeves offer endless possibilities for expressing your personal style.
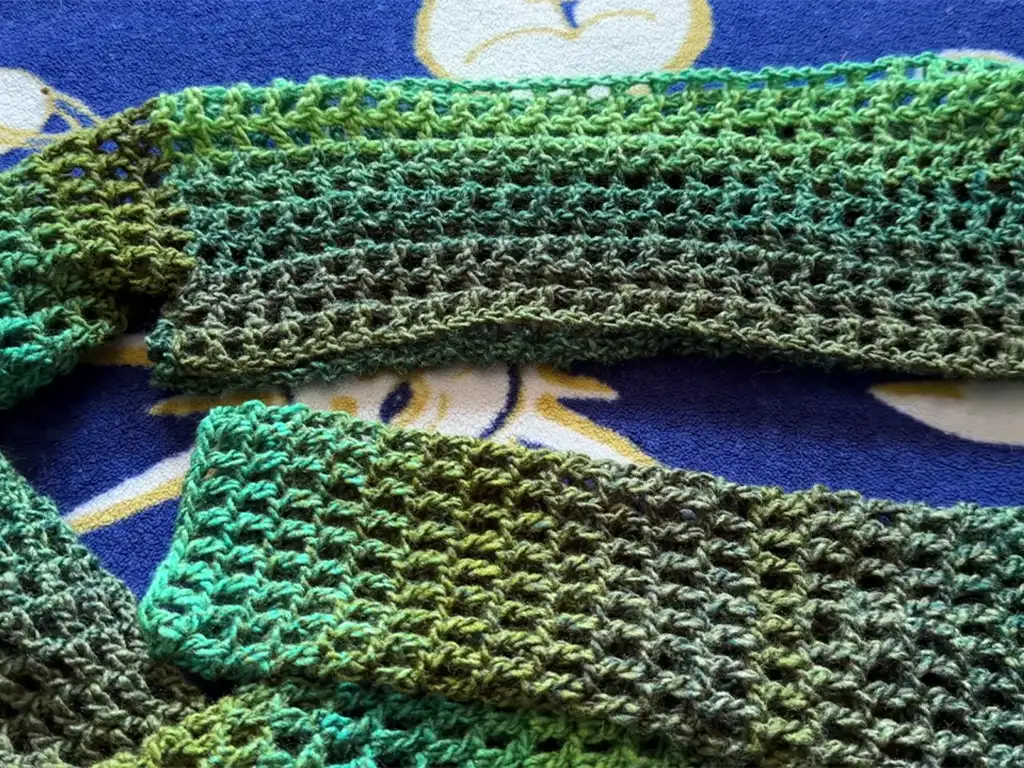
Crocheting the Basic Mesh Pattern: The Foundation of Your Sleeves
The foundation of this crochet sleeves pattern is a simple mesh pattern, created by alternating double crochet stitches with chain spaces. In addition to providing a beautiful texture, this mesh design also allows for breathability, making these sleeves perfect for warmer weather. To begin, you’ll create a foundation chain based on the width of your shoulders.
Creating the Neck Hole: A Comfortable Fit for Your Sleeves
Afterward, you’ll shape the neck hole by chaining a specific number of stitches. Definitely, this is a crucial step in ensuring a comfortable fit for your crochet sleeves. Actually, it’s important to try on the sleeves as you go to make sure the neck hole is the right size. Really, this is a great opportunity to personalize the fit.
Adding the Armholes: Shaping Your Crochet Sleeves
Then, you’ll create the armholes by slip stitching together a few stitches on each side of the sleeve. Additionally, you can adjust the size of the armholes based on your preference. Before you start crocheting around the armholes, make sure they fit comfortably.
Crocheting Around the Armhole: A Seamless Design
Currently, you’ll begin crocheting in rounds, working around the armhole opening. During this process, you’ll continue the mesh pattern, creating a seamless and flowing design. Before you finish, be sure to check the length of the sleeves to ensure they’re the desired length.
Finishing Your Crochet Sleeves: The Final Touches
Immediately, after you’ve reached the desired length, you’ll finish off the sleeves by slip stitching into the next stitch and weaving in any loose ends. Meanwhile, take your time with this step to ensure a neat and polished finish. After that, you can proudly wear your handmade crochet sleeves!
Tips for Customizing Your Crochet Sleeves: Size and Style
After completing your first pair of crochet sleeves, you might want to experiment with different sizes and styles. That’s where customization comes in! Subsequently, you can adjust the foundation chain to create wider or narrower sleeves. What’s more, you can try different yarn weights and colors to create a variety of looks. Conversely, you can also add embellishments like beads or fringes to personalize your crochet sleeves even further. Hence, the possibilities are endless!
Working in Rounds: Creating a Seamless Sleeve
In particular, working in rounds is a key technique for creating seamless crochet sleeves. Now, let’s delve into the details of this technique. Since then, this method has become increasingly popular for creating various crochet projects. Soon, you’ll master this technique and be able to create beautiful and professional-looking crochet sleeves. Such as with many crochet techniques, practice makes perfect! Namely, focusing on maintaining consistent tension will help you achieve a smooth and even fabric.
Adjusting the Length and Width of Your Sleeves
Above all, it’s important to remember that you can customize the length and width of your crochet sleeves to your liking. Adjacent to the instructions provided, you can add or subtract rows to achieve the desired length. Below, we’ll provide some tips on how to make these adjustments. For instance, if you want longer sleeves, simply continue crocheting in rounds until you reach the desired length. To illustrate, you can measure your arm to determine the perfect length for your crochet sleeves.
Adding Color and Texture to Your Crochet Sleeves
In fact, one of the most exciting aspects of crocheting is the ability to play with color and texture. Indeed, you can use a single color yarn for a classic look or experiment with multiple colors to create a more vibrant and eye-catching design. Most importantly, choose colors that complement your personal style and wardrobe. Notably, you can also incorporate different stitch patterns to add texture to your crochet sleeves. Nevertheless, even with a simple mesh pattern, you can achieve a beautiful and textured fabric by using a variegated yarn. Despite this, many crocheters shy away from experimenting with color, but don’t be afraid to get creative!
Styling Your Crochet Sleeves: From Casual to Chic
Introducing some styling tips for your new crochet sleeves! In addition to layering them over tank tops and dresses, you can also wear them with t-shirts, blouses, and even sweaters. To sum itup, crochet sleeves are a versatile accessory that can be dressed up or down. Ultimately, the possibilities are endless!


Crochet Sleeves Pattern: Written Instructions
Foundation Row:
- Make a slip knot.
- Ch a number of stitches equal to the width of your shoulders, ensuring the number is even. (Example: 54 ch)
- Dc in the 6th ch from the hook.
- Ch 1, skip next ch, dc in next ch. Repeat across the row.
- Dc in the last ch.
- Ch 3 (counts as a dc and ch 1 for the next row).
- Turn.
Rows 2-10 (Mesh Pattern):
- Dc in the top of the next dc (the one directly underneath the ch-1 space).
- Ch 1, skip next ch-1 space, dc in the top of the next dc. Repeat across the row.
- Dc in the top of the turning ch-3 from the previous row.
- Ch 3, turn.
Neck Hole Shaping:
- Work the mesh pattern for 5 or 6 dc (adjust this number for desired shoulder coverage).
- Count the number of stitches remaining on your hook (including the ch-1 spaces). Let’s call this number “X”.
- Ch X, then dc in the corresponding stitch on the other side of the foundation chain (6th ch from the end).
- Work the mesh pattern across the remaining stitches.
- Ch 3, turn.
Rows 11-20 (After Neck Hole):
- Continue working the mesh pattern, as established in rows 2-10.


Armhole Shaping:
- Fold the piece in half, lining up the shoulder seams.
- With the wrong sides facing, locate the stitch approximately two rows down from the shoulder seam.
- Sl st the corresponding stitches together on both sides of the sleeve, creating a small opening for the armhole. (You may need to adjust the number of slip stitches based on your arm circumference.)
- Repeat for the other side of the sleeve.
- Ch 3.
Sleeve Circumference (Rows 21- onward):
- Now working in rounds, dc in the top of the next dc.
- Ch 1, skip next ch-1 space, dc in the top of the next dc. Repeat around the entire armhole opening.
- When you reach the beginning of the round, sl st the last dc into the top of the starting ch-3.
- Ch 3, and continue working in rounds following the established mesh pattern.
Sleeve Length:
Continue working in rounds until the sleeve reaches your desired length. (Example: 39 rows)
Finishing:
- Sl st into the next stitch.
- Ch 1.
- Cut yarn and weave in all ends.

Increasing and Decreasing:
To increase the width of your sleeves, add more chains in the foundation row. To decrease the width, use fewer chains. You can also increase or decrease stitches along the circumference of the sleeve by adding or skipping stitches.
Tips and Tricks:
- Keep your tension consistent throughout the project for a neat and even finish.
- Try on the sleeves as you go to ensure a comfortable fit.
- Don’t be afraid to experiment with different yarn colors and textures.
Conclusion: Embrace the Art of Crochet Sleeves
In conclusion, crochet sleeves offer a fantastic opportunity to add a touch of handmade charm to your wardrobe. In general, this project is perfect for beginners, and the results are truly rewarding. Briefly, with a little practice, you’ll be able to create beautiful and stylish crochet sleeves that are perfect for any occasion. In summary, we encourage you to give this easy crochet sleeves pattern a try and unleash your creativity!
Be sure to share your finished projects on Instagram, TikTok, and Facebook. You can find me on Instagram here, TikTok here, and Facebook here. And don’t forget to check out the original tutorial by @HannahDrapinski on her YouTube channel. Watch the video here.
In this tutorial, we’ve covered everything you need to know to create your own beautiful crochet sleeves. To begin with, we discussed the materials and techniques involved. Now that you know the basics, it’s time to put your skills to the test!
As well as being a stylish accessory, crochet sleeves are also a great way to practice your crochet skills. Specifically, you’ll learn how to work in rounds, create a mesh pattern, and shape the neck and armholes. Overall, this project is a fantastic introduction to the world of crochet.
Likewise, if you’re looking for a quick and easy project, crochet sleeves are a great option. Nonetheless, even though they’re relatively simple to make, they still offer a lot of room for creativity. Still, don’t be afraid to experiment with different colors, textures, and embellishments. Even though you might make a few mistakes along the way, don’t give up! Initially, it might seem challenging, but with practice, you’ll become more confident in your skills.
Accordingly, we’ve provided detailed instructions and helpful tips to guide you through the process. Primarily, our goal is to empower you to create beautiful and unique crochet sleeves that you’ll love to wear. Notably, this pattern can be adapted to create a variety of different styles, so feel free to get creative! Significantly, this project is a great way to express your personal style and add a touch of handmade charm to your wardrobe.
Other Crochet Projects You’ll Love
If you enjoyed making these crochet sleeves, you might also love these other crochet projects:
- Crochet Summer Top
- Crochet Shawls and Wraps
- Crochet Fingerless Glove
- Crochet Headband
- Crochet hat
- Crochet blankets
- Crochet amigurumi
- Crochet bags
We hope you enjoyed this tutorial on how to crochet sleeves. Happy crocheting! Remember to leave a comment below and share your thoughts and experiences. We love hearing from our readers and creating a supportive community for crochet enthusiasts. Don’t hesitate to ask any questions you might have. Happy crafting!


