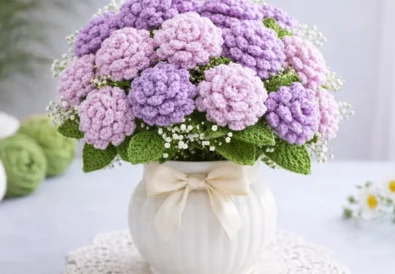
Isn’t crocheting awesome? It is a craft that lets you create beauty. This easy crochet flower pattern is perfect for beginners. Also, it’s rewarding for seasoned crocheters.
Besides, it’s a fun way to use scrap yarn. In this tutorial, we will make a delightful rose. It’s the perfect embellishment for any project. A finished crochet flower adds charm. Again, its potential uses are only bound by your creativity!
The difficulty level is beginner-friendly. Equally important, this handmade crochet flower rose is easy to customize.
This quick crochet flower for beginners is truly versatile. Adorn hats, bags, or blankets with these roses. Finally, you can create unique gifts!
The possibilities are endless. Before diving in, let’s explore what you’ll need.
Unwrap the Magic: Your Easy Crochet Flower Pattern Awaits
Ready to dive into a world of color and texture? This means that crafting your own crochet flower is now easier. Besides, this easy crochet flower pattern makes it simpler.
Let’s gather our supplies. Additionally, let’s set the stage for a fun creation.
Gather Your Tools: The Essential Crochet Supplies
First, you’ll need yarn. In particular, Alize Cotton Gold is fantastic. It’s a blend of cotton and acrylic. This makes it soft and durable. For example, choose your favorite colors. I recommend a lovely blue and a crisp white.
This creates a classic look! This yarn is DK weight. DK yarn is a medium thickness yarn. Next, you’ll need a 2.75 mm crochet hook. Next, scissors are helpful for snipping yarn. A yarn needle weaves in ends neatly.
Additionally, a felt-tip pen is optional. Ultimately, it’s for marking stitch counts if needed.
- Yarn: Alize Cotton Gold (DK weight, blue and white)
- Hook: 2.75 mm crochet hook
- Scissors
- Yarn needle
- Felt-tip pen (optional)
Master the Basics: A Quick Stitch Refresher
If you’re new to crochet, don’t worry! Actually, this pattern uses simple stitches. Let’s briefly explain some terms. Chain stitch (ch): It is the foundation. Wrap the yarn and pull it through the loop. Slip stitch (sl st): Joins stitches. Insert hook, yarn over, pull through all loops. Double crochet (dc): A basic stitch. Yarn over, insert hook, pull through. Yarn over, pull through two loops. As you continue to practice, it gets easier!
Also, understanding these stitches is key. In addition, it will help you with this pattern.
Grab Your Free Pattern: Download and Print Today
Want the written pattern on hand? You can download the PDF for the Crochet Rose Flower Pattern here for free: https://crochetstrends.com/wp-content/uploads/2025/02/Crochet-Rose-Flower-Pattern.pdf
Of course, having a printed pattern is handy. It is especially so when you’re on the go! Following this, you can easily access it while watching the video.
You should follow Tuba Crochet (@TubaCrochet) channel link: “(https://www.youtube.com/@TubaCrochet)” to explore more Crochet Flower Ideas and watch the video that inspired this blog post: https://www.youtube.com/watch?v=feiYmEUwnA0 .
From Zero to Rose: Beginner Crochet Flower Design in Minutes
Ready to create a beginner crochet flower design? It is easier than you think. Primarily, this section guides you to craft a rose. Now, its soft texture and charming design make it awesome. Additionally, this is achievable even in minutes!
Yarn Talk: Choosing the Perfect Cotton Thread
Yarn is key for this easy crochet rose pattern. First of all, I recommend Alize Cotton Gold. As mentioned earlier, it is a cotton-acrylic blend. Also, its soft texture is awesome. Cotton gives structure. Acrylic adds durability. There are a lot of options! Choose a yarn you love. What’s more, consider the fiber content. It should be about 50% cotton for the best results.
Color Palette Perfection: Inspiration for Stunning Flowers
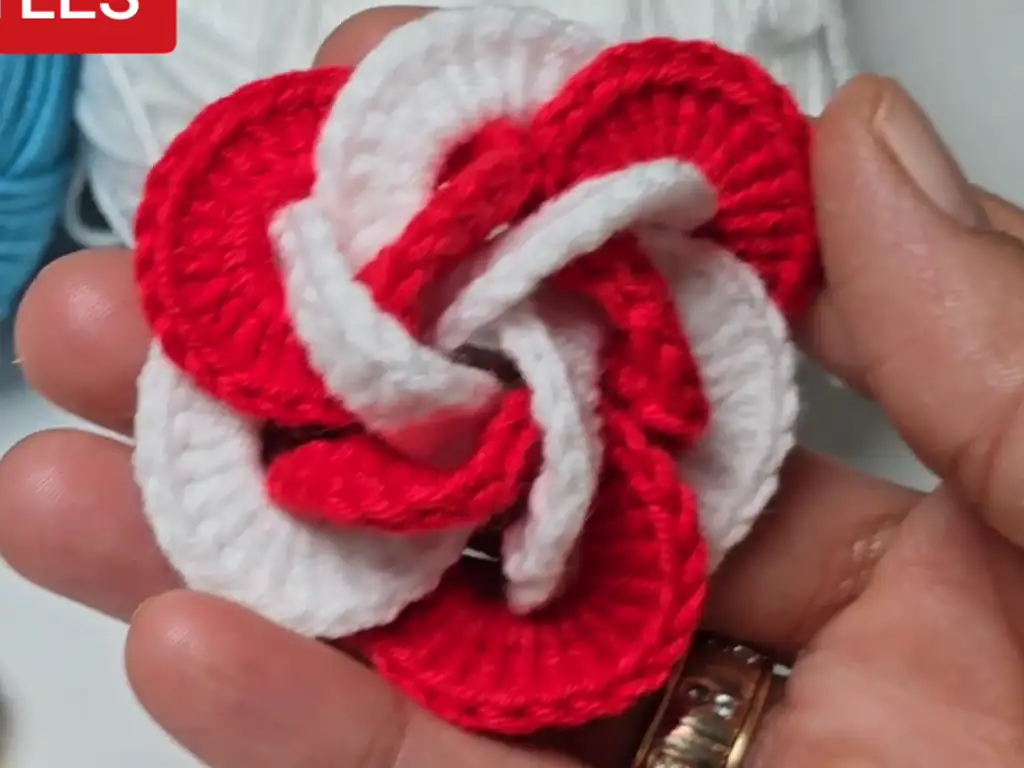
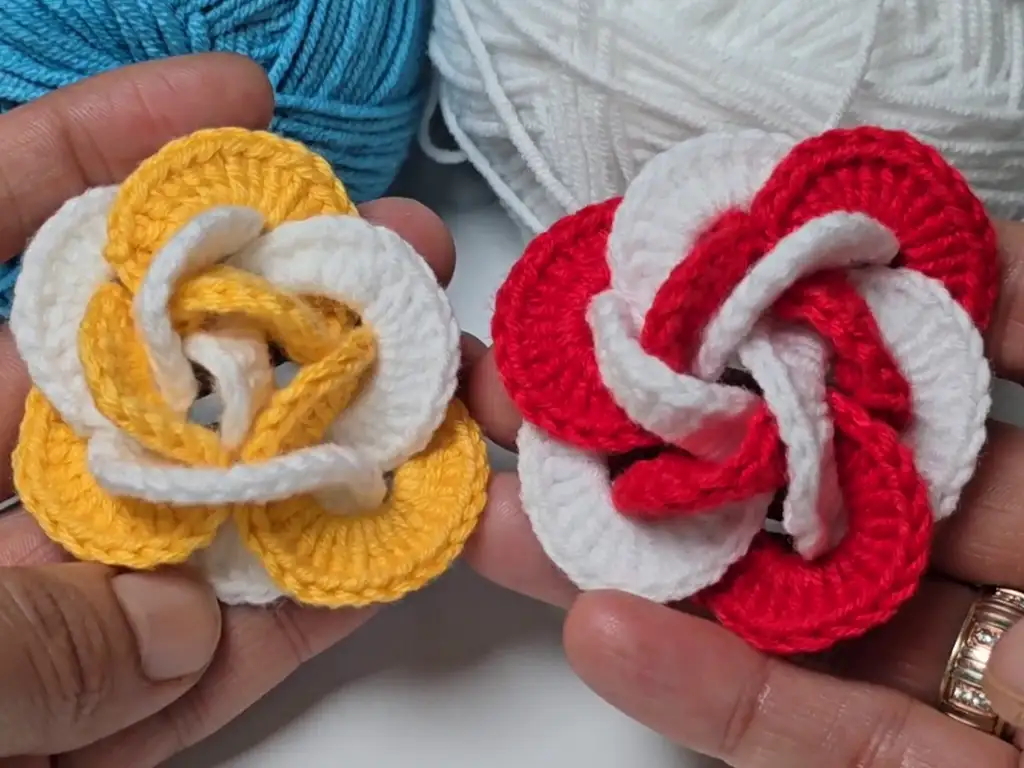
Color makes your flower unique. Definitely, the video uses blue and white. Consider other options! Pinks, purples, or yellows create a vibrant look. What’s more, two-color crochet flower designs look great. A darker shade for the petals works. A lighter shade for the center enhances detail. Moreover, contrasting colors make your petals pop! Ultimately, experiment and have fun with your choices.
Layering Secrets: Achieving Petal Perfection
The secret to this rose is layering. Namely, each round builds on the last. Moreover, each round adds dimension. Definitely, the key is the number of stitches. As you continue, thirty double crochets per round gives the right ruffle. Once you’ve done that adjust the number for different effects. Simultaneously, more stitches create a fuller rose. Less stitches create a tighter one.
Craft Your Own Rose: DIY Crochet Flower Step-by-Step Guide
Ready for action? In this tutorial, we’ll build the rose step-by-step. Ultimately, remember to take your time. A perfect rose takes patience. Here is a step by step method:
Round One: The Magic of the Center Ring
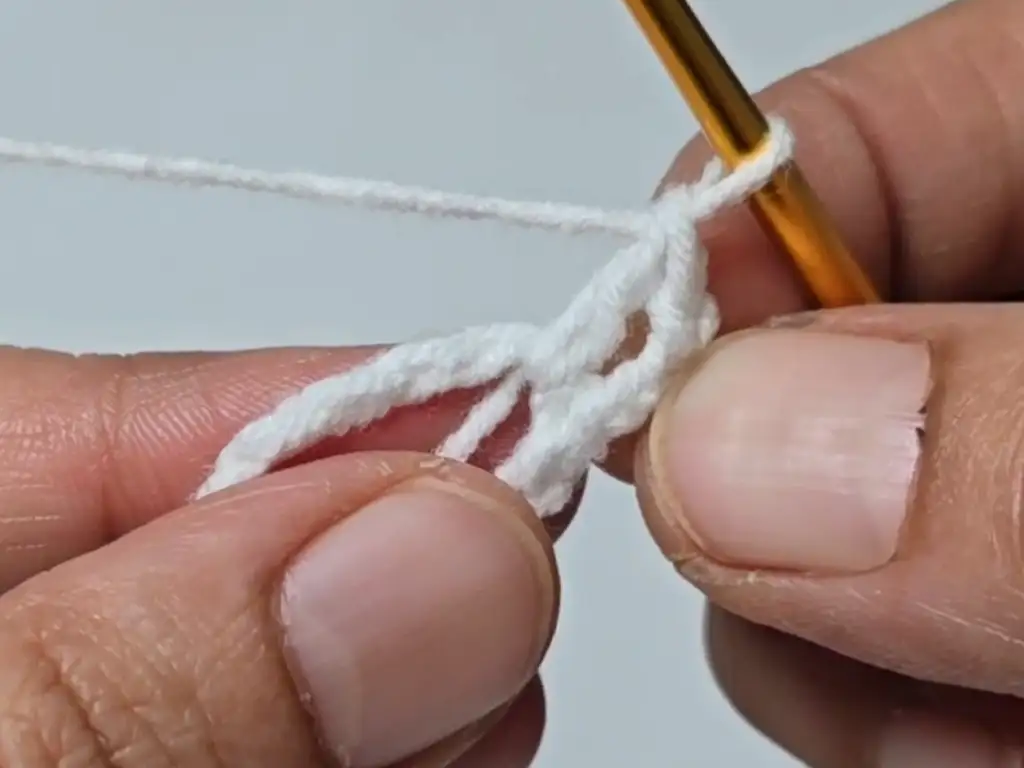
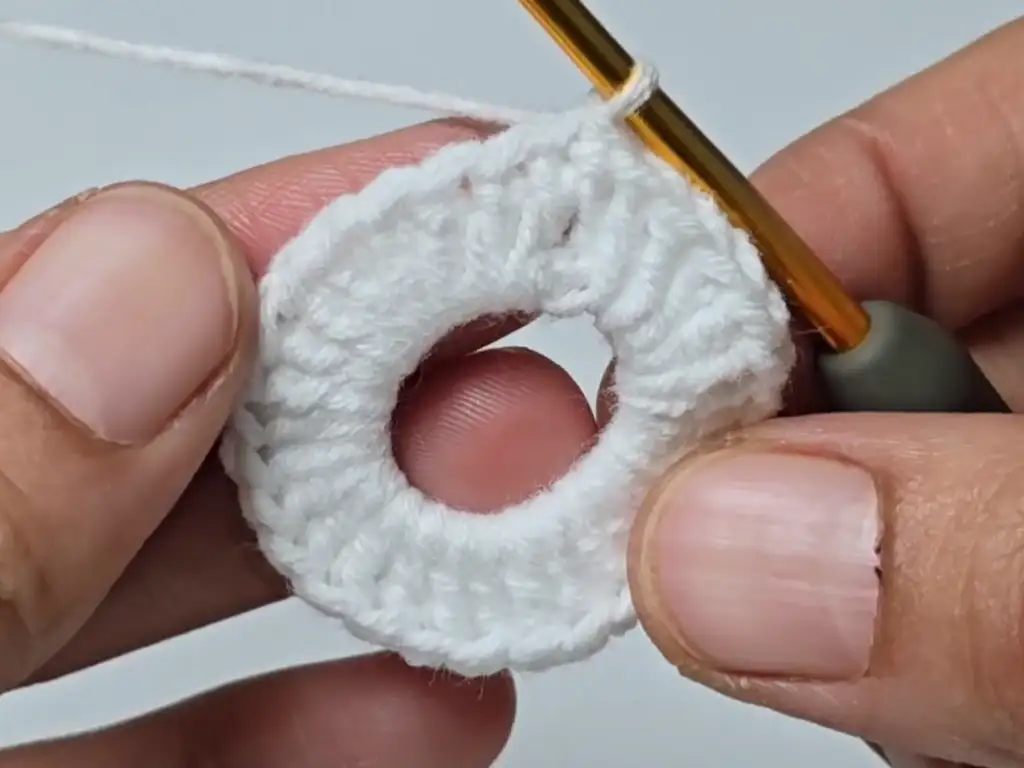
First, make a slip knot. This secures the yarn. After that, chain 13. Additionally, this sets the size. Slip stitch to the first chain to form a ring. Chain 3 (counts as the first double crochet). Now, double crochet into the ring. Afterwards, make a total of 30 double crochets. Slip stitch to the top of the first chain to join. In the end, Fasten off and cut the yarn.
Building the Base: The First Layer of Petals
Switch to your second color. To start, create a slip knot with your blue yarn. Chain 13. Pass this chain behind the first white ring. Slip stitch to the first chain to form a new ring. Primarily, chain 3 (counts as first double crochet).Double crochet into the blue ring. Total should be 30 double crochets. Slip stitch to the top of the first chain to join. Definitely, fasten off and cut the yarn.
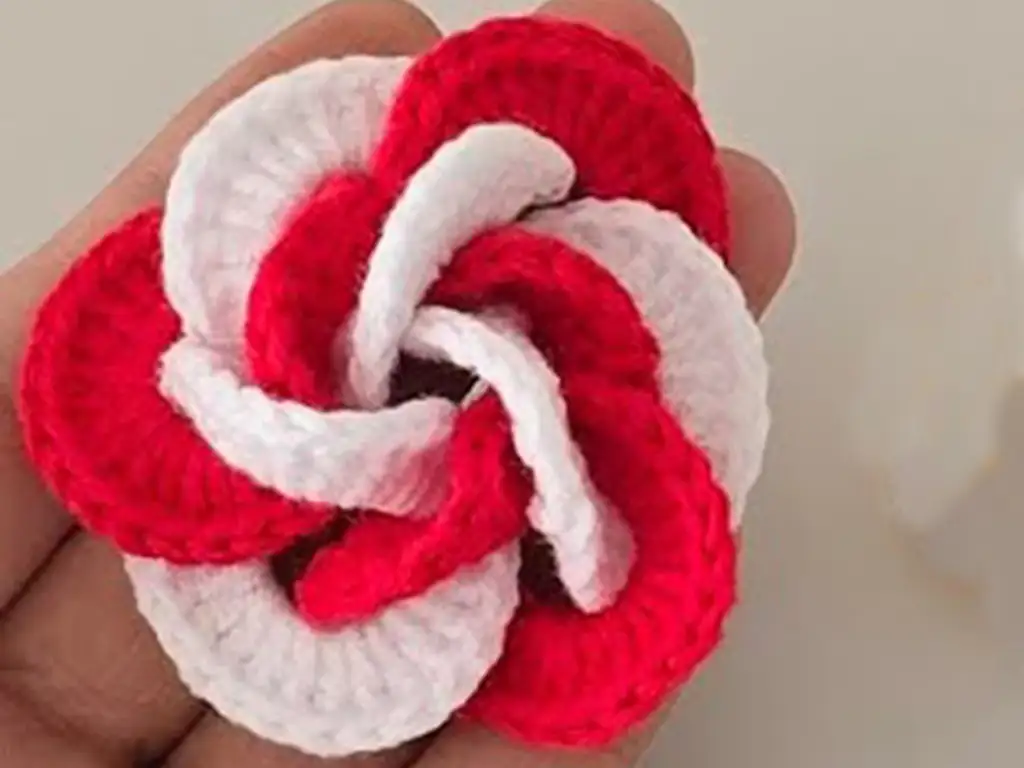
Weaving Wonders: Creating the Interwoven Rose Design
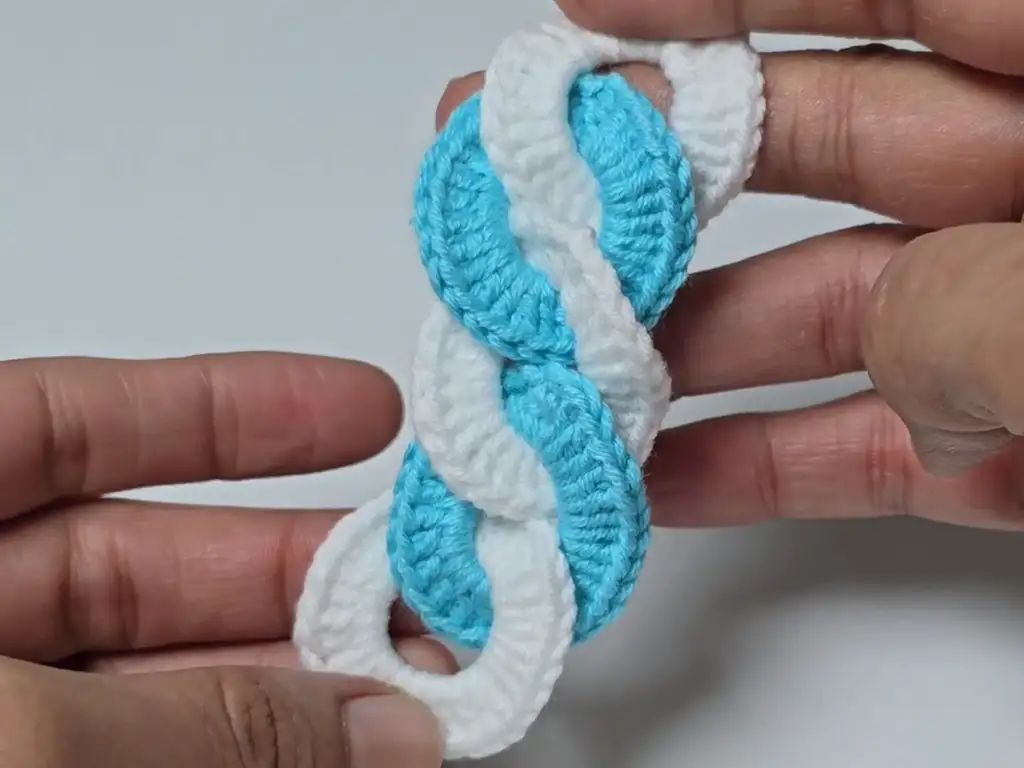
Repeat the process. Definitely, alternate colors for each round. This creates the interwoven look. Always pass the chain behind the previous ring. Total should be 5 rings. There is 2 white rings, 2 blue rings and 1 white rings.
Then, for the 6th ring, join the first and last white ring. It’s important to do so. Create a chain with your second color. Pass the chain through both white rings. Complete the 6th ring same way. Crochet 30 double crochets. Then, fasten off. Secure the ends.
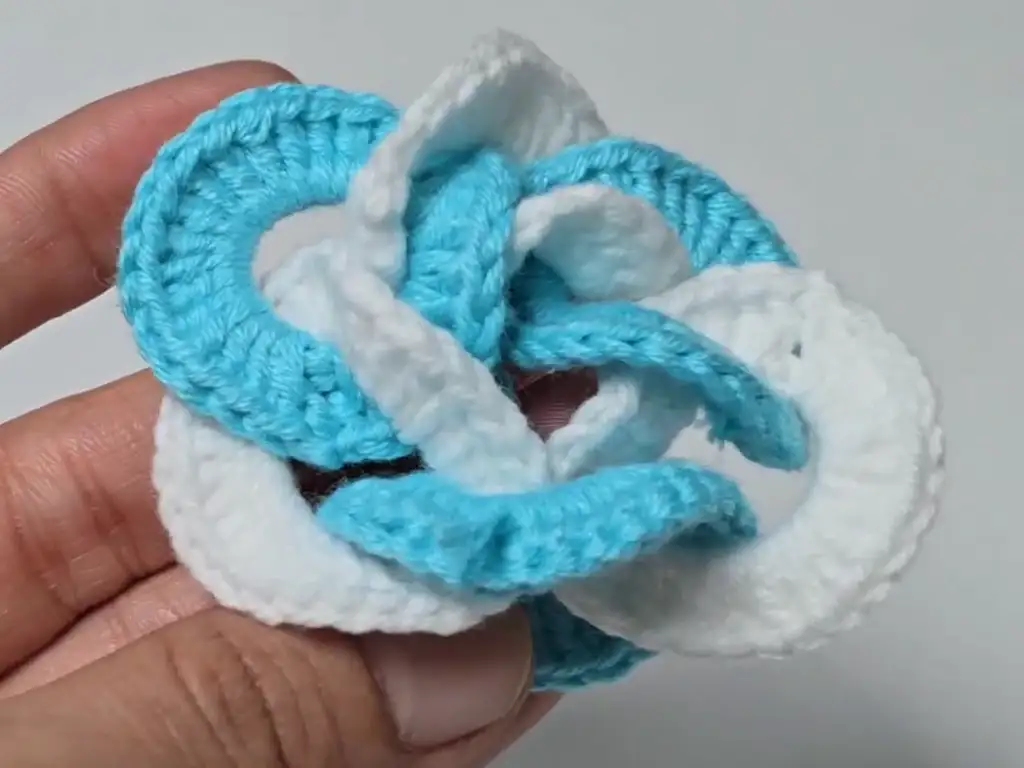
How to Crochet a 3D Rose Flower Applique: a Beginner’s Journey
This journey involves:
- Pulling the rings upwards.
- Gently shaping the rose.
- Securing loose ends.
Now, your 3D Crochet flower rose is ready.
Easy Crochet Rose Pattern for Beginners: Now It is Easy!
Finally, you are ready to share the rose. Crochet makes people happy. Clearly, the easy crochet rose design provides joy!
Quick Color Pop: Crochet Flower for Beginners – Two-Tone Edition
A two-color design adds interest. Such as blue and white, create depth. Besides, with this handmade crochet flower rose it’s simple to make. Follow the steps below to craft your two-tone rose!
Two-Tone Tactics: Mastering Color Changes
Changing colors can seem daunting. In reality, it’s quite simple. Above, finish the last stitch of the round. Before pulling through the final loop, drop the current color. Near, pick up the new color. Pull it through all loops. Now secure the yarn ends. Weave them in carefully. This creates a seamless color transition.
Ruffle It Up: Creating a Delightful Edging
The ruffle gives the rose charm. Before, it comes from the double crochets. 30 stitches per round is the key. After, feel free to experiment. Add more stitches for a dramatic ruffle. Reduce stitches for a tighter one. Because of this, the result will be the look you want!
Tension Tips: Making Every Stitch Count
Tension is important for uniform stitches. In other words, keep your tension consistent. Not too tight and not too loose.
Certainly, this comes with practice. To wrap up, try to relax. A relaxed hand creates even stitches.
Handmade Crochet Flower Rose: Feel The Rose!
Hold your finished rose. What do you feel? It’s not just yarn and stitches. It’s your time and creativity.
Indeed, this handmade crochet flower rose is a testament. Enjoy the process! Share your creations!
Blooming Beauties: Learn to Crochet Stunning 3D Flowers
What else can you make? Definitely, crochet flowers are versatile. Moreover, there’s a wide range of Crochet Flower Ideas. You can unleash your creative side!
Flower Power: Creative Ideas to Spark Your Imagination
Crochet flowers are great for embellishments. For instance, add them to hats. Bags, blankets, or scarves also work. Likewise, create a 3D crochet flower pattern for gifts.
Besides, stitch small bouquets as home decor. Embellish cards and scrapbook pages too. Above all, the possibilities are endless.
Rose Revolution: How to Crochet a Simple Rose, the Easy Way
This is what you’ve been waiting for. Time to crochet a simple rose. Again, this is achievable thanks to this easy crochet rose pattern.
Crafting the 3D Crochet Flower Rose: Step by Step
Refer to the pattern above. Before diving in, choose your colors. Such as a classic red or vibrant pink! Then, follow each step carefully. With patience, your 3d crochet flower rose will bloom!
Bringing it all Together: Assembling Your Petals
Shape the rose after finishing all rounds. Then, gently pull the rings upward. According to this, arrange them naturally. Secure loose ends on the back.
Definitely, weaving in ends keeps it neat. As a result, your Interwoven crochet rose looks professionally made.
Adding the Final Embellishments: Give Your Rose a Finishing Touch
Finally, you can make the rose awesome. Besides, consider adding a small pearl.
Also, attach it to the center. Sew on some green leaves to the base. Then, this completes the look. You are all set!
Frequently Asked Questions (FAQs)
- What yarn should I use for this project? Alize Cotton Gold is a great choice. Now it’s a DK weight cotton blend. This provides structure and softness.
- What size hook should I use? A 2.75 mm crochet hook works well.
- How do I change colors seamlessly? Finish the last stitch of the round. Then, drop the old color and pick up the new.
- My rose isn’t looking like the picture. What should I do? Check your tension. To illustrate, make sure it’s not too tight. Make sure it’s not too loose. Adjust your stitch count. That is to say, add or remove double crochets.
- Can I make this rose in one color? Of course! It will still look lovely.
- Can I sell the roses I make from this pattern? You are welcome to do so. Credit to Tuba Crochet is appreciated.
- What is the fastest crochet rose pattern step-by-step? The one described in this tutorial should be enough.
- How to crochet a rose step by step? With patience and practice.
- How to make a 3d crochet flower rose easy? With the right materials.
- Where can I find Free crochet flower pattern with written instructions? Please check the link in the blog post!
Share Your Creations!
Share your projects on Instagram “https://www.instagram.com/tubacrochet_ ”, TikTok “tiktok.com/@tubacrochet ” and Facebook “https://www.facebook.com/tubacrochet/ ”.
Invite readers to comment and share their own projects.
We can all learn. Crochet is a fantastic hobby. So share your work!
Written Pattern
Crochet Rose Pattern – Beginner Friendly
This pattern will guide you through creating a beautiful, ruffled crochet rose using simple techniques. We’ll use alternating colors to make it extra pretty.
Materials:
- Alize Cotton Gold yarn (or similar DK weight cotton blend) in two colors: Blue and White (Color 1 and Color 2).
- 2.75 mm crochet hook.
- Scissors
- Yarn needle for weaving in ends (optional, but recommended)
Gauge:
Gauge isn’t super critical for this project, as the size is more about the overall look. However, if you want a specific size, try this:
- Work a small swatch of double crochet stitches using your chosen yarn and hook.
- Measure a 2×2 inch square. Adjust your hook size if needed to get a similar density of stitches.
Abbreviations:
- ch = chain
- sl st = slip stitch
- dc = double crochet
- rep = repeat
Let’s Get Started!
Round 1 (White – Color 1):
- Make a Slip Knot: Place the end of your yarn over the top of the yarn and pull it through. Place the loop of yarn over the crochet hook.
- Chain 13: Wrap the yarn around the hook and pull it through the loop already on the hook. Repeat 12 more times. You now have 13 chains.
- Join to Form a Ring: Insert your hook into the very first chain you made. Yarn over and pull through both the chain and the loop on your hook. You’ve now formed a small ring with a slip stitch.
- Chain 3 (counts as first double crochet): This chain 3 will act as your first double crochet stitch in this round.
- Double Crochet in the Ring: Insert your hook into the center of the ring. Yarn over and pull up a loop (you have 3 loops on your hook). Yarn over and pull through the first 2 loops on your hook. Yarn over again and pull through the remaining 2 loops. You’ve made one double crochet.
- Repeat Double Crochet: Continue making double crochet stitches into the center of the ring until you have a total of 30 double crochet stitches, including the initial chain 3.
- Join with Slip Stitch: Insert your hook into the top of the chain-3 you made at the beginning of the round. Yarn over and pull through both the top of the chain and the loop on your hook. Fasten off.
- Cut Yarn: Cut the yarn, leaving a few inches of tail.
- Pull yarn through loop: Pull the yarn tail through the last loop on your hook to secure it.
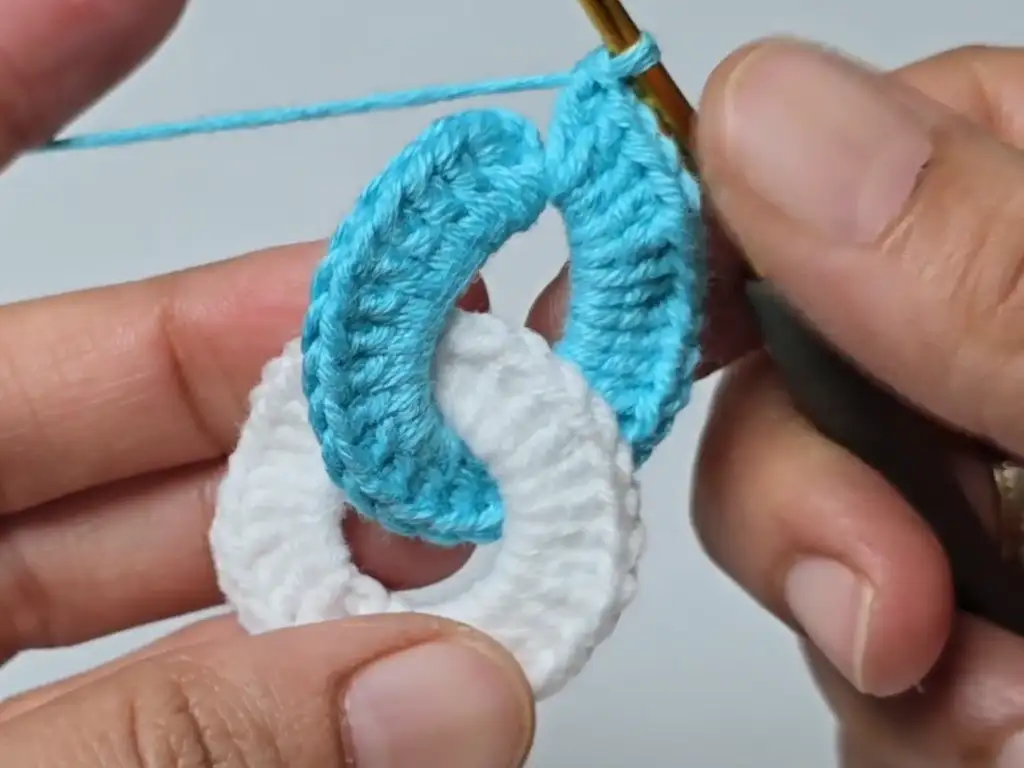
Round 2 (Blue – Color 2):
- Make a Slip Knot with your blue yarn.
- Chain 13: Make 13 chain stitches.
- Pass the Chain Behind and Through: Take the blue chain you just made and carefully pass it behind the white ring you created in Round 1, and then through the center of the ring.
- Join to Form a Ring: Insert your hook into the very first chain you made in blue. Yarn over and pull through both the chain and the loop on your hook. You’ve now formed another ring with a slip stitch.
- Chain 3 (counts as first double crochet):
- Double Crochet in the Ring: Insert your hook into the center of the blue ring. Yarn over and pull up a loop (you have 3 loops on your hook). Yarn over and pull through the first 2 loops on your hook. Yarn over again and pull through the remaining 2 loops. You’ve made one double crochet.
- Repeat Double Crochet: Continue making double crochet stitches into the center of the blue ring until you have a total of 30 double crochet stitches, including the initial chain 3.
- Join with Slip Stitch: Insert your hook into the top of the chain-3 you made at the beginning of the round. Yarn over and pull through both the top of the chain and the loop on your hook. Fasten off.
- Cut Yarn: Cut the yarn, leaving a few inches of tail.
- Pull yarn through loop: Pull the yarn tail through the last loop on your hook to secure it.
Rnds 3 and 4 (White – Color 1, then Blue – Color 2):
- Repeat the instructions for Round 2, alternating colors.
- Round 3 (White): Pass the white chain behind and through the blue ring.
- Round 4 (Blue): Pass the blue chain behind and through the white ring.
Round 5 (White – Color 1):
- Repeat the instructions for Round 2, alternating colors.
- Pass the white chain behind and through the blue ring.
Round 6 (Blue – Color 2):
- Make a Slip Knot with your blue yarn.
- Chain 13: Make 13 chain stitches.
- Pass the Chain Through Two Rings: This is where you’ll connect the beginning and end of the flower. Take the blue chain you just made and carefully pass it behind the last white ring you made, and through the first white ring you made in round one.
- Join to Form a Ring: Insert your hook into the very first chain you made in blue. Yarn over and pull through both the chain and the loop on your hook. You’ve now formed another ring with a slip stitch.
- Chain 3 (counts as first double crochet):
- Double Crochet in the Ring: Insert your hook into the center of the blue ring. Yarn over and pull up a loop (you have 3 loops on your hook). Yarn over and pull through the first 2 loops on your hook. Yarn over again and pull through the remaining 2 loops. You’ve made one double crochet.
- Repeat Double Crochet: Continue making double crochet stitches into the center of the blue ring until you have a total of 30 double crochet stitches, including the initial chain 3.
- Join with Slip Stitch: Insert your hook into the top of the chain-3 you made at the beginning of the round. Yarn over and pull through both the top of the chain and the loop on your hook. Fasten off.
- Cut Yarn: Cut the yarn, leaving a few inches of tail.
- Pull yarn through loop: Pull the yarn tail through the last loop on your hook to secure it.
Finishing:
- Weave in Ends: Use a yarn needle to carefully weave in all the yarn tails on the back of the rose. This will secure them and prevent unraveling.
- Shape the Rose: Gently pull the rings upwards and arrange them so they resemble a rose. You can play with the positioning to get your desired look.
Tips and Variations:
- Color Combinations: Get creative with your colors! Try different shades of pink and green, or use contrasting colors for a bolder look.
- Varying Ring Sizes: To create a more realistic rose shape, you can adjust the number of chains you make for each ring. For example, you could start with 10 chains for the first ring and gradually increase to 15 or 16 chains for the outer rings.
- Adding Leaves: Crochet some simple leaf shapes in green yarn and attach them to the base of the rose for a finished look. You can find many free leaf patterns online.
Increasing/Decreasing for Shaping (Beyond this Basic Pattern):
While this pattern doesn’t involve traditional increasing or decreasing within a row, you can adjust the overall size and shape by changing the number of chains in the initial chain and the number of double crochets in each round.
- Larger Rose: Use a larger hook and/or thicker yarn. Increase the number of chains in each ring slightly (e.g., start with 15 instead of 13) and add a few more double crochet stitches per round (e.g., 35-40 instead of 30).
- Smaller Rose: Use a smaller hook and/or thinner yarn. Decrease the number of chains in each ring slightly (e.g., start with 11 instead of 13) and reduce the number of double crochet stitches per round (e.g., 25 instead of 30).
- Altering petal depth: To make a rose with deeper, more pronounced petals, you can experiment with adding increases in specific sections of a ring. For example, in one ring, you might work a ‘2 dc in one stitch’ increase several times. This will cause the fabric to ruffle out more dramatically in those areas.
Other Crochet Projects You’ll Love:
Check out the other amazing crochet ideas that you can use to create wonderful works of art. Here are some other crochet projects you might enjoy:
- Simple Crochet Coaster
- Easy Crochet Eyeglass Holder
- Beginner-Friendly Crochet Scarf
- Quick Crochet Beanie Pattern
These patterns are a fantastic way to expand your skills.
So, grab your hook, choose your colors, and let your creativity bloom!