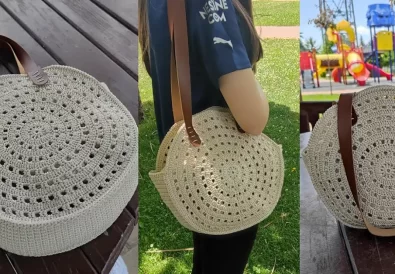
Hey there, fellow yarn enthusiasts! Are you ready to dive into a fun and satisfying project that will leave you with a gorgeous, handmade crochet tote bag? In this tutorial, I’ll be guiding you through the process of creating a beautiful and durable tote using macrame rope. This crochet tote bag pattern is perfect for beginners, and the end result is a trendy and versatile bag that’s perfect for everything from grocery shopping to a day at the beach. Let’s get started!
Crochet Tote Bag: A Beginner-Friendly Project
Why Choose a Crochet Tote Bag?
First of all, let’s talk about why you might want a crochet tote bag in the first place. Undoubtedly, these bags are incredibly practical! They’re perfect for carrying all sorts of things, from books and groceries to beach essentials and crafting supplies. Plus, they’re a stylish alternative to plastic bags and a great way to show off your handmade skills. In short, you’ll be the envy of all your friends!
Benefits of Using Macrame Rope
Now that you know why a crochet tote is a must-have, let’s discuss the benefits of using macrame rope. Specifically, macrame rope is a fantastic choice for this project because of its durability and texture. It creates a sturdy bag that can hold its shape, and the beautiful texture adds a touch of boho chic to your finished product. Obviously, it’s a winner!
Materials Needed for Your Crochet Tote
Macrame Rope: Choosing the Right Type
To begin with, you’ll need some macrame rope. For this crochet tote bag pattern, we recommend using a 100% polyester, number 3 thickness macrame rope. As you can see in the video tutorial by @TubaCrochet (https://www.youtube.com/@TubaCrochet) linked below, she uses a cream color, but feel free to get creative with your color choices! In fact, you can even create stripes or color blocks for a unique crochet tote bag design.
Crochet Hook Size and Other Essentials
Besides the macrame rope, you’ll need a 2.5 mm crochet hook. Additionally, gather some scissors for trimming the yarn, and a yarn needle for weaving in ends (optional). Lastly, you might want a stitch marker to help keep track of your rows.
Step-by-Step Crochet Tote Bag Instructions
Creating the Base of Your Crochet Tote
To start, we’ll create the base of our crochet tote bag. This is where we’ll lay the foundation for the rest of the bag. To begin, you’ll create a chain that’s slightly shorter than your desired bag width. Then, you’ll work double crochet stitches across the chain, making increases at the corners to shape the rectangular base.
Understanding the Starting Chain
The starting chain is crucial for determining the width of your crochet tote bag. Remember, it should be about 8 cm shorter than your desired finished width. For example, if you want a 30 cm wide bag, your starting chain should be approximately 22 cm long.


Working the First Row of Double Crochet
After creating your starting chain, you’ll work a row of double crochet stitches. This is where you’ll start to see the base of your crochet tote take shape. Initially, it might seem a little tricky, but don’t worry! With practice, you’ll get the hang of it.
Shaping the Corners of Your Tote
To create the corners of your crochet tote bag, you’ll work a few extra double crochet stitches in specific spots. This creates the necessary angles for a rectangular base. It’s a simple technique that makes a big difference!
Working the Body of the Crochet Tote
After completing the base, you’ll start working the body of your crochet tote. This involves working in continuous rounds, increasing the height of the bag.
Adding the Finishing Touches
Finally, you’ll finish off your crochet tote bag by adding handles and any other embellishments you desire. Moreover, you’ll weave in any loose ends to create a neat and polished look.


Customizing Your Crochet Tote Bag
Choosing Colors and Patterns
As well as using a single color, you can get creative with your crochet tote bag design by using multiple colors. For instance, you could create stripes, color blocks, or even try out different stitch patterns for a more textured look.
Using Solid Colors for a Classic Look
If you prefer a more classic crochet tote, stick with a single color. This is a great option if you want a versatile bag that will go with everything.
Creating Stripes or Color Blocks
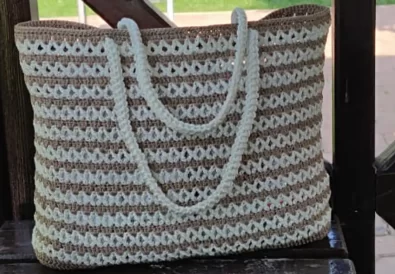
For a more playful look, try incorporating stripes or color blocks into your crochet tote bag. You can use different colors of macrame rope to create a fun and personalized design.
Exploring Different Stitch Patterns
Besides the standard double crochet stitch, you can experiment with other stitch patterns to create a unique texture for your crochet tote bag. There are many resources available online that can teach you different stitch patterns.


Adding Handles and Embellishments
In addition to customizing the colors and patterns of your crochet tote bag, you can also add handles and embellishments. Leather handles are a popular choice, but you can also use fabric straps or even knit your own handles. Similarly, you can add embellishments like tassels, beads, or embroidery to make your bag truly your own.
Tips and Tricks for Crocheting a Tote Bag
Maintaining Consistent Tension
One of the most important tips for crocheting a neat and even crochet tote bag is to maintain consistent tension. This means keeping your stitches the same tightness throughout the project. With practice, you’ll develop a feel for the right tension.
Avoiding Common Mistakes
Like any craft, crocheting can sometimes be a bit tricky. However, there are a few common mistakes you can avoid to ensure your crochet tote bag turns out beautifully. For example, make sure you’re counting your stitches correctly and paying attention to the pattern instructions.
Show Off Your Handmade Crochet Tote!
Sharing Your Creation on Social Media
Once you’ve finished your beautiful crochet tote bag, be sure to share it with the world! Post pictures on social media platforms like Instagram (https://www.instagram.com/tubacrochet_/), TikTok (tiktok.com/@tubacrochet), and Facebook (https://www.facebook.com/tubacrochet/). Not only will you be proud to show off your handiwork, but you’ll also inspire others to try crocheting their own crochet tote bags.
Inspiring Others to Crochet
By sharing your project and your passion for crocheting, you can help spread the joy of this wonderful craft. You never know, you might even inspire someone to pick up a hook and yarn for the first time!
Crochet Tote Bag Pattern:
This pattern uses US crochet terminology.
Materials:
Before you begin, gather the necessary materials. For this project, you’ll need the following:
- Macrame Rope: 100% polyester, Number 3 thickness. The video uses cream color, but you can choose any color or combination of colors. A total of 400 grams (4 x 100 grams) of macrame rope was used.
- Crochet Hook: Size 2.5 mm
- Bag Handles: The video uses leather bag handles, but you can use knitted handles or any other type you prefer.
- Scissors: For cutting the yarn.
- Yarn Needle: (Optional) For weaving in the ends.
Finished Size:
- Approximately 32 cm wide x 31 cm high (excluding handles)
- Size can be adjusted by changing the starting chain length and the number of rows worked.
Gauge:
- 56 chains = 24 cm
- This is a guide only. Tension and yarn thickness can affect gauge. It’s recommended to create a gauge swatch to ensure your bag turns out the desired size.
Abbreviations:
- Chain Stitch (ch): This is the foundation of most crochet projects and is used to create the starting chain for the bag.
- Double Crochet (dc): This is the primary stitch used to create the fabric of the bag. It creates a dense, textured fabric.
- Slip Stitch (sl st): This stitch is used to join rounds or rows together and to create a neat finish.
Basic Elements of the Design:
- Starting Chain: The foundation of the bag, determining its width. The chain is made slightly shorter than the desired finished width of the bag.
- Rectangular Base: The first 5 rows form a rectangular base for the bag.
- Turning Points: The corners of the rectangular base are reinforced with 5 double crochet stitches, creating the corners of the bag.
- Body of the Bag: After the base is formed, the bag is worked in continuous rounds, increasing in height.
- Pattern: A simple 2-row repeating pattern is introduced after the 7th row, creating a textured design on the body of the bag.
- Finishing: The top edge of the bag is finished with a row of slip stitches for a clean and polished look.
- Handles: Handles are attached after the bag is completed.
Pattern Notes:
- The pattern is worked in rows, turning at the end of each row.
- Increases are made at the turning points shape the rectangular base.
- A 2-row repeating pattern creates the textured design on the body of the bag.
Instructions:
Base:
- Row 1: Make 56 ch. (Note: Adjust this number for a wider or narrower bag. Subtract 8 cm from your desired finished width.)
Starting in the 4th ch from the hook, work 1 dc in each ch across. (54 dc)
In the last ch, work 5 dc. (Turning point)
Work 1 dc in each ch across the other side of the starting chain. (54 dc)
In the last ch, work 3 dc. (Turning point)
Sl st in the top of the beginning ch. - Row 2: Ch 3 (counts as 1 dc), 1 dc in the next dc, 5 dc in the next dc (corner), 1 dc in each of the next 52 dc, 5 dc in the next dc (corner), 1 dc in each of the next 52 dc, 5 dc in the next dc (corner), 1 dc in the next dc. Repeat from * once more.
Sl st in the top of the beginning ch. - Row 3: Ch 3 (counts as 1 dc), 1 dc in the next dc, 5 dc in the 3rd dc of the 5-dc corner group, 1 dc in each of the next 54 dc, 5 dc in the 3rd dc of the 5-dc corner group, 1 dc in each of the next 54 dc, 5 dc in the 3rd dc of the 5-dc corner group, 1 dc in the next dc. Repeat from * once more.
Sl st in the top of the beginning ch. - Rows 4-5: Repeat Row 3.
Body:
- Row 6: Ch 3 (counts as 1 dc), 1 dc in each dc across.
Sl st in the top of the beginning ch. - Row 7: Repeat Row 6.
- Row 8 (Pattern Row 1): Ch 3 (counts as 1 dc), 1 dc in the next dc, ch 2, skip 2 dc, 2 dc in the next dc, ch 2, skip 2 dc, 2 dc in the next dc. Repeat from * across, ending with ch 2, skip 2 dc, sl st in the top of the beginning ch.
- Row 9 (Pattern Row 2): Ch 3 (counts as 1 dc), 1 dc in the next dc, 2 dc in the ch-2 space, 1 dc in each of the next 2 dc, 2 dc in the ch-2 space, 1 dc in each of the next 2 dc. Repeat from * across, ending with 2 dc in the ch-2 space, sl st in the top of the beginning ch.
- Rows 10 onwards: Repeat Rows 8 and 9 until the bag reaches your desired height.
Finishing:
Final Row:
- Ch 1, sl st in each stitch across.
- Fasten off and weave in ends.
Handles:
Attach the handles securely the bag, using a yarn needle or preferred method.
Color Variations:
- Change colors at the end of any row by fastening off and joining the new color.
- Create stripes, color blocks, or other designs with your color changes.
Increasing and Decreasing:
- To make the bag wider, increase the number of chains in the starting chain.
- To make the bag narrower, decrease the number of chains in the starting chain.
- To make the bag taller, work more pattern repeats.
- To make the bag shorter, work fewer pattern repeats.
Other Crochet Projects You’ll Love
- Crochet Market Bag
- Crochet Beach Bag
- Crochet Blankets
- Crochet Shawl & Scarf
Conclusion:
Ultimately, crafting your own crochet tote bag is a rewarding experience. Thus, you’ll have a beautiful and functional bag that you can proudly use and show off. So grab your macrame rope and crochet hook, and let’s get started on this Easy Crochet Macrame Tote Bag Pattern for Beginners! Don’t forget to check out @TubaCrochet‘s video tutorial for visual guidance (https://www.youtube.com/watch?v=rB_URDDKToQ). And most importantly, have fun and be creative! We’d love to see your finished crochet tote bags! Share your projects on Instagram, TikTok, and Facebook, and let’s connect in the comments below! Happy crocheting!
This blog post, inspired by the wonderful tutorial by @TubaCrochet, provides a comprehensive guide to creating your own stylish and practical crochet tote bag. By following these step-by-step instructions and incorporating your own creative touches, you’ll soon have a handmade crochet tote that you’ll love using for years to come. We encourage you to explore the possibilities of this versatile crochet tote bag pattern and discover the joy of creating something beautiful with your own two hands. Remember, this is just the beginning of your crocheting journey! There’s a whole world of crochet bag patterns and ideas out there waiting to be explored. So grab your yarn and hook, and let your creativity flow!
We hope you found this crochet tote bag tutorial helpful. If you have any questions or comments, please feel free to share them below. We love hearing from our readers and fostering a vibrant crocheting community. Happy crafting!
Remember to watch the video tutorial for a visual guide: