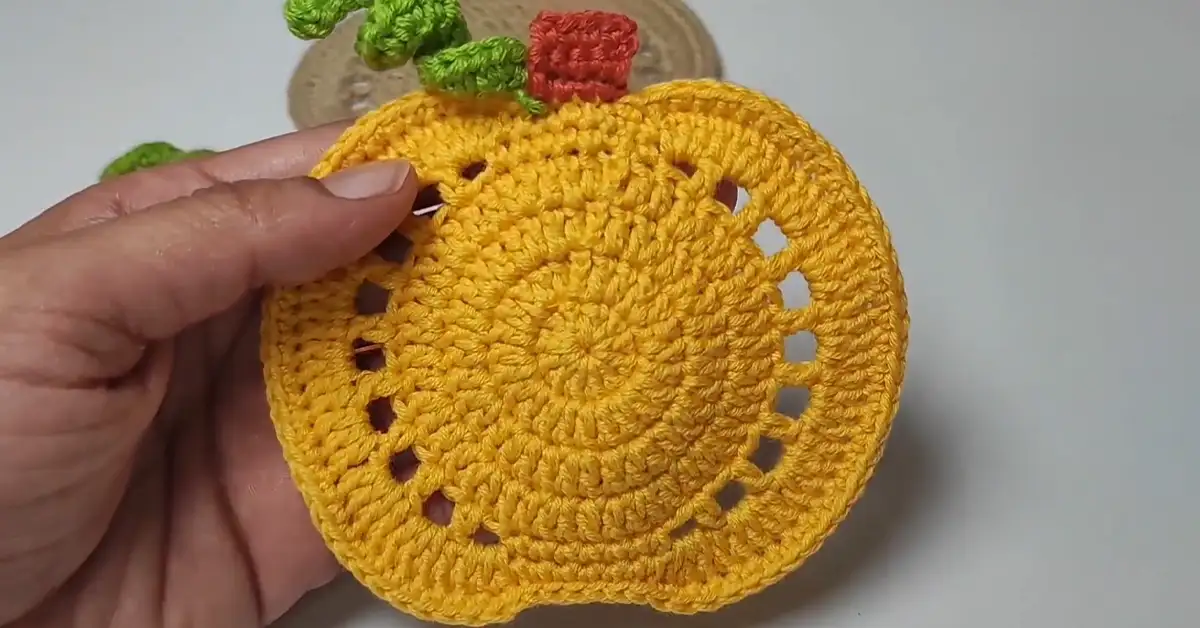
Fall is the perfect time to cozy up with your yarn and create something festive. In this tutorial, we’re diving into a Crochet Pumpkin Coaster project that’s simple, quick, and perfect for all skill levels. Whether you’re sipping on your pumpkin spice latte or decorating your home for the season, this pumpkin coaster pattern is both functional and adorable. Crochet fall coaster projects like this one add that charming handmade touch to your fall decor.
This project is beginner-friendly, making it ideal for anyone who wants to crochet a pumpkin coaster. Using simple techniques like double crochet and single crochet, you’ll be able to create a cozy coaster to protect your surfaces and elevate your autumn aesthetic. Plus, the pattern can be easily customized with different color yarns or small adjustments to the size.
In this blog post, I’ll walk you through the materials, provide a step-by-step crochet coaster tutorial, and give you some tips for customizing your crochet pumpkin coaster pattern. Let’s get started!
Crochet Pumpkin Coaster: A Touch of Fall Charm
There’s something about fall that inspires creativity—especially when it involves pumpkins! This pumpkin coaster pattern brings the warmth of the season into your home in a fun and practical way. Not only do these coasters protect your furniture, but they also add a dash of seasonal style. Imagine setting these under your warm cup of coffee or gifting them to friends as a thoughtful handmade present. It’s a small project that packs a big punch in the fall decor department.
These crochet pumpkin coasters are versatile, and you can use them during Halloween, Thanksgiving, or throughout the fall season. They’re a great conversation starter when guests come over and fit perfectly with any crochet fall coaster collection.
In terms of difficulty, this pattern is perfect for beginners, but if you’re more experienced, you’ll still enjoy this quick project. The design includes simple increases, easy double crochet stitches, and a few decorative touches, like a stem and leaf, to really make it stand out.
DIY Fall Decor: Why You’ll Love This Crochet Pumpkin Coaster
Why choose this crochet pumpkin coaster over other DIY decor projects? First of all, it’s quick to make—ideal for those looking for a fast project to finish in one sitting. You’ll only need a few basic materials, and you can switch up the colors to match your personal style or holiday theme.
Additionally, this project is a wonderful introduction to the world of crochet. Even if you’re new to crafting, the step-by-step instructions below will guide you through every part of the process. With a little patience, you’ll be able to whip up your very own crochet coaster in no time.
- Material versatility: Use any color combination you like! Whether you prefer classic orange pumpkins or a more neutral cream tone, the choice is yours.
- Gift-ready: These coasters make fantastic handmade gifts for friends, family, or even as part of a Thanksgiving crochet bundle.
- Beginner-friendly: This crochet pumpkin coaster pattern for beginners is designed to be simple and approachable for everyone.
Crafting Your Own Cozy: The Crochet Pumpkin Coaster Pattern
Now, let’s dive into the crochet pumpkin coaster pattern. The pattern, a simple approach, allows you to create a unique centerpiece for any season. You can easily adjust this easy crochet coaster to make a larger or smaller piece, thus achieving a personalized item. You can use this crochet pumpkin coaster as a part of your thanksgiving décor.
Step-by-Step Guide: Crochet Pumpkin Coaster for Beginners
The crochet pumpkin coaster pattern is wonderfully beginner-friendly, using standard crochet stitches. The simple crochet pumpkin coaster pattern free will guide you through each step with clear instructions, images, and video demonstrations from @TubaCrochet(https://www.youtube.com/watch?v=_aSKNuNXuME). We will walk you through every single step. The tutorial features several techniques and tips for creating a lovely, unique crochet coaster. The crochet pumpkin coaster is a simple and elegant project, and it is perfect for creating lovely décor.


Beyond the Basics: Crochet Pumpkin Coaster Tips & Variations
Beyond the basic crochet pumpkin coaster pattern, you can add some fantastic variations to make your coasters truly unique! For instance, you can experiment with different yarn colors to bring your coaster to life. In addition, you can easily alter the size. This easy crochet coaster is very beginner friendly. Moreover, you can use different stitches to make an amigurumi pumpkin coaster.
Customizing the Coaster:
- Color Variations: Instead of the traditional orange pumpkin, try using white for a neutral, farmhouse look or bright yellow for a fun twist on the classic pumpkin.
- Sizing Adjustments: If you want a larger coaster, you can continue adding rounds of double crochet, following the same increase pattern as Round 4.
- Extra Details: Add more leaves or even a curly vine by chaining and slip stitching back to the pumpkin body. It’s all about creativity here!
Materials Needed:
- Yarn: Himalaya Amigurumi Cotton Yarn (Color options: Orange for pumpkin, Brown for stem, Green for leaves)
- Thickness: Light worsted weight (category 3) cotton yarn for durability.
- Hook: 2.75 mm crochet hook.
- Other tools: Scissors, a yarn needle for weaving in ends, and a small amount of fiberfill for the stem.
Sizing Tips:
If you want to adjust the size of your coaster, simply use thicker yarn and a larger hook. Alternatively, you can follow the step-by-step guide below and add more rounds to increase the size.
Abbreviations (US Terms):
- MR: Magic Ring
- ch: Chain
- sc: Single Crochet
- dc: Double Crochet
- sl st: Slip Stitch
- inc: Increase (2 sc in the same stitch)
- hdc: Half Double Crochet
Pattern Instructions:
Pumpkin Body:
- Round 1: Start with an MR. Ch 3 (counts as first dc), 11 dc into MR, sl st to first dc. (12 dc)
- Round 2: Ch 3, dc in the same st, 2 dc in each st around. Sl st to first dc. (24 dc)
- Round 3: Ch 3, dc in the same st, dc in next st, 2 dc in next st around. Sl st to first dc. (36 dc)
- Round 4: Ch 3, dc in the same st, dc in next 2 sts, 2 dc in next st around. Sl st to first dc. (48 dc)
- Round 5: Ch 1, sc in each st around. Sl st to first sc. (48 sc)
Some viewers mentioned a missing “mesh” round between Rounds 4 and 5.
Actually, the mesh (box) section is already included in Round 5 – “Pumpkin Boxes”, where you chain 2 and skip a stitch to create the open boxes.
Round 6 then fills those boxes to form the pumpkin shape.
Stem:
- Attach brown yarn to the center of the coaster.
- Ch 6, starting from the second ch from the hook, sl st in each ch back toward the center.
- Fasten off and weave in ends.
Leaf:
- Attach green yarn to the top of the pumpkin.
- Ch 8, hdc in the third ch from the hook, sc in the next 3 ch, sl st in the remaining ch.
- Fasten off and weave in ends.


PDF Download:
Don’t forget, you can download the full crochet pumpkin coaster pattern PDF for free at this link to have on hand whenever you need it!
A Big Thanks to @TubaCrochet!
To wrap up, this crochet pumpkin coaster pattern was inspired by the wonderful video tutorial by @TubaCrochet on YouTube (https://www.youtube.com/@TubaCrochet). We highly recommend checking out her channel for more amazing crochet tutorials and inspiration. You can find the specific video for this project here: https://www.youtube.com/watch?v=zz9cDg1NBB8&lc=Ugyby2cQ5u-7pkdRw8V4AaABAg.
Share Your Creations!
For more tutorials, don’t forget to check out @TubaCrochet’s YouTube channel, and if you’re feeling social, share your finished projects with us on Instagram, TikTok, or Facebook.
Have any questions or tips to share? Drop them in the comments below!

Other Crochet Projects You’ll Love:
In addition to the crochet pumpkin coaster, there are many other cozy and charming crochet projects you can craft for fall and Thanksgiving.
- Fall Crochet Leaf Pattern
- Easy Crochet Shawl&Scarf Pattern
- Beginner Crochet Beanie Pattern
- Crochet Sunflower Keychain
- No-Sew Crochet Ghost
- Crochet Pumpkin Hair Tie
Conclusion
Creating your own handmade coasters is incredibly rewarding. With this easy crochet pumpkin coaster for Thanksgiving, you’ll not only have beautiful fall decor but also the satisfaction of making something with your own hands! I am sure your friends and family will love these crochet pumpkin coasters for coffee! This also is a great idea for Thanksgiving. Therefore, grab your hooks and yarn, because with each stitch, you’ll be crafting cozy vibes and festive cheer! Happy crocheting! Don’t hesitate to ask any questions.


