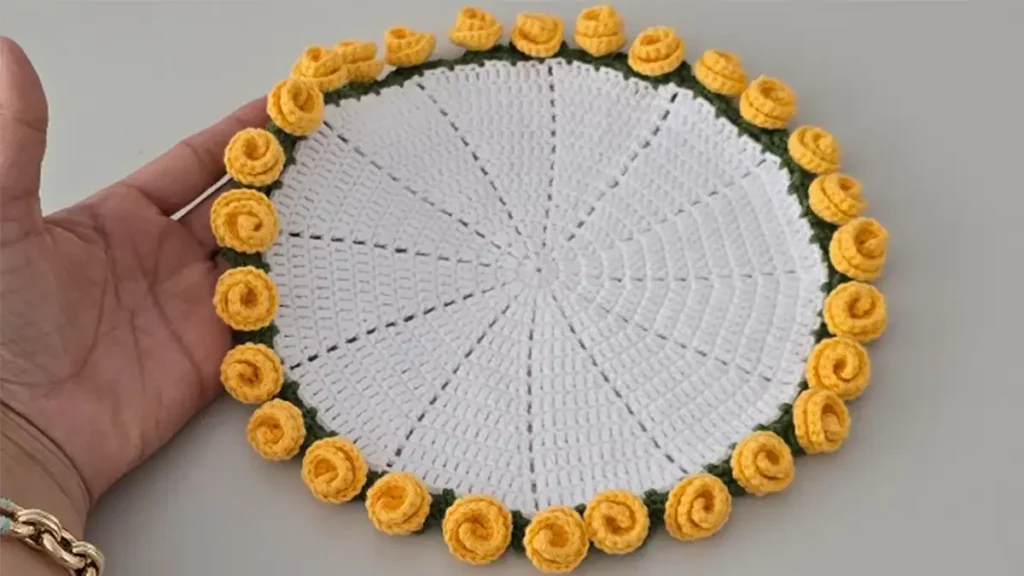
If you’re looking to add a handmade touch of elegance to your table, this crochet rose placemat is just what you need. With simple stitches and a romantic floral finish, it’s a perfect project for beginners and experienced crocheters alike.
In this step-by-step tutorial, you’ll learn how to create a round crochet placemat featuring delicate rose accents that match beautifully with your coaster sets. Whether you’re decorating for a special dinner or crafting a thoughtful gift, this pattern is easy to follow, fun to make, and truly eye-catching.

Materials You’ll Need for Your Crochet Rose Placemat
Before you dive into this crochet rose placemat project, it’s essential to gather your supplies. Using the right materials will ensure a smooth crocheting experience and a beautiful finished product.
Recommended Yarn and Tools
- Yarn: Soft 4-ply cotton yarn in white, green, and pink
- Crochet hook: 2.20 mm
- Scissors and yarn needle for weaving in ends
- Stitch marker (optional)
Using cotton yarn gives your crochet placemat a soft but durable texture, making it both elegant and practical for everyday use.
Choosing Colors for Your Rose Bouquet Table Mat
To match the original design in the video, go with a white base, green leafy arches, and pink roses. However, feel free to try alternative shades like lavender, peach, or yellow if you want to personalize your crochet table mat.
How to Crochet the Round Base of Your Crochet Rose Placemat
The foundation of this crochet placemat pattern is a simple circular motif that expands row by row. It’s ideal for both beginners and experienced crocheters who want to craft something stunning yet straightforward.
Steps to Start the Circle Base
- Begin with a magic ring.
- Round 1: Chain 2, then make 12 double crochets into the ring. Join with a slip stitch.
- Round 2: Chain 2, make 2 double crochets into each stitch around with a chain 1 between each group. Join.
You should now see the circle taking form—nice and even. Don’t forget to chain 1 between groups for spacing!


Expanding the Circle in Each Round
From Round 3 onward:
- Add 1 more double crochet per group with each new round.
- Place 2 double crochets into the last stitch of every group to increase evenly.
For example:
- Round 3: 3 double crochets per group
- Round 4: 4 double crochets per group
- …
- Round 13: 13 double crochets per group
Pro Tip: Make sure you stop at an odd number round (like 11, 13, or 15). This ensures your leafy triangle sections and rose counts line up symmetrically.
How to Crochet Leafy Borders for Your Placemat
After finishing the round base, it’s time to add the leafy green arches that will frame your crochet rose placemat and serve as the foundation for your roses.
Creating the Leaf Foundation with Chain Spaces
- Join green yarn to the top of any stitch from the final round of the base.
- Chain 4.
- Skip 2 stitches, then work 1 single crochet into the third stitch.
- Repeat: Chain 4, skip 2 stitches, single crochet.
- Continue this pattern all the way around the circle, treating chain spaces between groups as stitches, too.


You should end with an even number of chain spaces. In the tutorial, the creator had 56 arches, which means 56 roses will be placed.
Helpful Tip: If you end with an odd number of arches, simply add one more chain-4 loop at the end to make it even.
Building the Triangle-Shaped Leaf Sections
Now that you have your chain loops ready, you’ll shape them into leaf triangles.
- Into the first chain space, make:
- 1 single crochet
- Chain 4
- Slip stitch into the 2nd chain
- Chain 3
- Single crochet back into the same chain space
- Move to the next chain space and repeat.
This will form small triangular peaks—your leafy base is complete once you reach the starting point.
Great job! The leafy edge adds depth, texture, and contrast to your crochet placemat pattern, making it stand out beautifully on any table.
How to Crochet the 3D Roses for the Border
These roses bring the crochet rose placemat to life! They add volume, texture, and charm—perfect for anyone who loves floral detail. The best part? They’re easier than they look and super satisfying to make.
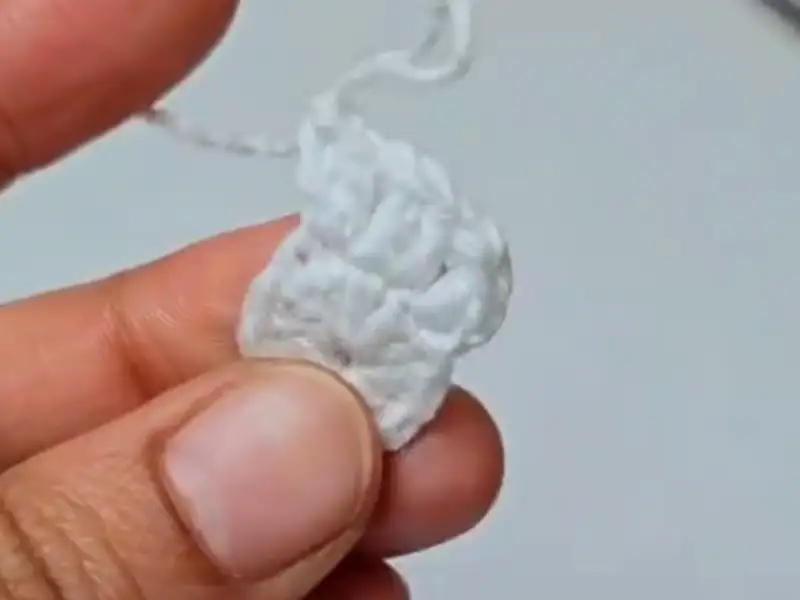
Step-by-Step: Creating the Rose Strip
- Attach pink yarn to the single crochet on the left side of any triangle section.
- Chain 14.
(You can adjust the number of chains for a fuller or smaller rose.) - In the 4th chain from your hook, make 2 double crochets.
- In the next chain, make 3 double crochets.
- Keep working 3 double crochets into every remaining chain.
- In the last chain:
- Make 3 double crochets
- Chain 3
- Slip stitch into the same space
You’ve now created a ruffled rose strip that curls naturally.


Rolling and Attaching the Rose
- Gently roll the crochet strip inward and upward to form a rose shape.
- Flip your rose to the back and insert your hook through any stitch to slip stitch and secure it.
- Then, slip stitch into the left side of the next triangle.
- Chain 1 and cut the yarn.
Pro Tip: Leave 1 triangle empty between each rose if you prefer a lighter design. Or place roses in every triangle for a fuller bouquet effect.
Repeat the process until your crochet placemat is framed with blooming 3D roses.
At this point, your project will already look like a decorative bouquet in yarn form—elegant, vibrant, and totally one of a kind!
Final Touches for Your Crochet Rose Placemat
After all your hard work, it’s time to give your crochet rose placemat the polished finish it deserves. A few small steps will make your piece look neat, professional, and ready to impress.
Hiding Yarn Tails and Securing Roses
Start by carefully weaving in any yarn tails left behind:
- Use a yarn needle to thread ends into the back side of your work.
- Be especially gentle around the rose bases, so they don’t shift or flatten.
- You can add a few extra stitches behind each rose to make sure they stay firmly in place.
Bonus Tip: Use a small dab of fabric glue behind the roses (optional) if you’re giving the placemat as a gift and want extra hold.
Blocking and Shaping the Placemat
To help the round base lay flat:
- Lightly spray or steam the back of the white base circle (not the roses!).
- Pin it to a flat surface in a perfect circle.
- Let it dry completely—this ensures it keeps its shape.
Avoid pressing or blocking the roses—they’re meant to stay fluffy and three-dimensional!
In the end, your crochet placemat will be sturdy, elegant, and ready for any table setup—from everyday use to special occasions.
Ways to Use or Gift Your Crochet Rose Placemat
Now that you’ve completed your stunning crochet rose placemat, let’s explore how you can showcase or gift this one-of-a-kind piece. Whether you’re decorating your home or surprising a friend, this floral design is guaranteed to delight.
Elegant Uses for Your Crochet Placemats
This handmade placemat makes a perfect:
- Table centerpiece for brunches, bridal showers, or tea parties
- Accent under plates or glassware at family dinners
- Layer under candles, vases, or serving trays for added charm
In fact, pairing it with a matching crochet rose coaster and placemat set can instantly transform any tabletop into a soft, romantic display.
Styling Tip: Use soft lighting and floral accessories to match the cozy vibe of your crochet bouquet placemat.
Gift Ideas for Handmade Floral Placemats
Looking to give your work as a gift? Here are some thoughtful ideas:
- Wrap the placemat in tissue paper and twine with a handwritten tag
- Bundle it with matching coasters or napkin rings
- Add it to a Mother’s Day, housewarming, or wedding gift basket
Handmade gifts like these show your care and creativity—especially when crafted with love and color!
Download the Free Crochet Pattern and Watch the Tutorial
If you’d like to follow along offline or save this project for later, here’s your chance!
Download the full written pattern (PDF)
Watch the step-by-step video tutorial on the @CrochetCraftsmann YouTube channel
You’ll find every stitch explained clearly, from the base circle to the blooming roses.
Final Thoughts – Share and Connect
This crochet rose placemat tutorial is a wonderful way to mix elegance and creativity. Whether you made it for your home or a gift, we hope you loved every step!
What yarn colors did you use? Let us know in the comments below!
And don’t forget:
- Like the video
- Subscribe to @CrochetCraftsmann
- Tag your work with @tubacrochet_ on Instagram
- Share it on Facebook or TikTok
Other Crochet Projects You’ll Love
- Easy Crochet Rosebud Keychain Tutorial – DIY Gift Idea
- This Rose Bouquet Turns Into a Coaster – Easy Crochet DIY
- Crochet Heart Keychain with Puff Stitch – Beginner Friendly
Frequently Asked Questions – Crochet Rose Placemat
What size is the finished placemat?
The final size depends on how many rounds you complete, but the tutorial example measures approximately 30–35 cm in diameter.
Can I use acrylic yarn instead of cotton?
Yes, but cotton is preferred for structure—especially for the roses and leaf details. Acrylic may make the edges curl more.
How many color combinations can I try?
Endless! Many crocheters love using pastels for spring, red roses for romance, or muted tones for rustic looks.
Is this a good project for gifting?
Absolutely. This placemat looks beautiful in gift baskets, especially when paired with matching coasters or floral napkin holders.