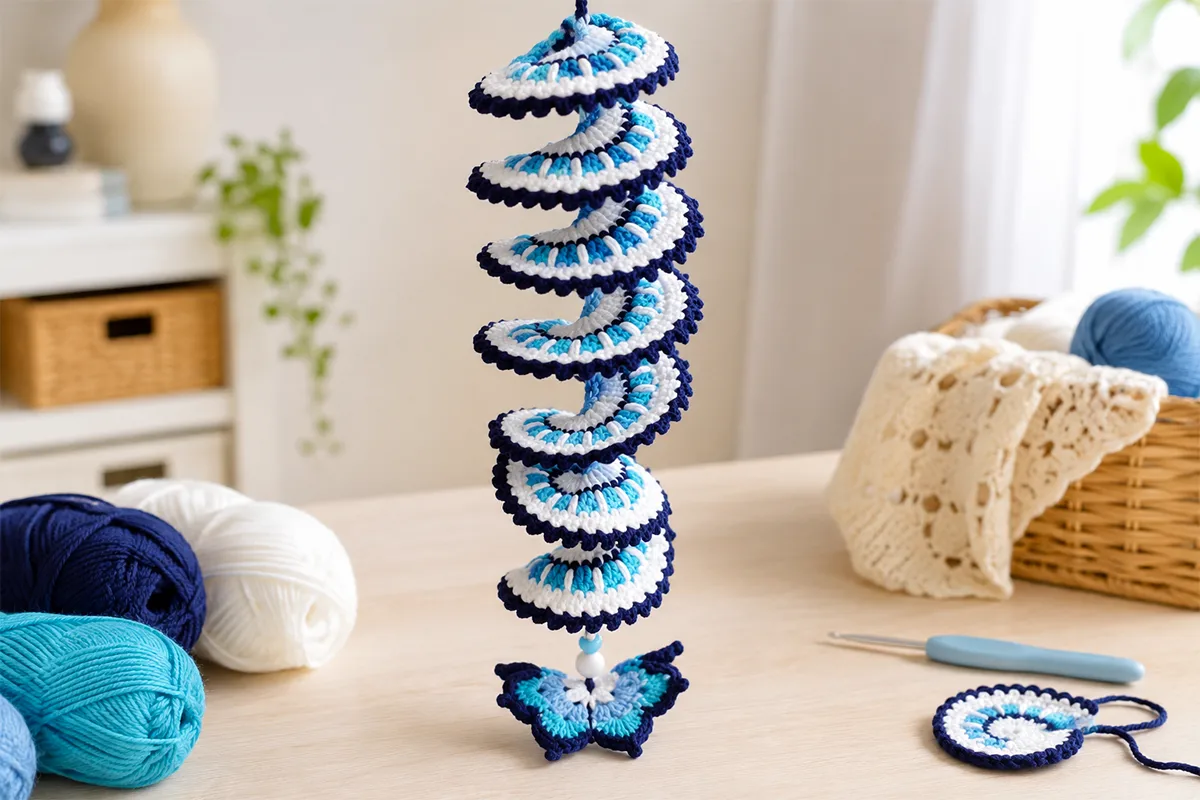
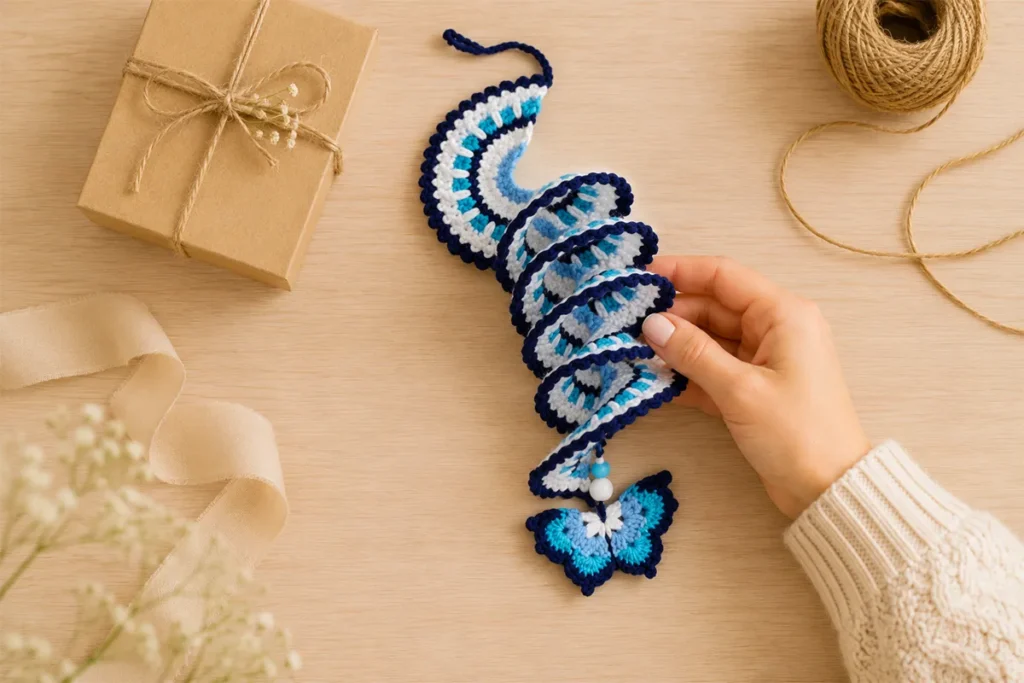
Easy crochet wind spinner projects are such a fun way to turn a simple crochet strip into something that looks magical when it hangs. This design starts with a basic chain, grows into a soft spiral through increase rows, and finishes with beads and a small crochet butterfly at the bottom.
The blue and white colors give this piece a gentle evil eye inspired crochet decor look, which makes it lovely for a porch, balcony, window, or a cozy handmade corner at home. It looks detailed when it is finished, but the steps are simple enough for confident beginners.
You can watch the full video tutorial here.
You can also download the printable written pattern here.
Easy Crochet Wind Spinner Pattern Overview
This crochet wind spinner with butterfly begins as a long strip. The curl starts forming as you work increase rows across the chain. Once the crochet part is finished, you twist the strip from the hanging loop so it opens into a beautiful spiral shape.
The finished look is soft, decorative, and eye-catching. The beads and butterfly add a sweet handmade finish, while the navy treble crochet contrast detail gives the blue and white spiral more depth.
This is a nice project if you enjoy:
- handmade porch decor
- crochet gift ideas
- small home decor projects
- beginner-friendly crochet tutorials
- blue and white crochet decor
- decorative crochet with beads
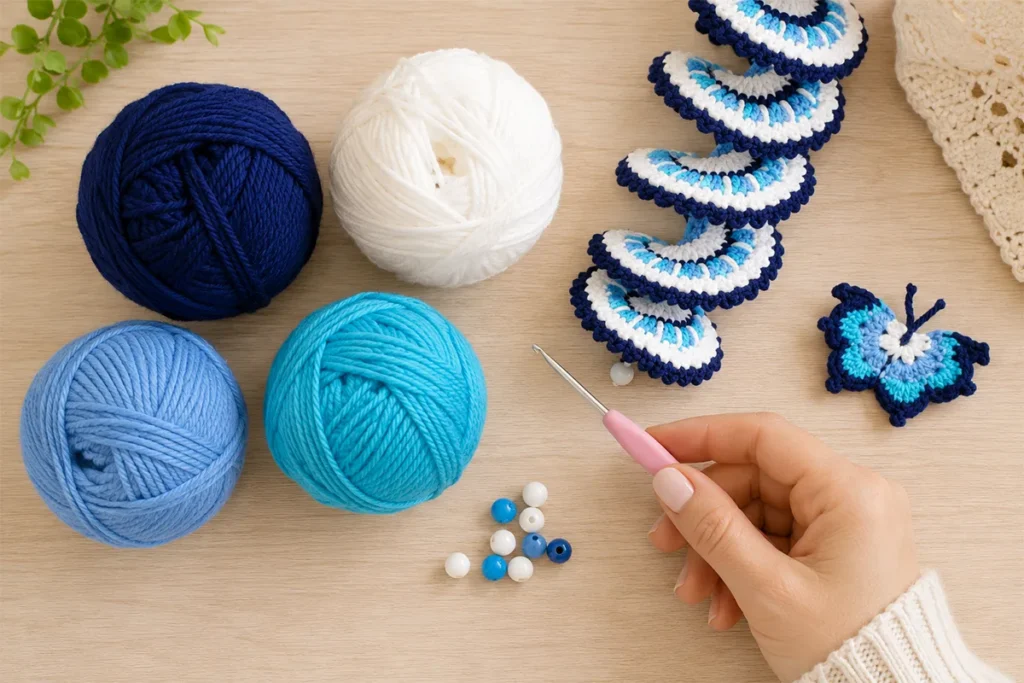
Materials for This Easy Crochet Wind Spinner
For this project, you will need:
- Yarn in multiple colors
- White yarn
- Navy yarn for the treble crochet contrast detail
- 2.50 mm crochet hook
- Beads in colors you like
- A small crochet butterfly for the bottom decoration
The transcript does not clearly state the yarn weight or yarn type. Choose yarn that works well with your hook and gives the spiral enough body to hold its shape.
The sample uses blue and white colors for an evil eye inspired crochet decor feel, but you can change the colors to match your porch, balcony, window area, or gift theme.
Finished Size for the Crochet Wind Spinner
You can make the starting chain as long as you want your wind spinner to be.
For a nice size, a starting chain of about 35 to 40 cm works well. That is around 14 to 16 inches.
In the tutorial sample, the wind spinner begins with 75 chains.
The finished hanging length can vary depending on your yarn, tension, starting chain, and how the spiral settles after twisting.
US Crochet Terms and Abbreviations
This pattern uses US crochet terminology.
- ch = chain
- sc = single crochet
- dc = double crochet
- tr = treble crochet
- sl st = slip stitch
- st / sts = stitch / stitches
- sk = skip
Notes Before You Start This Easy Crochet Wind Spinner
Keep your stitches relaxed as you work. Relaxed tension helps the spiral open more smoothly later.
Final stitch counts are not given for each row, so focus on the stitch placement as you work.
The ch-2 at the beginning of the double crochet rows is made before working 1 dc into the same stitch. The transcript does not clearly say whether the beginning ch-2 counts as a dc, so follow the stitch placement shown in the video.
For the bottom decoration, this project uses a small crochet butterfly. In the video, the butterfly is mentioned as a design from a previous keychain tutorial. You can use that same butterfly here, skip the antennae for this version, and finish the top with beads instead.
How to Crochet a Wind Spinner Step by Step
Start with the Main Chain
Make a chain as long as you want your wind spinner to be.
For the tutorial sample, make 75 chains.
This foundation chain determines the final length of your crochet wind spinner.
Row 1: Single Crochet Increase Row
After your last chain, insert your hook into the third chain from the hook.
Work 2 sc into that chain.
Continue across the row, working 2 sc into each chain all the way to the end.
When you reach the end of the row, ch 1.
Cut the yarn.
This first increase row gives the strip more fullness and starts preparing it for the spiral shape.
Row 2: Double Crochet Increase Row
Go back to the beginning of the row and join the second color in the first stitch.
Ch 2.
Make 1 dc into the same stitch.
Now work across the row.
Work 2 dc into the top of each sc all the way across.
This spiral crochet increase row is where the curl begins to show more clearly. Keep your stitches relaxed and avoid pulling too tightly.
After the last 2 dc, ch 1.
Cut the yarn.
Row 3: Single Crochet Row
Go back to the beginning of the row and join the third color.
Join your yarn in the first stitch, then ch 1.
Place 1 sc into the same stitch.
Continue across the row with 1 sc in the top of each dc.
At the end of the row, ch 1 and cut the yarn.
Row 4: Chain Space and Double Crochet Row
Go back to the beginning of the row and join the fourth color.
Join your yarn in the first stitch.
Ch 2, then place 1 dc into the same stitch.
Next, ch 1 and sk 1 stitch.
Work 2 dc into the next stitch.
Continue this repeat all the way to the end of the row:
Ch 1, sk 1 stitch, make 2 dc into the next stitch.
When you reach the end, ch 1 and sk 1 stitch.
Make 2 dc into the top of the last stitch.
Ch 1.
Cut the yarn.
This row creates the spaces that will be used for the contrast detail in the next step.
How to Add the Treble Crochet Contrast Detail
This is the part that gives the wind spinner its bold blue and white contrast. The navy treble crochet contrast detail is worked down into the skipped stitches below, while the white stitches continue across the top.
Contrast Detail Note
For the navy treble crochet details, use the navy yarn only when working each treble crochet into the skipped stitch below.
After making the treble crochet, cut the navy yarn, then continue with the white yarn.
Repeat this same process each time you need a navy treble crochet.
Contrast Detail Row
Keep the front of your stitches facing you.
Join the white yarn at the top of the first chain.
Ch 1.
Make 1 sc into the top of the next dc.
Join the navy yarn, pull up a loop from the skipped sc below, and work 1 tr.
Cut the navy yarn.
Switch back to the white yarn and work 1 sc into each of the next 2 dc.
Join the navy yarn again.
Pull up a loop from the skipped stitch below.
Work 1 tr.
Cut the navy yarn again.
Repeat this sequence all the way to the end of the row:
Work 1 sc into each of the next 2 dc with white yarn.
Join navy yarn and work 1 tr into the skipped stitch below.
Cut the navy yarn.
Continue with white yarn.
This detail helps the spiral stand out and gives the finished wind spinner that pretty evil eye inspired crochet decor look.
Next Single Crochet Increase Row
When you reach the end of the contrast row, keep working with the same color.
Ch 1 and turn your work.
Work 2 sc into the first stitch.
Place 1 sc into the next stitch.
Then work 2 sc into the following stitch.
Continue across the row with this repeat:
2 sc into the next stitch, then 1 sc into the next stitch.
Keep repeating to the end.
This row adds more fullness and helps the strip curl even more.
Picot Style Decorative Edge for the Crochet Wind Spinner
When you reach the end, change color again for the final decorative edge.
Ch 3.
Turn your work.
Make a sl st into the first chain.
Sk 1 stitch.
Make another sl st.
Ch 2.
Make a sl st into the first chain.
Sk 1 stitch.
Make a sl st.
Ch 2.
Make a sl st into the second chain.
Keep repeating this same style until you reach the end of the row.
This picot style decorative edge gives the wind spinner a neat, textured finish. The transcript does not give a full stitch-count repeat for this edge, so if you are new to this type of edging, pause the video at this part and follow the slip stitch placement closely.
How to Make the Hanging Loop
After the last sl st, make the hanging loop.
Chain as long as you want the loop to be.
For the sample, I made 25 chains.
Then sl st into one of the chains on the loop.
Ch 1 and cut the yarn.
This simple chain loop makes it easy to hang your crochet wind spinner on a porch, balcony, window hook, or wall hook.
Add Beads and a Crochet Butterfly to the Wind Spinner
The butterfly used for this wind spinner comes from my crochet butterfly keychain tutorial. You can use that same butterfly here, skip the antennae for this version, and finish the top with beads instead.
Thread your beads in any colors you like.
Secure the bead section between the first-row stitches of the wind spinner.
Then attach the crochet butterfly to the bottom end.
Thread your beads in any colors you like.
Secure the bead section between the first-row stitches of the wind spinner.
Then attach the crochet butterfly to the bottom end.
This small butterfly detail turns the project into a sweet crochet gift idea and gives the finished piece a more special handmade look.
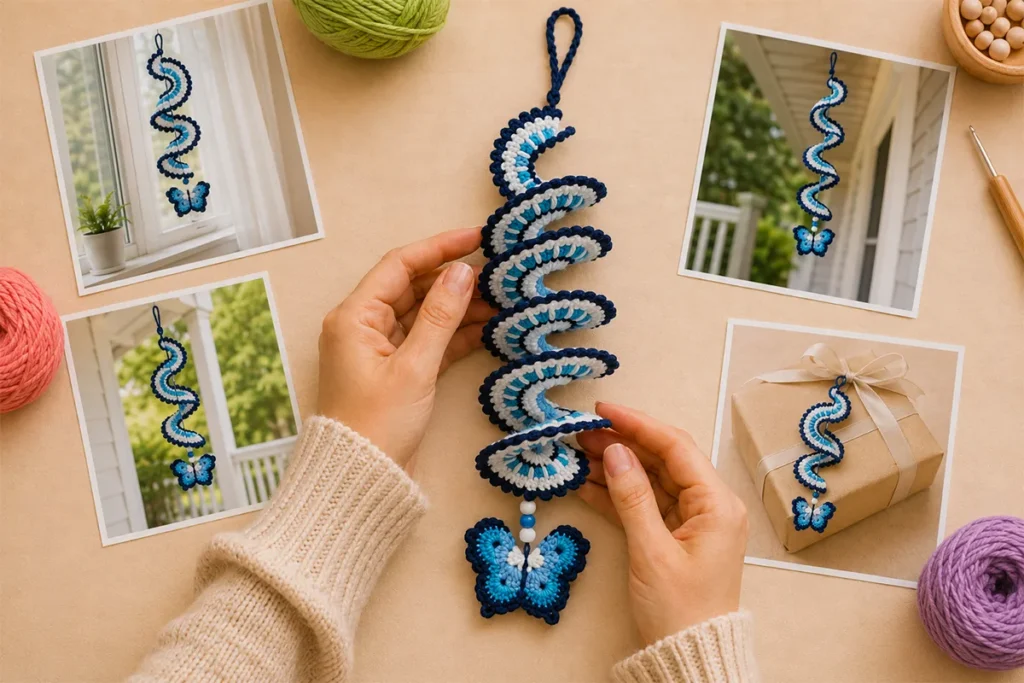
How to Shape the Crochet Wind Spinner
After attaching the beads and butterfly, hold the piece from the hanging loop.
Gently twist it around itself to create the full wind spinner shape.
Take a moment to adjust the spiral.
Let the curls open evenly.
Once the piece settles, you will see the blue and white twist more clearly. This is the moment when the simple crochet strip finally becomes a beautiful hanging spiral.
Handmade Porch Decor and Gift Ideas
This easy crochet wind spinner is lovely for:
- porch decor
- balcony decor
- window decor
- garden corners
- craft fair displays
- handmade gifts
- summer crochet projects
- evil eye inspired crochet decor
You can make it in blue and white like the tutorial, or choose colors that match a holiday, a room, or the person you are making it for.
A soft coastal version would look beautiful with white, light blue, and navy.
If you want something brighter for summer, try yellow, pink, and turquoise.
When making it as a gift, choose the recipient’s favorite colors and finish it with matching beads.
More Easy Crochet Ideas You May Like
If you enjoy small handmade decor projects like this easy crochet wind spinner, you may also like a few other beginner-friendly crochet ideas on the blog.
For the butterfly detail at the bottom, you can use the same small butterfly from my crochet butterfly keychain tutorial. It works beautifully as a charm, and for this wind spinner version, you can skip the antennae and finish it with beads instead.
If you love quick handmade gifts, take a look at more easy crochet keychain patterns. Small projects like keychains, charms, and mini decorations are perfect for using leftover yarn and making cute last-minute gifts.
You can also explore more crochet home decor patterns if you want to make handmade pieces for your porch, balcony, window, or craft room.
And if you are just getting comfortable with basic stitches, my easy crochet patterns for beginners are a great place to find simple projects with clear step-by-step instructions.
Helpful Tips for a Smooth Crochet Wind Spinner Spiral
Keep your tension relaxed from the beginning. Tight stitches can make the spiral harder to open.
The increase rows are what help the strip start curling.
Keep the front of your stitches facing you when adding the contrast detail.
The navy treble crochet detail is worked down into the skipped stitches below, which makes the blue and white design stand out.
Use bead colors that match your yarn or your home decor.
Once the piece is twisted and opened, adjust the curls gently so the spiral hangs evenly.
Final stitch counts are not given for each row, so focus on the stitch placement as you work.
Frequently Asked Questions About This Easy Crochet Wind Spinner
What type of yarn and hook size should I use?
For best results, I recommend using sport or DK weight cotton yarn with a 2.50 mm crochet hook. Cotton yarn helps the spiral hold its shape nicely while still keeping the wind spinner light and flexible.
What is the recommended size for the wind spinner?
You can make the starting chain as long as you want your wind spinner to be. For a nice size, about 35 to 40 cm works well, which is around 14 to 16 inches. In this tutorial, the sample starts with 75 chains.
Is this crochet wind spinner pattern suitable for beginners?
Yes, this crochet wind spinner pattern is beginner-friendly. It uses basic US crochet stitches, including chain, single crochet, double crochet, treble crochet, and slip stitch. The spiral looks impressive, but it is made with simple increase rows.
Why is my wind spinner not curling into a spiral?
The spiral shape is created by the increase rows. When you work multiple stitches into the same stitch, the strip starts to curl naturally. If your wind spinner is not opening smoothly, your tension may be too tight. Try to keep your stitches relaxed and even.
How do I create the blue and white contrast effect?
The blue and white contrast effect is made in the contrast detail row. Navy treble crochets are worked down into skipped stitches from the previous row, while the white stitches continue across the top. This creates the bold detail that makes the spiral stand out.
What is the picot-style edge?
The picot-style edge is the final decorative border made with chains and slip stitches. It adds texture and gives the wind spinner a more finished look.
How do I make the hanging loop?
After the last slip stitch, make a chain as long as you want the hanging loop to be. In this tutorial, 25 chains are made. Then slip stitch into one of the chains on the loop, chain 1, and cut the yarn.
Can I customize the bottom decoration?
Yes. This tutorial uses beads and a crochet butterfly at the bottom, but you can choose bead colors that match your yarn or your home decor. For this version, the butterfly is used without antennae so the beads can be added as the decorative finish.
Where can I find the crochet butterfly pattern?
The butterfly used in this wind spinner was shared before as a keychain tutorial. You can use that same butterfly for this project. For this wind spinner version, skip the antennae and finish the top with beads instead.
Where can I use this crochet wind spinner?
This crochet wind spinner is lovely for porch decor, balcony decor, window decor, garden corners, or as a handmade gift. You can change the colors to match your home, the season, or the person you are making it for.
Where can I find the written instructions? You can download the full step-by-step PDF here.
If you make this easy crochet wind spinner, I’d love to know which colors you used. You can watch the full step-by-step video tutorial on YouTube, download the PDF pattern, and follow Crochet Craftsman for more beginner-friendly crochet projects.
Watch the video tutorial.
Download the written PDF pattern:
Follow along for more crochet ideas:
YouTube:
https://www.youtube.com/@CrochetCraftsmann
Instagram:
https://www.instagram.com/Craftsman_Crochet
Facebook:
https://www.facebook.com/crochetcraftsmann/
Pinterest:
https://tr.pinterest.com/tubacrochet/