Discover how to crochet a quick & easy summer crop top! This DIY tutorial is perfect for beginners and offers a free pattern for a beautiful design.
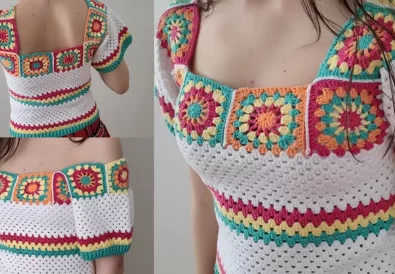
Get ready to add a touch of handmade charm to your summer wardrobe with this gorgeous crochet crop top pattern. Whether you’re a seasoned crocheter or a curious beginner, this project is the perfect way to create a unique and stylish garment. Crocheting is not only a fun and relaxing hobby, but it also allows you to express your creativity and make one-of-a-kind pieces. This breezy crop top is a fantastic project for warmer weather, and I’m here to guide you every step of the way!
Materials
Before we dive in, let’s gather our supplies:
- Yarn: For this project, I recommend using a light or medium-weight yarn in a summery fiber like cotton or a cotton blend. The Sinfonia yarn used in the video tutorial is a great option.
- Crochet hook: Choose a crochet hook size that is appropriate for your chosen yarn. The pattern will usually suggest a hook size.
- Scissors: For cutting your yarn.
- Tapestry needle: To weave in loose ends.
- Stitch markers: (Optional, but helpful for keeping track of your stitches)


Crochet Know How
Let’s talk about some of the techniques you’ll use in this pattern:
- Chain Stitch (ch): One of the most basic crochet stitches, forming the foundation of many projects.
- Single Crochet (sc): A versatile stitch used to create a dense fabric.
- Picot Stitch: A decorative stitch adding a dainty, scalloped edge.
If you’re a beginner, don’t worry! There are many excellent online resources and YouTube videos (like the one on the Isabella.Crochett channel: https://www.youtube.com/@isabella.crochett ) to help you master these stitches.
Gauge:
Gauge is not crucial for this project, but maintaining consistent tension will create a neat and even fabric.
Notes:
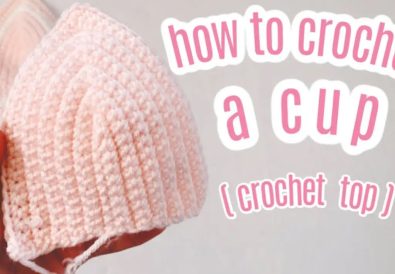
- This pattern creates two separate cup pieces that are then sewn together.
- You can adjust the length of the crop top by adding or subtracting rows to the cup sections.
- The picot edging adds a decorative touch, but you can substitute it with a simple row of single crochets if desired.
Let’s Create Your Crochet Summer Top
Now, let’s get into the step-by-step pattern:
The Cups:
- Start Chain (Foundation Chain): Chain 14 stitches.
- First Row: Single crochet into the second chain from your hook and in each stitch across the chain (creates 13 single crochets).
- Turning Chain: Chain 1 stitch to turn your work.
- Second Row: Work 2 single crochets into each stitch across the row (creates 26 single crochets).
- Body of the Cup: Repeat row 4 (work 2 single crochets into each stitch across) for approximately 10 more rows, or until the cup reaches your desired height. Tip: Try the cup on yourself to determine the appropriate length.
- Fastening Off: Fasten off your yarn, leaving a long tail for sewing later.


Second Cup:
- Repeat steps 1-6 to create the second cup.
Joining the Cups:
- Placement: Lay the two cup pieces together with right sides facing each other.
- Sewing: Using your tapestry needle and the long tail left from fastening off, single crochet through both thicknesses of fabric along the raw edges, joining the two cups together. Tip: Work one single crochet into each stitch along the edge of the first cup, then into the corresponding stitch on the second cup.
- Continue Joining: Continue single crocheting around the entire joined edge, working 2 single crochets into each corner for a smooth finish. Fasten off your yarn and weave in the loose end.
Edging (Optional):
This pattern utilizes a picot stitch edging for a decorative touch.
- Picot Stitch: Chain 1, single crochet into the next stitch. Chain 3, skip 1 stitch, single crochet into the next stitch. This creates a small loop (picot) and positions you for the next single crochet.
- Repeat Edging: Continue working picot stitches around the entire top edge of your crop top. A picot stitch is worked in every other single crochet space.
- Fastening Off: Fasten off your yarn and weave in the loose end.
Finishing Touches:
- Weave in any remaining loose ends from throughout your project.
- Blocking (optional): Wet blocking your finished top can help it lay flat and even out the stitches.
Styling Your Crochet Crop Top
This versatile crop top can be styled in many ways!
- Casual: Pair it with high-waisted jeans, shorts, or a skirt for a relaxed summer look.
- Bohemian: Add a flowy skirt, sandals, and statement jewelry for a carefree vibe.
- Beach Ready: Throw it on over your swimsuit for a cute cover-up.
Ascending and Descending Rows (Optional):
This pattern creates a straight crop top. If you’d like to add shaping for a more fitted look, you can incorporate increasing and decreasing rows at the sides.
- Increasing: To make the top wider at the hips, work an extra single crochet into the edge stitch at the beginning and end of specific rows.
- Decreasing: To make the top narrower at the waist, work two single crochets together (sc2tog) at the beginning and end of specific rows.
Experimentation:
Feel free to customize this pattern to create your own unique top! Try different colors, yarn weights, or even add embellishments like fringe or buttons.


Tips
- Tension: Maintain consistent tension throughout your work for an even fabric.
- Counting: Double-check your stitch counts, especially when increasing or decreasing.
- Blocking: Wet blocking can help shape your finished top and even out the stitches.
Conclusion
Congratulations on completing your beautiful crochet crop top! I hope you enjoyed the process of creating this unique piece. Don’t be afraid to experiment with different colors, yarns, or even embellishments to make it truly your own. Be sure to share photos of your finished work on Instagram (@tubacrochets?igsh=MW0wNjA2ZTcwbjUyMw==) or TikTok (@tiktok.com/@tubacrochet). I’d love to see your creations!
Feel free to leave a comment below if you have any questions. And for more crochet inspiration and tutorials, check out the YouTube video that inspired this pattern (https://www.youtube.com/watch?v=E7trf7vr6UU)
Happy crocheting!