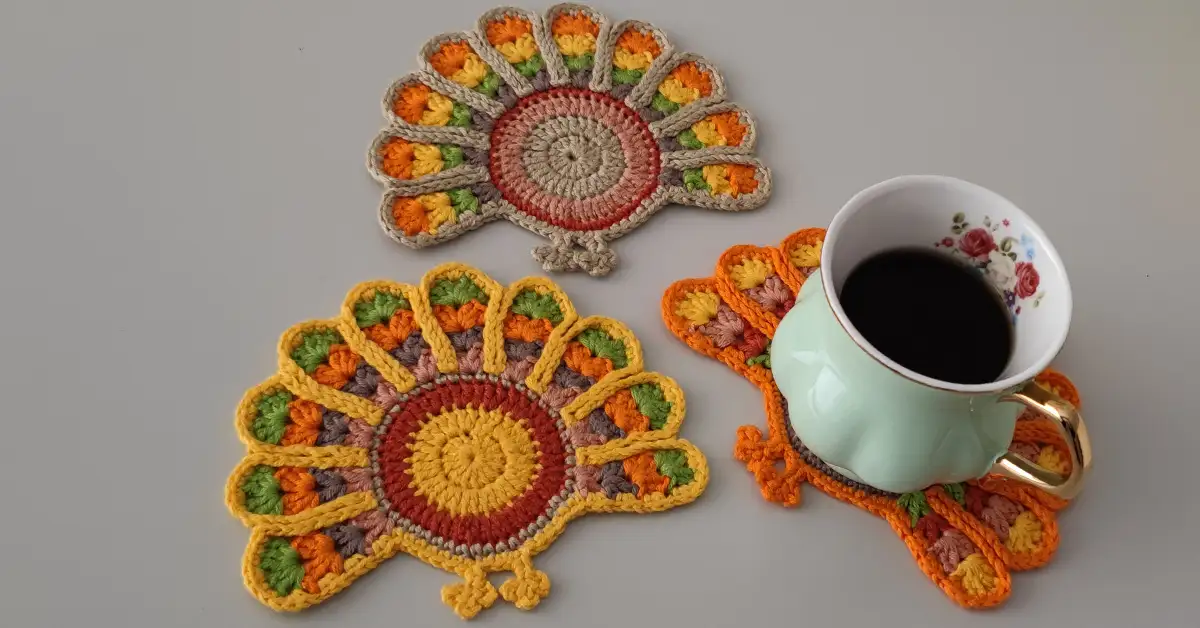
Introducing Your Adorable Crochet Turkey Coaster
Crochet coasters are perfect for adding a bit of charm to your home decor, and this crochet turkey coaster is no exception! With Thanksgiving around the corner, this project is not only festive but also practical, making it a great gift or seasonal table accessory. The crochet turkey coaster pattern is easy to follow, even for beginners, with step-by-step instructions. You’ll be able to whip up a set in no time. This project is perfect for crochet coasters for beginners, with basic stitches, color changes, and simple techniques. Whether you’re new to crochet or have been doing it for years, this DIY crochet coaster will quickly become a favorite fall project. Not only is it cute, but it’s also functional, protecting your surfaces from drink spills.
Why Choose a Crochet Turkey Coaster?
As the leaves change and the air turns crisp, our thoughts naturally turn to Thanksgiving and the cozy vibes of autumn. What better way to embrace the season than with handmade crochet coasters that add a touch of festive charm to your home? Crochet turkey coasters are not only practical but also incredibly cute and a great way to showcase your crafting skills. They make perfect Thanksgiving crochet coasters and thoughtful handmade gifts for friends and family.
The Charm of Handmade Crochet Coasters
DIY crochet coasters are a delightful way to add a personal touch to your home decor. Crochet coaster ideas are endless, allowing you to express your creativity and match your coasters to any season or style. Handmade crochet coasters also make wonderful gifts, especially for those who appreciate the time and effort put into crafting something unique.
Gathering Your Supplies for the Crochet Coaster Project
Materials List for Your Crochet Coaster
To embark on this crochet coaster tutorial, you’ll need a few basic supplies:
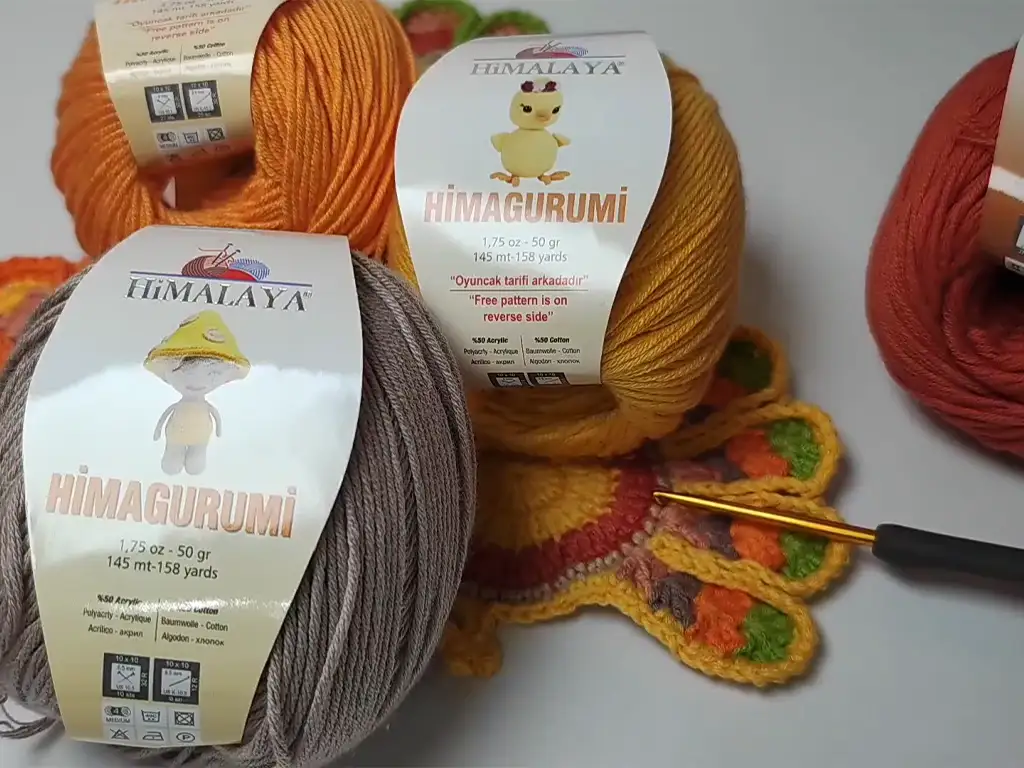
- Yarn: I recommend using worsted weight cotton yarn in at least 5 colors. Specifically, I used Himalaya Himagurumi Cotton Yarns, but any similar cotton yarn will work beautifully.
- Brown (for the body)
- Orange (for the first feather layer)
- Yellow (for the second feather layer)
- Green (for the third feather layer)
- Cream (for the edging and feet)
- Crochet Hook: A 2.75 mm crochet hook is ideal for this project, but you can adjust the hook size depending on your yarn and desired tension. If you’re a beginner, it’s helpful to have a few different sizes on hand to experiment with.
- Scissors: Sharp scissors are essential for cutting yarn cleanly.
- Yarn Needle: A yarn needle with a large eye is used for weaving in the ends of your yarn neatly.
Essential Crochet Tools for Beginners
If you’re new to crocheting, don’t worry! The crochet turkey coaster pattern is a fantastic project for beginners. Here are a few essential tools to get you started:
- Crochet Hook Set: A set with various hook sizes will give you flexibility for different projects.
- Stitch Markers: These small markers help you keep track of your stitches and rounds, especially when working in the round.
- Scissors: As mentioned before, sharp scissors are a must-have.
- Yarn Needle: Essential for weaving in those loose ends.
Step-by-Step Crochet Coaster Tutorial: The Foundation
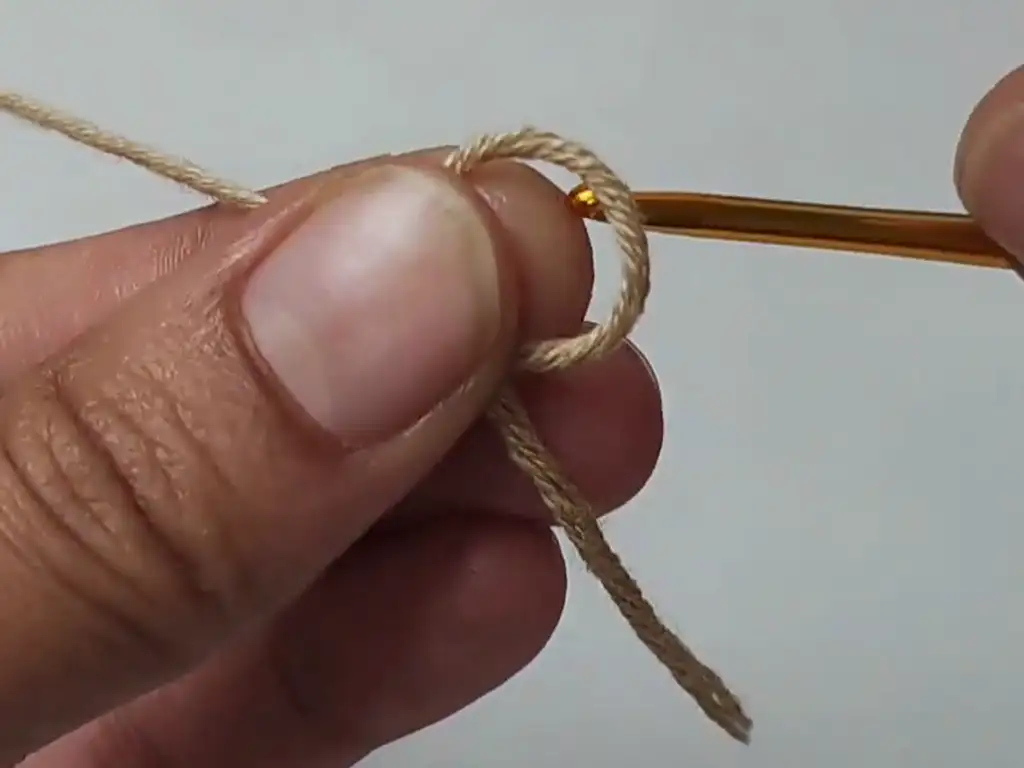
Making the Magic Ring for Your Crochet Coaster
The crochet turkey coaster pattern begins with a magic ring. This technique creates a tight, adjustable starting point for crocheting in the round. If you’re unfamiliar with the magic ring, there are many excellent video tutorials available online, including one by the talented @TubaCrochet on her YouTube channel (https://www.youtube.com/@TubaCrochet).
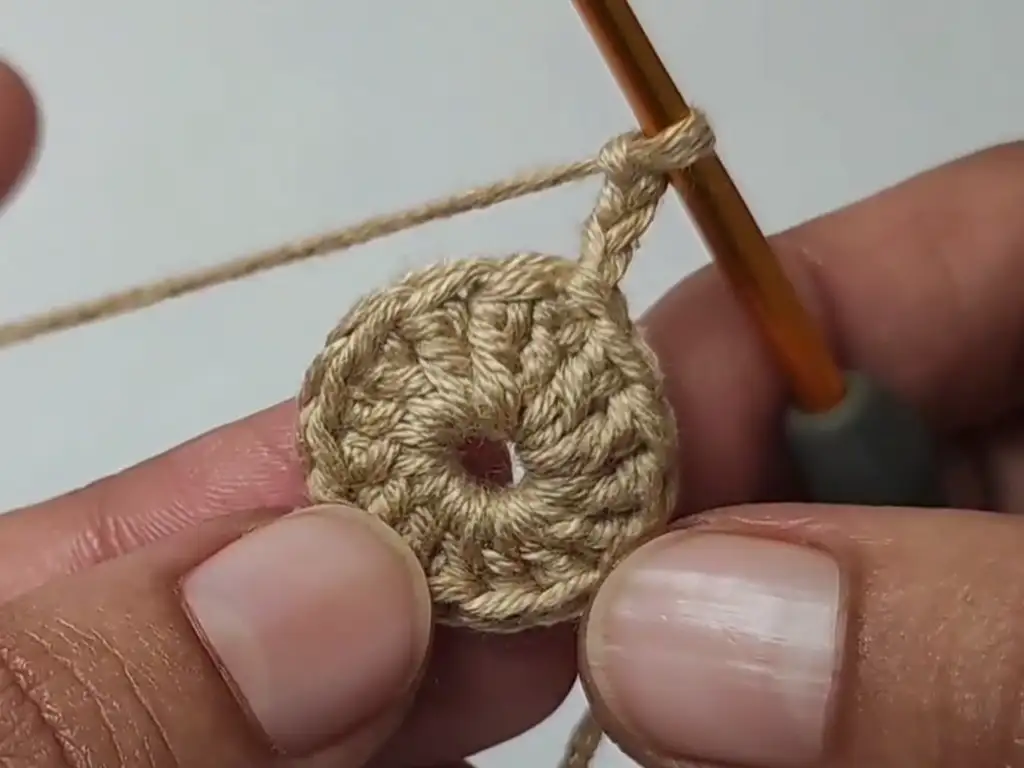
Round 1: Creating the Base of Your Crochet Coaster
After making your magic ring, you’ll begin working the first round of your crochet coaster. This round establishes the base of the coaster and involves primarily double crochet (dc) stitches. If you’re new to double crochet, it’s a simple stitch that creates a solid fabric.
Round 2: Increasing for Your Crochet Coaster
In the second round, you’ll start increasing the number of stitches in your crochet coaster. Increasing means working two double crochet stitches into one stitch from the previous round. This expands the circle and creates the flat, circular shape of the coaster.
Adding Color and Texture to Your Crochet Coaster
Round 3 & Beyond: Stripes and Texture
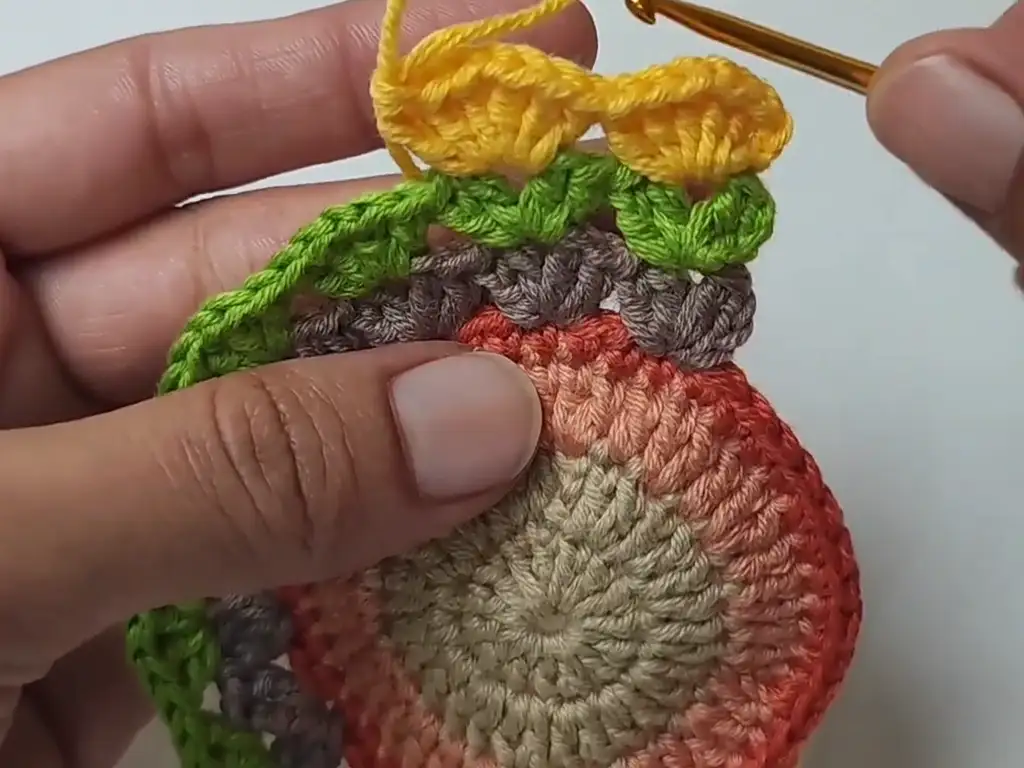
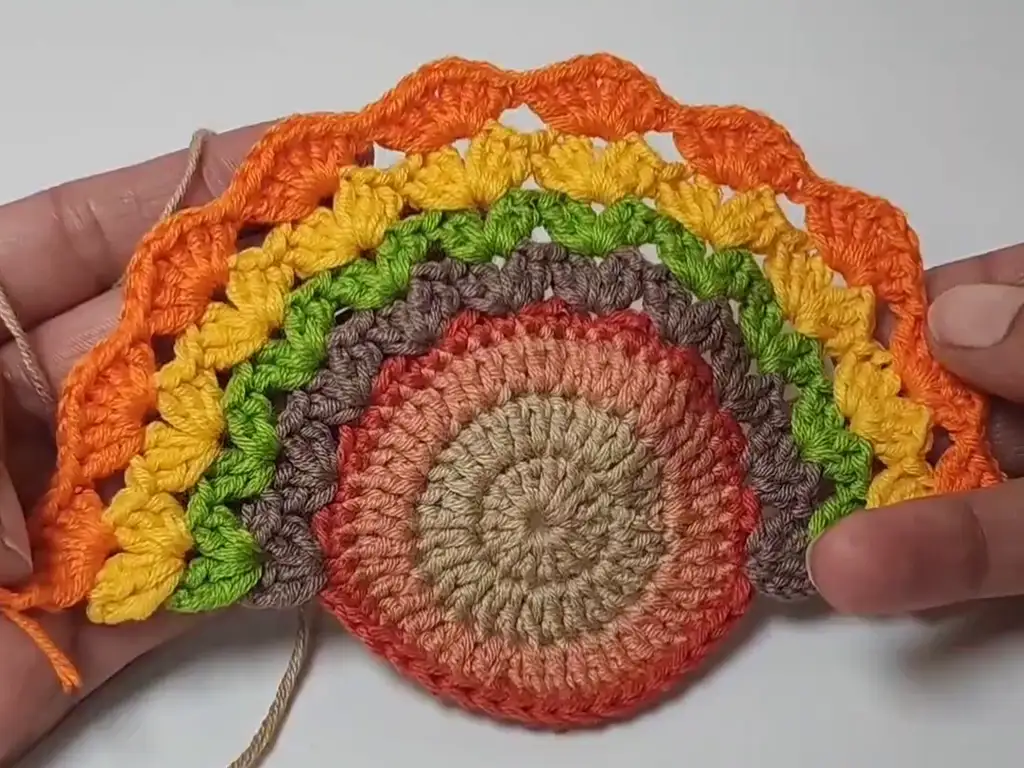
Now that you have the foundation of your crochet coaster, it’s time to add some color and texture! Rounds 3 and beyond involve working with different colors of yarn and introducing a stitch pattern that creates the “feathers” of the turkey. You’ll be working with single crochet (sc), double crochet (dc), and chain stitches (ch) to achieve this effect.
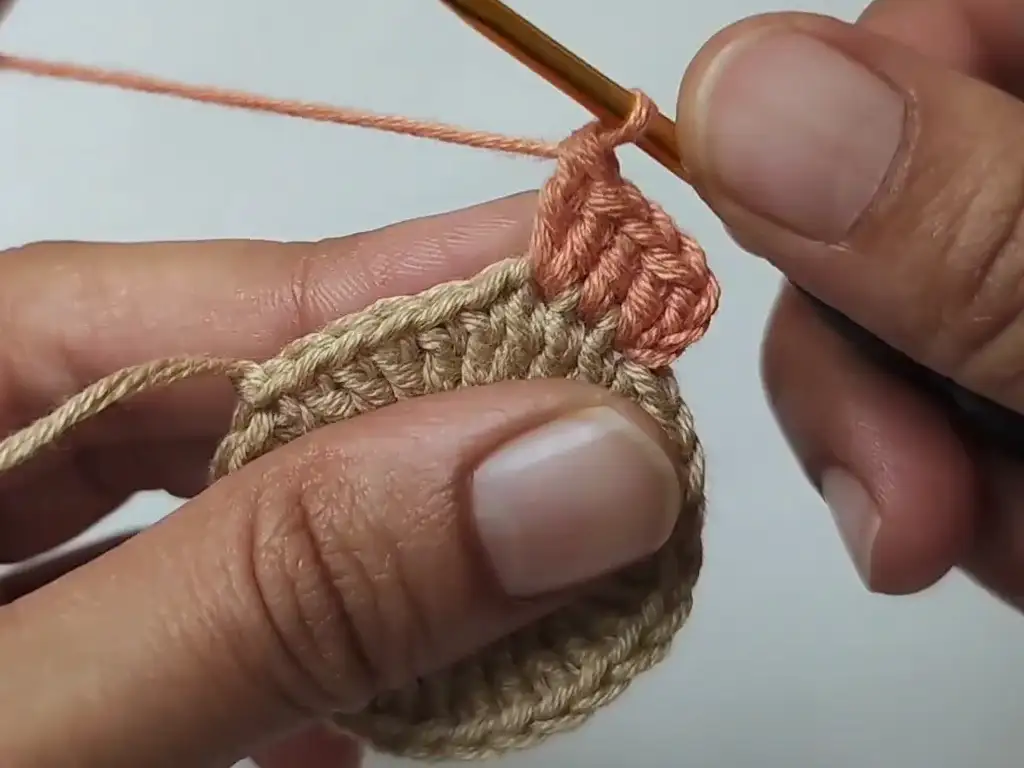
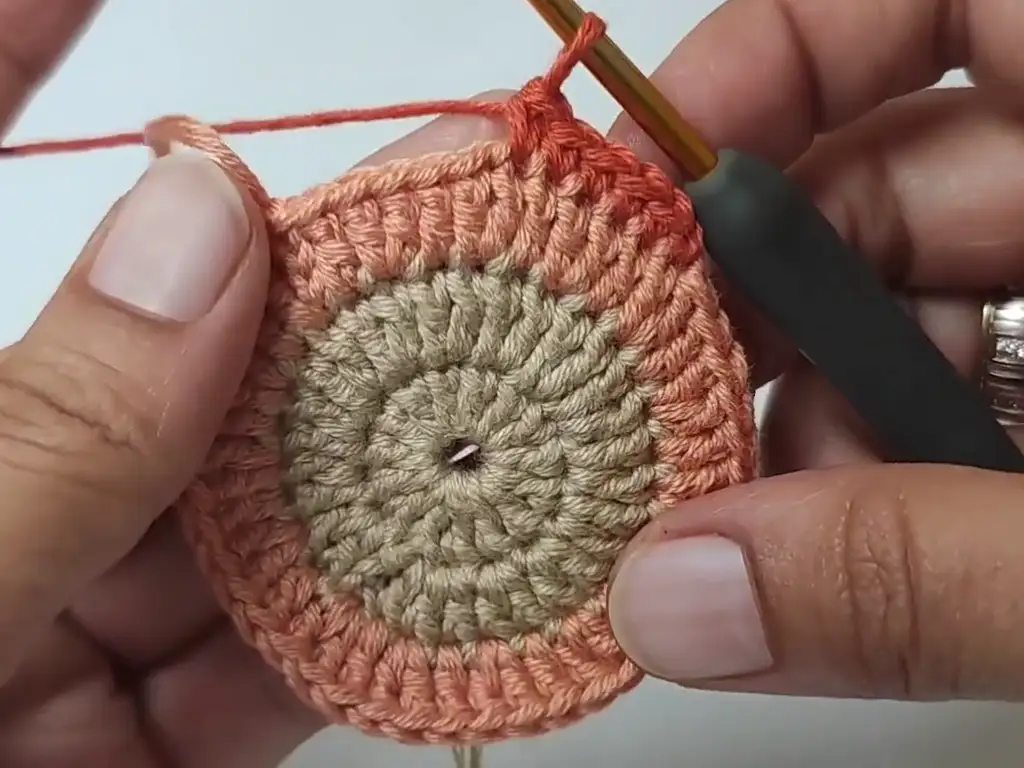

Making Color Changes in Your Crochet Coaster
Changing colors in crochet is easy! When you reach the end of a round and want to switch to a new color, simply finish your last stitch with the old color, then cut the yarn, leaving a tail for weaving in later. Join the new color with a slip stitch in the next stitch, and continue crocheting with the new color.
Maintaining Even Tension in Your Crochet Coaster
As you crochet your DIY crochet coaster, it’s important to maintain even tension. This means keeping your stitches consistent in size and tightness. Uneven tension can result in a wonky or misshapen coaster. Practice and patience are key to achieving even tension.
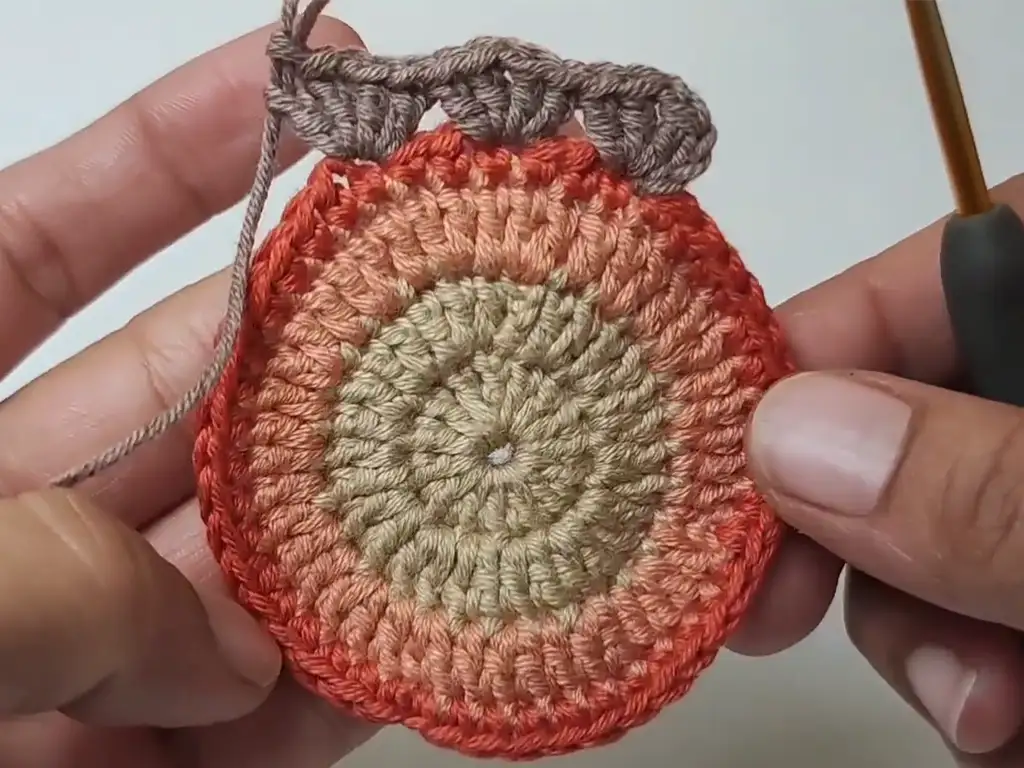

Finishing Touches for Your Crochet Coaster
Weaving in the Ends of Your Crochet Coaster
Once you’ve completed the last round of your crochet turkey coaster, you’ll need to weave in the loose ends of yarn. This creates a neat and professional finish. Use your yarn needle to thread the ends through the back of the stitches, securing them in place.
Adding the Turkey Legs (Feet)
To complete the turkey look, you’ll add two little legs (feet) to your crochet coaster. These are made with simple chains and slip stitches. You can refer to the detailed crochet turkey coaster pattern free below for step-by-step instructions.
Blocking Your Finished Crochet Coaster
Blocking is a technique used to shape and flatten your finished crochet coaster. It involves gently stretching and pinning the coaster to a blocking board or mat and then misting it with water. Allow it to dry completely, and your coaster will have a beautiful, polished look.


Beyond the Basics: More Crochet Coaster Ideas
Variations on the Crochet Turkey Coaster Design
Once you’ve mastered the basic crochet turkey coaster pattern, you can get creative with variations! Experiment with different color combinations, add embellishments like beads or buttons, or even try using variegated yarn for a unique effect.
Inspiration for Your Next Crochet Coaster Project
The possibilities for crochet coaster ideas are truly endless! You can create coasters for any season or holiday, personalize them with initials or names, or even design coasters inspired by your favorite animals or hobbies.
Different Types of Crochet Coasters
There are many different types of crochet coasters you can explore, such as:
- Granny Square Coasters: These classic coasters are made with granny squares, a popular crochet motif.
- Solid Granny Square Coasters: These are solid granny squares which are also easy to make.
- Floral Crochet Coasters: Add a touch of nature to your table with floral-inspired coasters.
- Mandala Crochet Coasters: Create intricate and beautiful coasters using mandala patterns.
- Geometric Crochet Coasters: Experiment with different geometric shapes and stitch patterns.
Crochet Turkey Coaster Pattern
Skill Level: Beginner-friendly
Materials:
- Yarn: Worsted weight cotton yarn in at least 5 colors. I recommend using:
- Brown (for the body)
- Orange (for the first feather layer)
- Yellow (for the second feather layer)
- Green (for the third feather layer)
- Cream (for the edging and feet)
- Crochet Hook: 2.75 mm (or size needed to achieve gauge)
- Scissors
- Yarn Needle (for weaving in ends)
Gauge: Not crucial for this project, but aim for a relatively tight fabric so the coaster lays flat.
Abbreviations:
- ch = chain
- sc = single crochet
- dc = double crochet
- sl st = slip stitch
- st(s) = stitch(es)
- sp = space
- inc = increase (2 dc in one st)
Instructions:
Round 1 (Brown):
- Make a magic ring. (If you’re unfamiliar with the magic ring, there are many tutorials available online.)
- Ch 3 (counts as 1 dc).
- Work 14 dc into the magic ring. (15 dc total, including the ch 3)
- Sl st to the top of the beginning ch 3 to close the round.
Round 2 (Brown):
- Ch 3 (counts as 1 dc).
- Inc in the next st. Repeat from * around. (30 dc total)
- Sl st to the top of the beginning ch 3 to close the round.
Roud 3 (Orange):
- Ch 1. Cut the brown yarn and join the orange yarn with a sl st in any st.
- Ch 3 (counts as 1 dc).
- Dc in the same st as the ch 3.
- Dc in the next st. Inc in the next st. Repeat from * around. (45 dc total)
- Sl st to the top of the beginning ch 3 to close the round.
Round 4 (Yellow):
- Ch 1. Cut the orange yarn and join the yellow yarn with a sl st in any st.
- Sc in each st around. (45 sc total)
- Sl st to the first sc to join.
Round 5 (Green):
- Ch 1. Cut the yellow yarn and join the green yarn with a sl st in any st.
- Ch 3 (counts as 1 dc).
- (2 dc, ch 1, 2 dc) all in the same st. Skip 2 sts. Repeat from * around, ending with (2 dc, ch 1, 2 dc) in the last st. (10 groups of dc clusters total)
- Sl st to the top of the beginning ch 3 to close the round.
Roud 6 (Brown):
- Ch 1. Cut the green yarn and join the brown yarn with a sl st in the ch-1 sp of any dc cluster.
- Ch 3 (counts as 1 dc).
- *(2 dc, ch 1, 2 dc) all in the same ch-1 sp. * Repeat from * in each ch-1 sp around. (10 groups of dc clusters total)
- Sl st to the top of the beginning ch 3 to close the round.
Round 7 (Orange):
- Ch 1. Cut the brown yarn and join the orange yarn with a sl st in the ch-1 sp of any dc cluster.
- Ch 3 (counts as 1 dc).
- *(3 dc, ch 1, 3 dc) all in the same ch-1 sp. * Repeat from * in each ch-1 sp around. (10 groups of dc clusters total)
- Sl st to the top of the beginning ch 3 to close the round.
Round 8 (Yellow):
- Ch 1. Cut the orange yarn and join the yellow yarn with a sl st in the ch-1 sp of any dc cluster.
- Ch 3 (counts as 1 dc).
- *(3 dc, ch 1, 3 dc) all in the same ch-1 sp. * Repeat from * in each ch-1 sp around. (10 groups of dc clusters total)
- Sl st to the top of the beginning ch 3 to close the round.
Edging and Feet (Cream):
- Ch 1. Cut the yellow yarn and join the cream yarn with a sl st in any st along the edge of Round 4 (the yellow sc round).
- (2 sc in the next st, ch 1). Repeat from * around the entire coaster, working into each st of Round 4 and the ch-1 sps of the dc clusters.
- When you reach the first “feather” cluster (Round 5), work (2 sc, ch 1, 2 sc, ch 1, 3 sc) across the cluster.
- Continue working (2 sc, ch 1) in each st/sp around until you reach the next feather cluster. Repeat step 3 for each cluster.
- After finishing the last cluster, continue with (2 sc, ch 1) until you reach the beginning of the round. Sl st to the first sc to join.
Feet:
- Foot 1:
a. Ch 6.
b. Sl st in the 5th ch from the hook.
c. Ch 4. Sl st in the same st as the previous sl st.
d. Ch 4. Sl st in the same st as the previous sl st.
e. 2 sc in the 2nd ch of the initial ch-6.
f. Sl st in the same st where you started the ch-6. - Continue edging: 2 sc in the next st.
- Foot 2: Repeat steps a-f from Foot 1.
- Continue edging with sc until you reach the beginning of the foot section. Sl st to the first sc to join.
Finishing:
- Weave in all loose ends securely.
Tips for Adjusting Size:
- To make the coaster larger: You can increase the size by adding more rounds before starting the “feather” section (Rounds 5-8). You can also add more dc clusters in each feather round.
- To make the coaster smaller: You can decrease the size by working fewer rounds before the feather section. You can also decrease the number of dc clusters in each feather round.
Color Variations:
- Feel free to get creative with your color choices! You can use any colors you like to make your turkey unique.
- You can also try using variegated yarn for a fun effect.
Downloadable Pattern:
You can download a free PDF version of this crochet turkey coaster pattern here: https://crochetstrends.com/wp-content/uploads/2024/10/Crochet-Turkey-Coaster-Pattern.pdf
Watch the Video Tutorial:
For a visual guide, be sure to check out the fantastic video tutorial by @TubaCrochet on YouTube: https://www.youtube.com/watch?v=G3DHmJOdq00
Share Your Creations!
We’d love to see your finished crochet turkey coasters! Share your projects on Instagram (https://www.instagram.com/tubacrochet_/), TikTok (tiktok.com/@tubacrochet), and Facebook (https://www.facebook.com/tubacrochet/).
Let’s Connect!
We encourage you to leave a comment below and share your thoughts on this crochet coaster pattern. Have you tried making crochet coasters before? What are some of your favorite crochet coaster designs?
Other Crochet Projects You’ll Love
Are you looking for more creative crochet projects? Check out my other blog posts for inspiration. I have a ton of fun, easy-to-follow crochet patterns for all skill levels!
- Crochet Pumpkin Coaster: Add a touch of Halloween spirit to your home with these adorable pumpkin coasters.
- Crochet granny squares: Learn the classic granny square and use them to create blankets, cushions, or other accessories.
- Crochet blankets: Make a cozy and colorful blanket for a loved one’s new arrival.
We hope you have a wonderful time crafting your own adorable crochet turkey coasters. Happy Thanksgiving!