

Looking for a pretty and practical project? Try this crochet rose coaster tutorial!
It looks like a bouquet, but folds open into a beautiful floral drink coaster.
This pattern is simple, fun, and perfect for beginners and advanced crocheters alike.
You’ll love how it transforms from a soft rose into a useful handmade piece.
Let’s grab some yarn and start stitching something lovely together!

Materials Needed for Your Crochet Rose Coaster
Yarn Type, Hook Size, and Tools
To make this crochet rose coaster, you’ll need a few simple materials. Use 100% cotton yarn for structure and durability. Choose soft pink for the roses, white or yellow for the base, and green for the leaves. A 2.20 mm crochet hook is perfect for achieving clean stitches. You’ll also need scissors, a yarn needle, and optionally, a stitch marker to help track your rounds.
Recommended Colors and Fiber Content
Additionally, cotton yarn holds its shape well, which is ideal for flower coaster patterns. Try pastel tones like blush pink or light yellow for a soft bouquet feel. You can also experiment with bolder colors for a modern twist.
Step-by-Step Crochet Rose Coaster Pattern
Creating the Base
Start with a magic ring.
Chain 2, then make 11 double crochets into the ring—12 stitches total.
Pull the yarn to close the ring tightly.
Slip stitch into the top of the starting chain to finish the round.
In Round 2, chain 2.
Work 2 double crochets in each stitch around.
You’ll now have 24 stitches.
In Round 3, work 1 double crochet in the next stitch, then 2 double crochets in the next.
Repeat this sequence all the way around.
Slip stitch to join. You should now have 36 stitches.
Round 4: Chain 2.
Work 1 double crochet in the next 2 stitches, then 2 in the third.
Keep going with this pattern until you reach 48 stitches.
Round 5: Keep increasing.
Do 1 double crochet in the next 3 stitches, then 2 in the fourth.
Chain 1 between each group—this will create spacing for the leaf loops later.
Rounds 6 and 7: Keep the pattern going.
Now make 4 double crochets per group, then 5 in the next round.
Continue adding 1 extra double crochet in each group with every round.


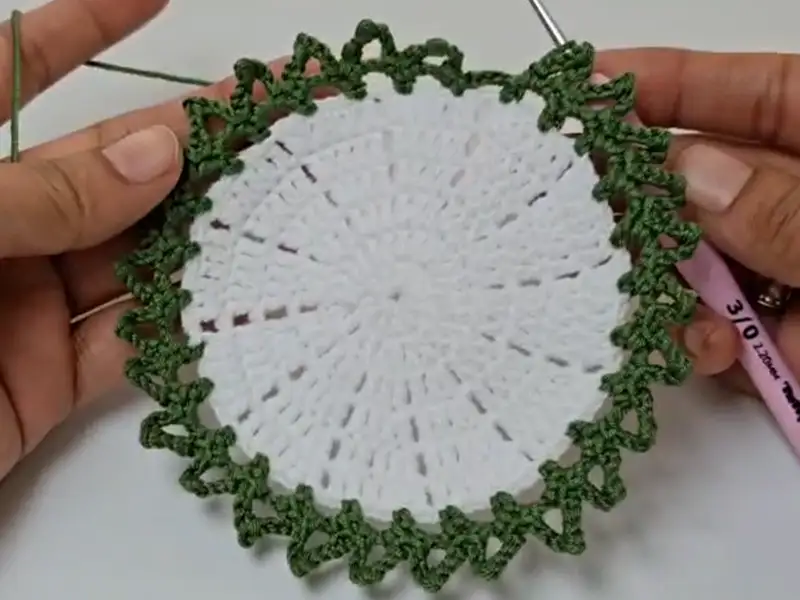
Making the Leaf Loops and Petals
Attach green yarn to any stitch on the final round of the base.
Chain 4, skip 2 stitches, and single crochet in the next. Repeat this around the coaster.
To make the leaves, go into the first chain space. Work a single crochet, then chain 4.
Slip stitch in the second chain from your hook, chain 3, and single crochet in the same space.
Repeat this pattern in each chain loop to form the leafy edges.
After that, move on to the roses.
Crocheting the Roses
Attach pink yarn to the base of a triangle between leaf spaces.
Chain 12. In the fourth chain from the hook, work 3 double crochets.
Then make 3 double crochets in every remaining chain.
Once complete, chain 3 and slip stitch into the starting spot.
Twist the strip to form a rose shape and secure it with a stitch at the back.
Repeat in every third triangle space, or space evenly around the coaster.


Attaching Everything Together
Finally, secure all roses and shape the bouquet.
Use a yarn needle to sew each rose in place around the outer edge.
Adjust the shape by hand so the bouquet looks full and rounded.
You can gently fold the coaster inward to shape it like a blooming bouquet.
Pro Tips for Crochet Rose Coaster Projects
Tips for Crochet Rose Coaster Beginners
If you’re new to crochet, take your time with each step.
Use a stitch marker to help track your rounds, especially for the base.
Keep your tension even so your stitches don’t curl or bunch.
When making the rose strip, try not to pull too tight—this helps the rose roll easily.
Don’t worry if your first rose looks messy. Practice makes perfect!
Weaving in your ends neatly will give your crochet flower coaster a polished finish.
Color Ideas for Your Crochet Rose Coaster
Want a realistic look? Go for soft pink roses, light green leaves, and a white base.
Feeling bold? Try red roses with dark green leaves and a black base.
For a spring theme, use pastels—lavender, mint, pale yellow, and blush.
Monochrome more your style? Use different shades of one color for the entire piece.
You can even make a set of coasters, each with different flower colors for variety.
Above all, experiment with colors that make you happy!
Frequently Asked Questions (FAQ)
Q1: Is this pattern beginner-friendly?
A: Yes, this crochet rose coaster is great for beginners.
The stitches are basic, and each part is broken into simple steps.
Q2: What yarn works best for this coaster?
A: Use 100% cotton yarn for a firm, absorbent finish.
It holds shape better than acrylic, especially for the 3D rose petals.
Q3: Can I make this coaster without the roses?
A: Yes! You can stop after the leaf round for a floral base design.
It still looks lovely as a standalone crochet flower coaster.

Wrap Up: Crochet Rose Coaster & Final Thoughts
You’ve just learned how to create a beautiful, handmade crochet rose coaster.
From magic rings to rolled roses, every step comes together in this blooming design.
Whether you gift it or use it at home, it’s a lovely and practical project.
What colors will you try for your rose coaster?
Let us know in the comments below—we’d love to hear your ideas!
Watch the Full Video Tutorial
This design was created by @CrochetCraftsmann on YouTube.
Watch the full tutorial here
Don’t forget to like, comment, and subscribe for more creative crochet content!
Share Your Projects
Finished your coaster?
Share it with us on social media—we’d love to see your version!
Tag @tubacrochet on:
Download the Free Written Pattern
Want to print it or follow offline?
Download the PDF pattern here
It includes detailed steps, shaping instructions, and helpful tips.
Other Crochet Projects You’ll Love
Here are some other creative patterns to explore next:
- Crochet Rosebud Keychain – A quick and elegant gift idea
- Puff Stitch Heart Keychain – Soft and adorable for any occasion
- Crochet Chicken Coaster – Fun and playful for your kitchen table
- Macrame Yarn Bag – Stylish and practical for everyday use


