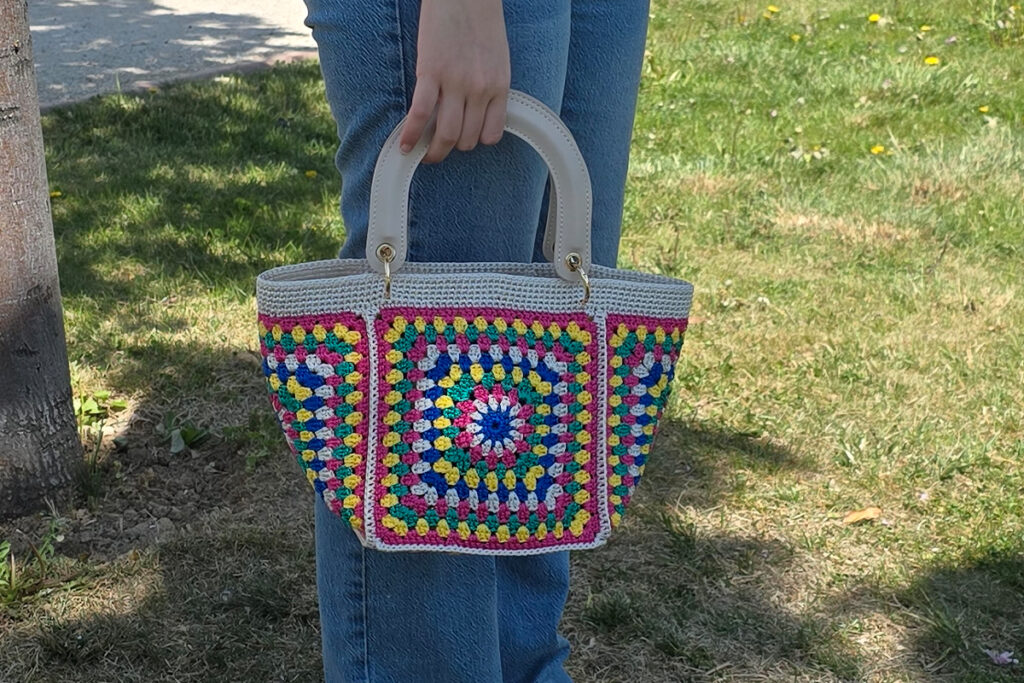
Looking for a fun, colorful, and beginner-friendly crochet project? You’re in the right place! In this tutorial, we’ll walk you through how to make a Crochet Macrame Handbag using simple granny squares. Whether you’re brand new to crochet or looking for a fast weekend project, this crochet handbag tutorial is a perfect choice. You’ll learn how to stitch the squares, join them into a tote, and finish with a beautiful handle—either leather or handmade!
Need visual guidance? Watch the full step-by-step tutorial here while following the written pattern below.
Let’s grab our yarn and get started!
Materials You’ll Need for This Crochet Macrame Handbag
Before we begin, let’s make sure you have everything ready.
For this project, you’ll need 5 skeins of Spoga No.3 macrame rope in your favorite colors. This rope is 100% polyester, which makes it strong and perfect for bags. You can use multiple colors for a vibrant look, or stick to one for a minimalist style.
We’ll be using a 2.75 mm crochet hook for the entire project—including the squares and the bag assembly.
You’ll also need a yarn needle to weave in ends and scissors to trim your yarn neatly.
If you want a more polished result, try adding leather bag handles. Or for a full handmade touch, crochet your own straps using simple techniques like I-cord or flat bands.
Got everything ready? Let’s get started!
How to Crochet the Granny Squares for the Bag
The base of this stylish handbag is made from five identical granny squares, each with 11 rounds.
Step-by-step granny square tips:
- Begin from the center and work outward, following a standard granny square structure.
- Use the same color sequence for all five to keep the design cohesive.
- Each square should measure around 18 cm wide.
- Keep your tension even to ensure all squares are the same size.
If you want a larger bag, simply increase the number of rounds per square. For a smaller version, decrease the rounds. You’ll find a video link in the tutorial description that walks you through the square-making process in detail.
Assembling the Crochet Granny Square Bag – Step by Step
Now let’s bring your squares together and build the body of your crochet handbag.
Follow this layout:
- Lay the five squares in a T-shape formation—one center square for the base, one on each side, and one each for the front and back.
- Use single crochet stitches (sc) to join edges, always working from the right side (RS).
- At each corner, make 2 single crochets to secure the angle and reinforce the seams.
Begin joining the base square to the front, back, and both side squares. Work your way around until all five are attached. This forms the solid foundation of your bag.
Vertical Joins to Shape Your Crochet Macrame Handbag
Once the base layout is assembled, it’s time to join the squares vertically to create the side walls.
- Continue from where you left off, joining upward with single crochet.
- Join opposite loops for a clean and invisible seam.
- Be consistent—always make 2 sc at each corner.
- On two sides, you’ll need to cut and rejoin the yarn to start fresh.
At this stage, your crochet granny square bag will really start to look like a finished tote!
Adding the Top Border of Your Crochet Tote Bag
Let’s clean up the top edge and give the bag a neat, structured finish.
Border instructions:
- Join your yarn to the top of any square.
- Round 1: Ch 1, sc in each stitch across. Make 2 half double crochets (hdc) in each corner.
- If needed, add an extra hdc in the seam between squares.
- Rounds 2–6: Ch 1, sc in each stitch around, join with sl st.
This top band adds both structure and elegance. You can repeat this process for more or fewer rounds depending on your style preference.
How to Attach the Crochet or Leather Bag Handle
Once the top border is complete, it’s time to add the finishing touch.
- You can use leather bag handles for a professional look.
- Alternatively, crochet your own using an I-cord or flat strap.
- Sew or secure the handle into the center top edges of the front and back panels.
Looking for inspiration? Head to the bag handle playlist on TubaCrochet’s channel for plenty of strap ideas!
Finishing Touches for Your Handmade Crochet Handbag
Don’t forget the final details that bring everything together!
- Weave in all ends using a yarn needle for a clean interior.
- Gently steam block the bag if you want sharper edges.
- Personalize it with buttons, lining, or keychain accessories.
This crochet macrame handbag is not just beautiful—it’s versatile and totally giftable!
Download the Free PDF Crochet Bag Pattern
Want a printable version of this pattern? We’ve got you covered!
Click here to download the full PDF
It includes step-by-step instructions and full-color crochet diagrams for the squares, layout, and top edge.
Frequently Asked Questions – Crochet Macrame Handbag
Can I use cotton yarn instead of macrame rope?
Yes, but polyester rope adds structure and durability, which is ideal for bags.
How can I line this crochet bag?
You can sew a fabric lining and attach it using a whip stitch just below the top border.
What’s the best way to secure the handle?
Use durable thread or yarn to stitch through reinforced stitches or buttons.
Can I wash this crochet macrame bag?
Yes! Hand wash gently in cold water and lay flat to dry.
Can I make this bag larger or smaller?
Absolutely. Simply increase or decrease the number of rounds in your granny squares.
Other Crochet Bag Projects You’ll Love
- [Crochet Rose Bouquet Blanket – Easy and Elegant Gift Idea]
- [Crochet Rosebud Keychain – Quick and Cute Project]
- [Floral Coaster – Beginner Friendly and Decorative]
Ready to Crochet Your Own Macrame Handbag?
This crochet macrame handbag is fun, stylish, and perfect for everyday use.
Have you tried it yet—or do you plan to customize it with your own colors? Let us know in the comments below!
Watch the full video tutorial here:
Click to watch on YouTube – TubaCrochet
Don’t forget to like, comment, and subscribe to support the channel: @TubaCrochet
Share your finished bag with us!
Tag us on social media so we can feature your project:
• Instagram: @tubacrochet_
• TikTok: @tubacrochet
• Facebook: Tuba Crochet
Download the PDF Pattern and save it to your crochet library forever.
Happy crocheting—and see you in the next pattern!