

The crochet cloche hat is a timeless classic, exuding elegance and vintage charm. Initially popular in the 1920s, the cloche hat has made a resurgence in recent years, becoming a beloved accessory for fashion-conscious crocheters. This crochet hat pattern offers a beautiful blend of texture and structure, thanks to the use of Tunisian crochet and a clever Regilin brim. Beginner crochet enthusiasts will find this pattern manageable, with clear instructions and helpful tips along the way. Overall, the finished crochet cloche hat is a versatile piece, perfect for keeping warm during fall and winter or adding a touch of sophistication to any outfit.
Crochet Cloche Hat: Materials & Tools
Before we dive into the pattern, let’s gather our materials. To begin with, you’ll need a few essential items to create your crochet cloche hat.
Materials:
- Yarn:
- Main Color (MC): Medium weight yarn (approximately 240m/100g), such as a wool/acrylic blend. You’ll need approximately 150-200 yards, depending on the desired size and brim width.
- Optional Contrast Color (CC): For embellishments or a contrasting brim.
- Crochet Hook: 3.5mm (or size needed for your chosen yarn achieve gauge).
- Regilin: 4mm wide, approximately 1mm thick, cut slightly longer than your desired brim circumference.
- Tapestry Needle: For weaving in ends.
- Scissors
Choosing the Right Yarn for Your Crochet Cloche Hat
The beauty of a crochet cloche hat lies in its texture and drape. Specifically, a medium-weight yarn, such as a wool/acrylic blend, works wonderfully for this project. The example in the video uses a yarn with approximately 240 meters per 100 grams. As you can see, this creates a fabric that is both warm and has a lovely drape. Of course, you can experiment with other yarn fibers and weights, but keep in mind that this may affect the overall size and drape of your finished hat. Consider color options as well. For instance, a rich jewel tone or a classic neutral shade would both create a stunning crochet hat for women.
Essential Crochet Hooks for a Perfect Cloche
In this tutorial, we’ll be using a 3.5mm crochet hook. However, the ideal hook size may vary depending on your chosen yarn and personal tension. As a general rule, it’s best to start with the hook size recommended on your yarn label and adjust as needed achieve a comfortable tension. You want your stitches to be defined but not too tight.
Understanding Regilin: The Secret to a Structured Brim
Regilin is a stiff, yet flexible, ribbon-like material used give shape and structure to hat brims. It’s the secret ingredient that gives our crochet cloche hat with brim its elegant, defined shape. In this case, we’ll be using 4mm wide Regilin that’s about 1mm thick. You can find Regilin at most craft stores or online.

Crochet Cloche Hat Pattern: Getting Started
Now that you know what materials you need, let’s jump into the crochet cloche hat pattern!
Making the Foundation Chain for Your Cloche
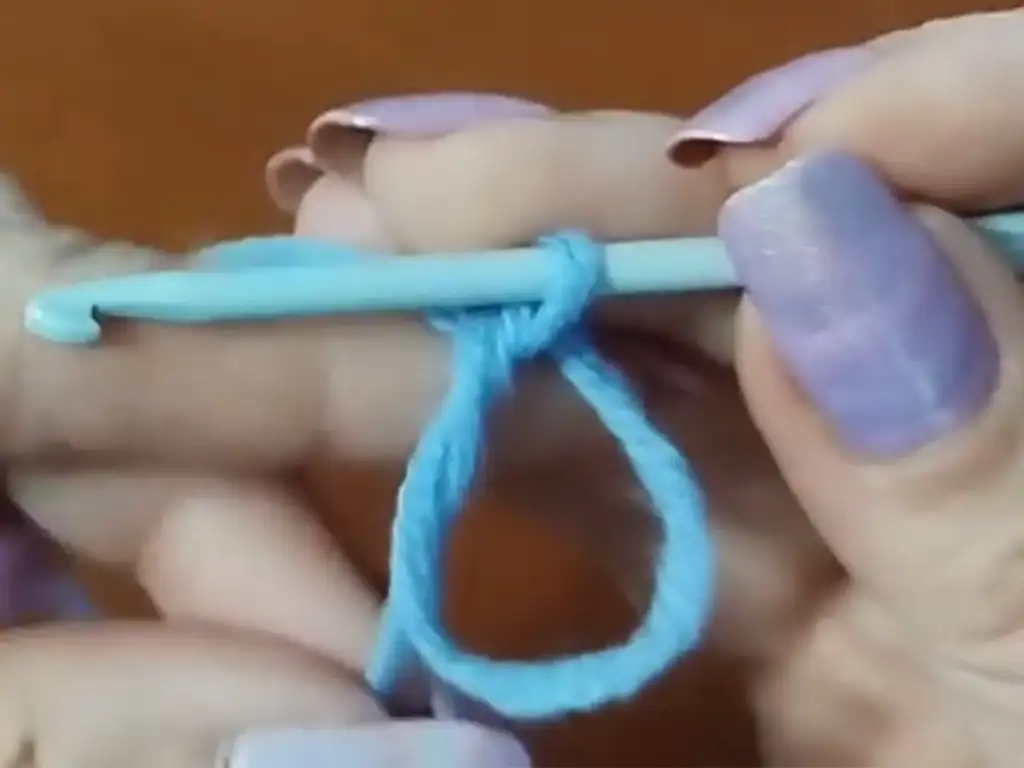
To begin, we’ll start with the crown of the crochet cloche hat. The crown is worked in the round, starting with a magic ring. If you’re unfamiliar with the magic ring technique, don’t worry! There are plenty of helpful tutorials available online.
Understanding Crochet Cloche Hat Sizing
This crochet cloche hat pattern is written for an average adult head circumference of 22-23 inches (56-58 cm). However, you can easily adjust the size by adding or subtracting rounds in the crown section. Each additional round will increase the circumference by approximately 1 inch (2.5cm). For example, if you need a larger hat, you might add one or two more rounds to the crown.
Essential Crochet Abbreviations for Cloche Hats
Before we proceed with the pattern, let’s familiarize ourselves with some common crochet abbreviations:
- ch: chain
- sl st: slip stitch
- sc: single crochet
- hdc: half double crochet
- TSS: Tunisian simple stitch
- FPsc: front post single crochet
- st(s): stitch(es)
- rnd(s): round(s)
- beg: beginning
- rep: repeat
- RS: right side
- WS: wrong side
Tunisian Simple Stitch Cloche Hat: Body Construction
Now comes the fun part – working the body of the crochet cloche hat using Tunisian crochet!
Mastering the Tunisian Simple Stitch (TSS)
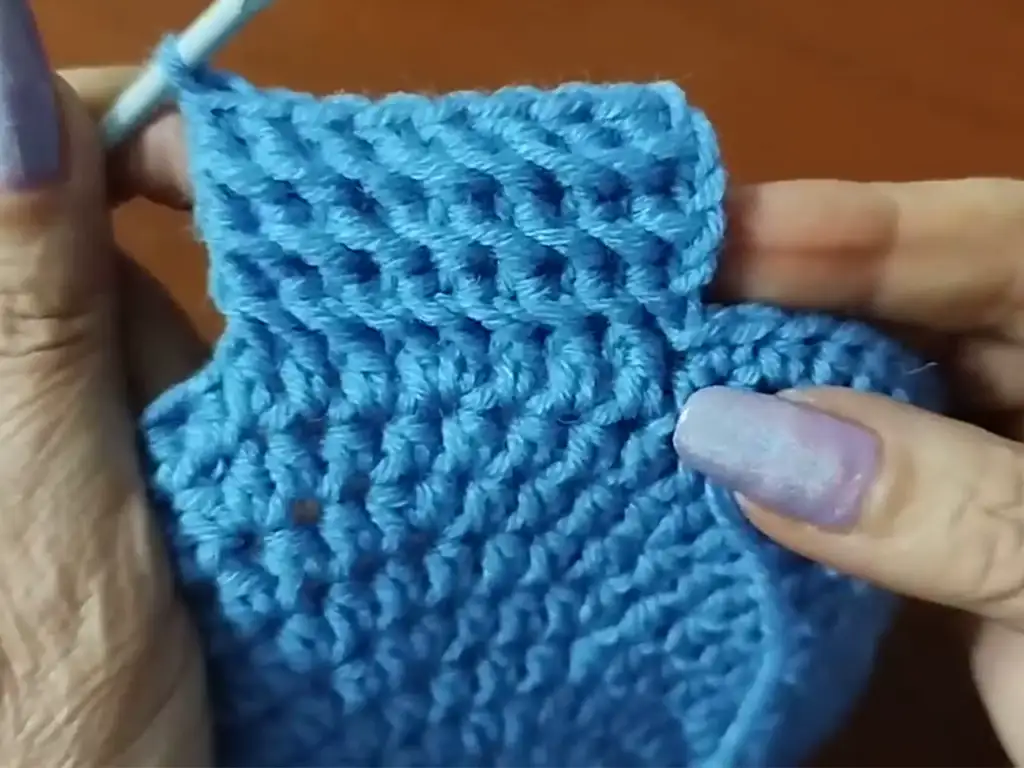
Tunisian crochet is a unique technique that creates a beautiful, textured fabric. The Tunisian simple stitch (TSS) is the foundation stitch we’ll be using for the body of the cloche. In essence, it involves working a forward pass across a row, picking up loops on your hook, and then working a return pass to complete the row. Likewise, it’s a bit like knitting in that you have live stitches on your hook throughout the row. If you’re new to Tunisian crochet, there are many excellent tutorials available online that can guide you through the basics.
Increasing and Decreasing in Tunisian Crochet for Cloche Shaping
To shape the cloche hat, we’ll need to increase and decrease stitches in the Tunisian crochet sections. Increasing involves working two stitches into a single vertical bar, while decreasing involves working two stitches together. These techniques will help us create the curved shape of the cloche.
Working the Body of the Crochet Cloche Hat: Row-by-Row Instructions
After that, you’ll find the complete written pattern for the crochet cloche hat below. Moving on, follow the instructions carefully, paying attention to stitch counts and special instructions for increases and decreases. In this tutorial, you’ll be able to create a truly unique and stylish crochet cloche hat.

Crochet Cloche Hat Brim: Shaping & Structure
The brim of the crochet cloche hat adds a touch of elegance and provides extra warmth and protection from the elements.
Transitioning from the Body to the Brim of Your Crochet Cloche Hat
Once you’ve completed the body of the cloche, we’ll transition to working the brim. To start, we’ll switch back to regular crochet and work a couple of rounds of single crochet stitches around the edge of the body. This creates a smooth foundation for the brim.
Creating a Flared Brim with Increases
To achieve the classic cloche shape, we’ll gradually increase the number of stitches in each round of the brim. Certainly, this creates a flared effect that frames the face beautifully. The pattern includes specific instructions for where and how to increase stitches.
Inserting Regilin for a Sturdy and Stylish Cloche Brim
Undoubtedly, Regilin is the key to achieving a structured and well-defined brim. In other words, we’ll insert the Regilin into the final round of the brim, crocheting around it as we go. This creates a sturdy brim that holds its shape beautifully.
Finishing Your Crochet Cloche Hat: Tips & Tricks
To wrap up your crochet cloche hat, we’ll need to take care of a few finishing touches.
Weaving in Ends Neatly on Your Crochet Cloche
As you continue, weaving in the ends is an important step in creating a polished and professional-looking crochet cloche hat. To illustrate, use a tapestry needle weave the yarn tails through the back of your stitches, securing them discreetly.
Blocking Your Crochet Cloche Hat for a Professional Finish
Blocking is a technique that helps shape and enhance the drape of your finished crochet cloche hat. In fact, it involves gently stretching and pinning the hat to a desired shape and allowing it to dry completely. This can help create a more even and polished look.
Adding Embellishments to Your Crochet Cloche: Personal Touches
Lastly, feel free to add your own personal touches to your crochet cloche hat! For instance, you could add a decorative button, a crocheted flower, or even a bit of ribbon or lace. Indeed, let your creativity shine!


Crochet Cloche Hat Variations & Inspiration
Now that you’ve mastered the basic crochet cloche hat pattern, why not explore some variations and get inspired to create your own unique designs?
Exploring Different Yarn Weights and Colors for Unique Cloche Hats
To put it another way, using a different yarn weight can dramatically change the look and feel of your crochet cloche hat. For instance, a bulky yarn will create a chunkier, more substantial hat, while a fingering weight yarn will result in a lighter, more delicate cloche. Of course, don’t be afraid to experiment with different color combinations as well!
Adding Decorative Stitches to Your Crochet Cloche
In addition to using Tunisian simple stitch, you can also incorporate other decorative stitches into your crochet cloche hat. To illustrate, consider adding a few rows of post stitches or shell stitches to the body or brim for a unique touch.
Finding Inspiration for Your Next Crochet Cloche Project
In short, the possibilities are endless when it comes to designing your own crochet cloche hat. To begin, look for inspiration in vintage fashion magazines, online crochet communities, or even your own wardrobe! In this tutorial, you’ll learn how to create your own variations of the crochet cloche hat.
Crochet Cloche Hat Pattern:
Pattern Notes:
- The crown is worked in the round using hdc stitches with increases.
- The body (tul) is worked using Tunisian crochet in rows back and forth.
- The brim is worked in rounds using TSS with increases.
- The Regilin is inserted into the final round of the brim provide structure.
Adjusting Size:
- Head Circumference: Adjust the diameter of the crown increase or decrease the number of increase rounds. Each additional increase round will add approximately 1 inch (2.5cm) circumference.
- Hat Depth: Adjust the length of the tul section by increasing or decreasing the number of Tunisian crochet rows.
- Brim Width: Adjust the width of the brim by increasing or decreasing the number of increase rounds in the brim section.
Instructions:
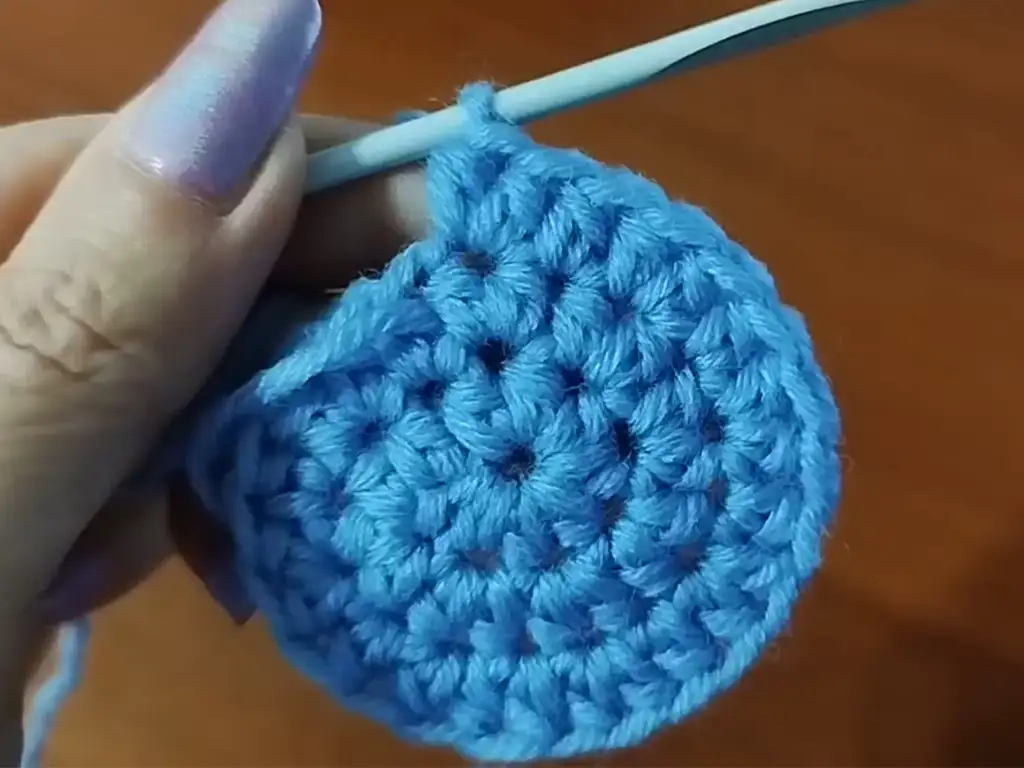
Crown:
- Rnd 1: Make a magic ring, ch 2 (counts as 1 hdc), 7 hdc in ring, sl st first hdc. (8 hdc)
- Rnd 2: Ch 2, 2 hdc in each st around, sl st first hdc. (16 hdc)
- Rnd 3: Ch 2, hdc in next st, 2 hdc in next st, rep around, sl st first hdc. (24 hdc)
- Rnd 4: Ch 2, hdc in next 2 sts, 2 hdc in next st, rep around, sl st first hdc. (32 hdc)
- Rnd 5: Ch 2, hdc in next 3 sts, 2 hdc in next st, rep around, sl st first hdc. (40 hdc)
- Rnd 6: Ch 2, hdc in next 4 sts, 2 hdc in next st, rep around, sl st first hdc. (48 hdc)
- Rnd 7: Ch 2, hdc in next 5 sts, 2 hdc in next st, rep around, sl st first hdc. (56 hdc)
- Rnd 8: Ch 2, hdc in next 6 sts, 2 hdc in next st, rep around, sl st first hdc. (64 hdc)
- Rnd 9: Ch 2, hdc in next 7 sts, 2 hdc in next st, rep around, sl st first hdc. (72 hdc)
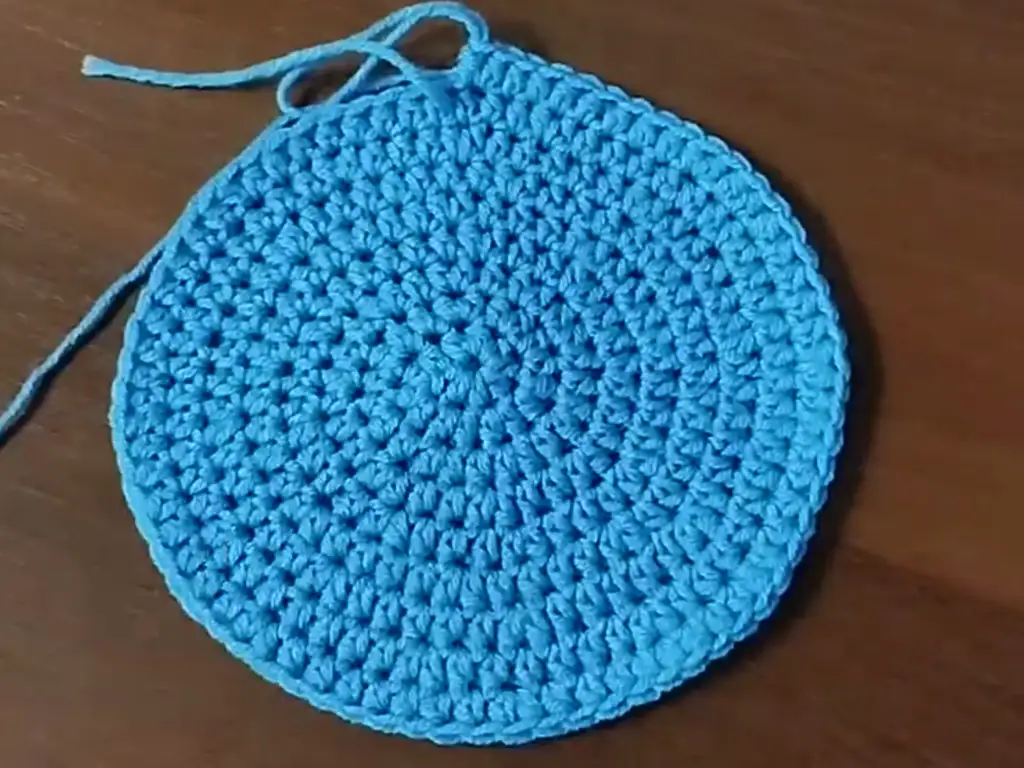
- Rnd 10: Ch 2, hdc in next 8 sts, 2 hdc in next st, rep around, sl st first hdc. (80 hdc)
NOTE: If you need a larger crown, continue with increase rounds following the established pattern (e.g., Rnd 11: hdc in next 9 sts, 2 hdc in next st, etc.) Measure the diameter of the crown periodically ensure it’s the size you need.
Body (Tul):
- Row 1 (RS): Attach MC with a sl st any st around, ch 6, skip 1 st, insert hook in next st, draw up a loop, rep around until 1 st remains before the beg ch, insert hook under both loops of the beg ch, draw up a loop. (81 loops on hook)
- Return Pass: Yarn over, draw through 1 loop, yarn over, draw through 2 loops, rep across until 1 loop remains.
- Row 2 (WS): Ch 1 (does not count as a st), insert hook under vertical bar between first 2 vertical bars of previous row, draw up a loop, rep across until 1 vertical bar remains, insert hook under the last vertical bar and the sl st from the previous row, draw up a loop. (81 loops on hook)
- Return Pass: Yarn over, draw through 1 loop, yarn over, draw through 2 loops, rep across until 1 loop remains.
- Row 3 (RS): Ch 1, FPsc around first vertical bar of previous row, TSS in each remaining vertical bar across, FPsc around the last vertical bar and sl st from previous row.
- Return Pass: Same as Row 2.
- Rep Rows 2 & 3 until desired depth of tul is reached. (The example used 4 rows total).
NOTE: For a shallower hat, work fewer rows. For a deeper hat, work more rows.
Brim:
- Rnd 1: Sl st join the last Tunisian crochet row form a continuous round. Ch 1, sc in each st around, sl st join. (80 sc)
- Rnd 2: Ch 1, sc in each st around, sl st join. (80 sc)
- Rnd 3: Ch 12 (adjust this number for wider or narrower brim), skip 1 st, insert hook in next st, draw up a loop, rep around until 1 st remains before the beg ch, insert hook under both loops of the beg ch, draw up a loop. (93 loops on hook)
- Return Pass: Yarn over, draw through 1 loop, yarn over, draw through 2 loops, rep across until 1 loop remains.
- Rnd 4: Ch 1, FPsc around first vertical bar of previous rnd, TSS in next 3 vertical bars, TSS twice in next vertical bar (increase), TSS in next 3 vertical bars, rep around, ending with FPsc around last vertical bar and sl st.
- Return Pass: Same as Rnd 3.
- Rnd 5: Rep Rnd 4.
- Rnd 6: Rep Rnd 4, inserting Regilin behind the FPsc and TSS stitches as you work.
Finishing:
- Fasten off, leaving a long tail for sewing.
- Sew the two ends of the Regilin together securely.
- Weave in all ends neatly.
- Block the hat if desired.
- Add any desired embellishments (optional).
Downloadable Pattern:
Download the complete written pattern (PDF) for the Free Crochet Cloche Hat with Brim here: https://crochetstrends.com/wp-content/uploads/2024/09/Free-Crochet-Cloche-Hat-With-Brim.pdf
Video Tutorial:
A big thank you to @Marina_1962 for the inspiration for this crochet cloche hat pattern! You can watch her original video tutorial “Осенняя шляпка тунисским вязанием” (Autumn Hat with Tunisian Crochet) here: https://www.youtube.com/watch?v=bSPGQva9eN4. Afterward, be sure to subscribe to her channel (https://www.youtube.com/@Marina_1962) for more amazing crochet projects!
Share Your Creations!
Be sure to share your crochet projects on social media! Tag me on Instagram, TikTok, and Facebook so I can see your beautiful creations.
- Instagram: https://www.instagram.com/tubacrochet_
- TikTok: tiktok.com/@tubacrochet
- Facebook: https://www.facebook.com/tubacrochet/
I’m always excited to see what others are making!
Let me know if you have any questions about the pattern, and I’ll be happy to help!
Let’s Connect!
Ultimately, we encourage you to leave comments and questions below. Moreover, we love hearing from our readers and building a vibrant crochet community. Most importantly, don’t be shy – share your tips, tricks, and experiences with us!
Other Crochet Projects You’ll Love:
- Easy Crochet Slouchy Beanie Pattern
- How to Crochet a Chunky Blanket
- Free Crochet Shawl&Scarf Patterns
- Easy Crochet Coasters
Conclusion: We hope you enjoyed this crochet cloche hat pattern and tutorial. As a result, with a little practice and patience, you can create a beautiful and stylish hat that will keep you warm and fashionable all season long. Consequently, happy crocheting!


