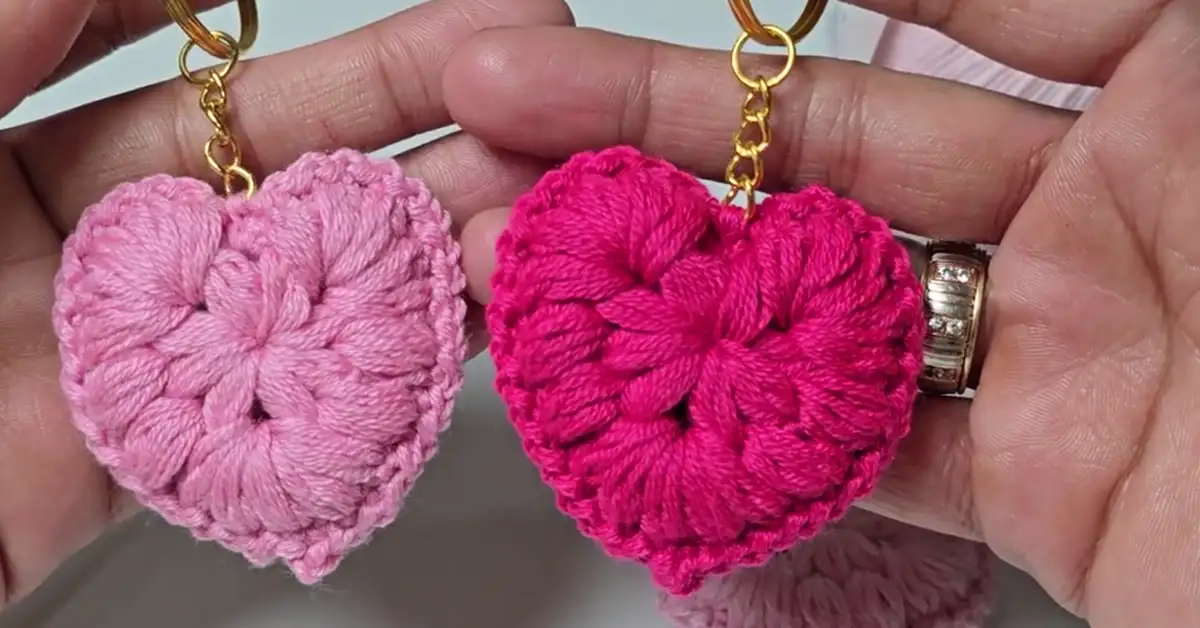
Hey y’all! If you’re looking for a fun, quick project, this DIY crochet keychain is it. I’m so excited share this crochet heart keychain tutorial with you. It’s a cute little puff stitch heart keychain that’s perfect for beginners. Seriously, it’s so easy, you’ll whip it up in no time! Whether you want a sweet gift or a new accessory, this handmade crochet keychain idea has you covered. Let’s get started on this beginner crochet heart keychain tutorial—trust me, you’ll love it!
This project uses puff stitches make a plump heart shape. You’ll make two pieces, join them, and add a keychain clip. It’s great for gifting—like for Valentine’s Day—or just keeping for yourself. Plus, it’s free, simple, and totally doable, even if you’re new crochet. Ready? Grab your hook, and let’s make something adorable!

DIY Crochet Heart Keychain Tutorial – Perfect for Beginners!
This crochet heart keychain tutorial is all about keeping things easy and fun. It’s a beginner-friendly crochet heart tutorial that anyone can tackle. Besides, who doesn’t love a handmade gift? Let’s break down why this project rocks.
Why Choose a Puff Stitch Heart Keychain?
So, why this specific design? Firstly, the puff stitch is gorgeous. It creates a bouncy, 3D texture. But unlike amigurumi, there’s no fiddly stuffing! This makes the easy crochet heart pattern much faster. Also, it’s incredibly versatile. This small crochet heart pattern works as a keychain. Or use it as a bag charm. Add it to gift wrapping. String several together for a garland! Besides, the process is really enjoyable. Watching the puffs build up is very satisfying. It’s a simple crochet heart keychain tutorial with step-by-step instructions. You get a big impact with fairly basic techniques. Ultimately, it’s just plain cute!
Quick & Easy Crochet Gift Ideas for Any Occasion
Need a last-minute handmade crochet gift idea? This puff stitch heart keychain is your answer! Seriously, you can make one quite quickly. Especially once you get the hang of the puff stitch. Think Valentine’s Day gifts. Teacher appreciation presents. Party favors or stocking stuffers. Or just a little “thinking of you” token. Because it’s a small crochet heart pattern, it uses minimal yarn. Therefore, it’s very budget-friendly. You can find the free crochet heart keychain tutorial for beginners right here. Making something handmade adds a personal touch. It shows you care. This cute and easy crochet heart keychain gift idea fits perfectly. It’s a wonderful crochet heart keychain gift for friends step by step. Consider making a Valentine’s Day crochet keychain for someone special.
Materials Needed for Your Crochet Heart Keychain
Okay, let’s gather our supplies! Getting the right tools makes crafting smoother. Here’s what you’ll need for this DIY crochet keychain.
Best Yarn & Hook for a Small Crochet Heart Pattern
- Yarn: Cotton yarn is highly recommended. The transcript mentions Himalaya Himagurimi. It gives great stitch definition. However, any smooth DK or worsted weight yarn works. Acrylic or blends are fine too. Choose colors you absolutely love! Bright pinks, deep reds, soft pastels? Maybe even variegated yarn? The choice is yours! You don’t need much yarn at all. Specifically, maybe 15-20 yards per heart piece. Finding the best yarn for crochet keychains often means choosing durability. Cotton holds up well.
- Crochet Hook: A 2.5 mm hook was used in the video. But, check your yarn label. It usually suggests a hook size. Use that as a starting point. If your puffs seem too loose, try a smaller hook. If they are too tight and stiff, go up a size. Consistency is key for neat puffs. You want them plump, not sloppy or dense. Thus, hook size matters for the look.
Essential Tools for DIY Crochet Keychains
- Scissors: Any small, sharp pair for snipping yarn ends.
- Yarn Needle (or Tapestry Needle): This is crucial. You need it for weaving in yarn tails. A blunt tip helps avoid splitting yarn. Choose one with an eye large enough for your yarn.
- Keychain Hardware: You need something to attach your heart! A split ring (like on keys) works well. A lobster clasp is another great option. You can find these online or at craft stores.
- Stitch Marker (Optional but Recommended): Especially for beginners! Use it to mark the first stitch of a round. This helps you know where a round begins and ends. A simple safety pin or scrap of contrasting yarn works too. Indeed, it prevents losing your place.


Step-by-Step Puff Stitch Heart Keychain Pattern
Alright, let’s crochet! Remember, take your time. Enjoy the process. This crochet heart keychain step-by-step guide is detailed. We’ll break down every part. Don’t forget, we use US standard crochet terms.
Gauge Check: Gauge isn’t critical here. However, try to keep your tension even. Your finished heart might be 2-3 inches across. If it looks much different, adjust your hook size.
Abbreviations:
- ch: chain
- sl st: slip stitch
- sc: single crochet
- yo: yarn over
- st(s): stitch(es)
- sp(s): space(s)
- puff st (3): puff stitch using 3 loops (explained below)
- puff st (4): puff stitch using 4 loops (explained below)
- Rnd: Round
- […] … times: repeat instructions in brackets
Important Technique: Puff Stitch Explained
- Puff Stitch (3 Loops) – puff st (3):
- Yarn over (yo).
- Insert hook into indicated stitch or space.
- Yo, pull up a loop. Keep it loose, about sc height. (3 loops on hook)
- [Yo, insert hook into same st/sp, yo, pull up loop] repeat 2 more times. (7 loops total on hook)
- Yo, carefully pull through all 7 loops on hook.
- Chain 1. This closes the puff stitch securely. This closing ch 1 is important!
- Puff Stitch (4 Loops) – puff st (4):
- Same as above, but repeat Step 4 three more times instead of two. (9 loops total on hook before pulling through)
- Yo, pull through all 9 loops.
- Chain 1 (to close).
How to Start with a Magic Ring (Easy Beginner Guide)
The magic ring crochet keychain method creates a tight center. No ugly hole! Here’s how to make a crochet heart keychain for beginners starting right.
- Loop yarn around your fingers twice, forming an ‘X’.
- Slide hook under the first loop. Grab the second loop. Pull it under the first.
- Remove fingers carefully. Keep loops on hook.
- Yo, pull through the loop on your hook. This makes a starting knot.
- Your adjustable ring is ready! Don’t pull the tail tight yet.
(Need more help? Search YouTube for “magic ring crochet tutorial” – many great visual guides exist!)
Crocheting Puff Stitches: Simple Step-by-Step Instructions
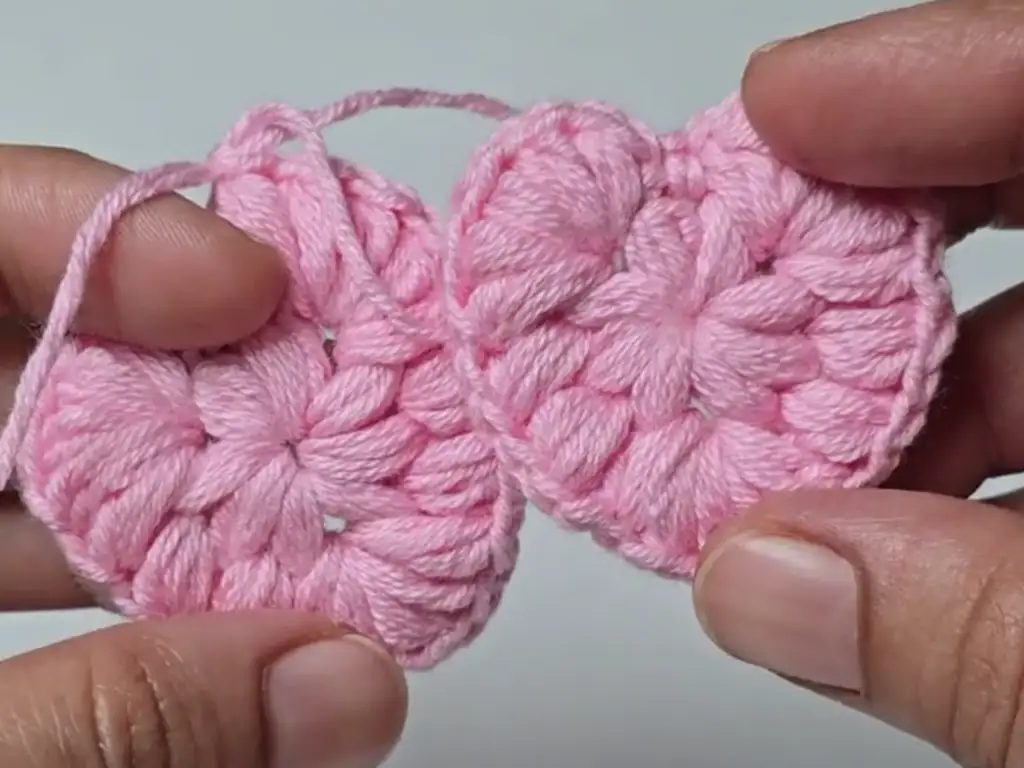
Let’s Make the Heart Piece (Make 2 Identical Pieces)
Rnd 1: Building the Foundation
- Start with your magic ring.
- Chain 1. (This does not count as a stitch).
- Make 1 single crochet (sc) into the ring.
- Reminder sc: Insert hook in ring, yo, pull loop up (2 loops on hook). Yo, pull through both loops.
- Make 1 puff st (3) into the ring. (Remember the steps above!)
- Chain 2. This creates our first corner space.
- Repeat [1 puff st (3) into ring, chain 2] seven more times.
- Tip: Count carefully! You need 8 puffs total in the ring.
- You should now have 8 puff stitches. And 8 chain-2 spaces between them.
- Gently pull the starting yarn tail. Pull it firmly. Watch the center close up neatly!
- Join the round. Find the top of the very first puff stitch made (skip the sc and ch 1). Insert hook under the top two loops. Make a slip stitch (sl st).
- Reminder sl st: Yo, pull through the stitch and the loop on your hook. All in one go.
(End Rnd 1: 8 puff sts, 8 ch-2 spaces)
Shaping the Heart: Increasing and Decreasing Rows (Round 2 Technique)
Round 2 is where the heart shape magically appears! We use clusters of puff stitches. This acts like increasing stitches in specific spots. It creates the curves and the point. We are working into the chain-2 spaces from Round 1.
Rnd 2: Forming the Heart Shape
- Chain 1. (Does not count as a stitch).
- Find the first ch-2 space right after your join.
- Work all these stitches into that same first ch-2 space:
- [Puff st (3), ch 1] repeat 5 times.
- Result: You have a fan of 5 puffs (3 loops each). They’re separated by ch 1s. This is the first top curve!
- Move to the next ch-2 space.
- Make 1 puff st (4) in this space. (Remember, 4 loops this time!).
- Chain 1.
- Move to the next ch-2 space.
- Make 1 puff st (4) in this space.
- Chain 1. These two slightly larger puffs form the side.
- Move to the next ch-2 space.
- Work all these stitches into this same space:
- [Puff st (3), ch 1] repeat 5 times.
- Result: Another fan of 5 puffs (3 loops each). This creates the bottom point of the heart!
- Join the round. Find the top of the very first puff stitch made in this round (Rnd 2). Make a slip stitch (sl st) into it.
(End Rnd 2: 12 puff sts total in this round, clustered into 4 groups)
Finishing the Heart Pieces:
- First Heart Piece:
- Cut yarn, leaving a 6-inch tail.
- Pull tail through the loop on hook. Pull tight to fasten off.
- Use yarn needle. Weave in the starting magic ring tail. Also, weave in this ending tail. Hide them securely on the back side. Trim any excess yarn.
- Second Heart Piece:
- Complete Rnd 1 and Rnd 2 exactly the same way.
- BUT! Do NOT cut the yarn after the final slip stitch join.
- Leave the loop on your hook. Use your yarn needle. Weave in only the starting magic ring tail now. We’ll use the attached working yarn to join.
Assembling & Finishing Your Handmade Keychain
Almost there! Now we put our beautiful heart pieces together. This creates that lovely, slightly puffy DIY crochet keychain.
Joining Two Hearts for a 3D Keychain Effect
- Align Hearts: Take both heart pieces. Place them together. Make sure the wrong sides (backs) are facing each other. The pretty “right” sides should be facing out. Line up the edges carefully.
- Find Starting Point: Locate the dip between the two top curves. This is near where you finished Rnd 2. You should still have your hook in the loop of the second heart piece.
- First Joining Stitch: Insert hook into the joining sl st (or the space right there) of the front heart piece. Then, insert hook into the corresponding stitch/space of the back heart piece. You’re going through both layers. Yo with your working yarn. Pull loop through both layers (2 loops on hook). Yo, pull through both loops. That’s 1 single crochet (sc) join. It anchors the pieces.
- Work Down the Side: We’ll now create a neat edge.
- Chain 1.
- Find the next space between puffs from Rnd 2. This is likely the ch-1 space. Insert hook into this space through both layers.
- Make a slip stitch (sl st) through both layers.
- Repeat [Chain 1, sl st into next space between puffs through both layers]. Continue this pattern down the curve towards the point. Take your time lining up the spaces.
Shape the Point:
- Keep going with [Ch 1, sl st] until you reach the bottom point. This aligns with the middle (3rd) puff of the 5-puff cluster at the bottom.
- Work your last (Ch 1, sl st) into the space before that center puff.
- Now, insert hook into the top of that center bottom puff stitch (or its ch-1 space). Go through both layers.
- Chain 2. This helps create a sharp point.
- Make 1 single crochet (sc) into the exact same stitch/space. Go through both layers again. Point complete!
- Work Up the Other Side: Continue joining upwards.
- Chain 1.
- Find the next space between puffs (after the point sc). Insert hook through both layers. Make a slip stitch (sl st).
- Repeat [Chain 1, sl st into next space between puffs through both layers]. Work evenly up the second side curve.
- Finish Joining: You’re almost back where you started!
- When you reach the first sc join, make one last Chain 1.
- Make a slip stitch (sl st) into that very first sc join stitch.

How to Attach the Keychain Ring Securely
- Fasten Off: Cut the working yarn. Leave another 6-inch tail. Pull the tail completely through the loop on your hook. Pull gently to tighten the knot.
- Weave Final End: Thread this tail onto your yarn needle. Carefully weave it back and forth. Hide it within the joining stitches on the inside edge. Make it secure. Trim any excess yarn.
- Attach Hardware: Choose your keychain finding (split ring or clasp). Gently open it. Slide it through one of the sturdy chain spaces. Pick a space in the top dip of the heart. Choose the space created during the joining round. Make sure it feels secure. Close the ring or clasp firmly.
Ta-da! You’ve finished your beautiful puff stitch heart keychain! Step back and admire your work. It’s a lovely little piece of handmade art. This beginner-friendly crochet heart tutorial is complete!
Pro Tips & Customization Ideas
Want to elevate your crochet heart keychain tutorial experience? Here are some extra tips and fun ideas.
Troubleshooting Common Crochet Heart Mistakes
- Puffs Too Loose/Sloppy: Your tension might be too loose. Or you might need a smaller hook. Try pulling the loops tighter as you make the puff. Ensure you pull through all loops cleanly.
- Puffs Too Tight/Stiff: Tension might be too tight. Or try a slightly larger hook. Make sure you pull the loops up to a good height. Don’t strangle the yarn!
- Heart Shape Uneven: Double-check your stitch counts for Rnd 2. Did you put 5 puffs in each “fan” section? Did you make the 4-loop puffs in the correct spaces? Also, ensure you’re joining the edges evenly. Don’t skip spaces during assembly.
- Magic Ring Won’t Close: Make sure you looped the yarn correctly initially. Pull the starting tail, not the working yarn. Sometimes a little wiggle helps it close.
- Losing Your Place: Use that stitch marker! Place it in the first puff stitch of each round. Move it up as you go. Specifically, it helps track the round’s beginning.
Creative Variations: Colors, Charms & Seasonal Themes
This easy crochet heart pattern is a fantastic base! Let’s customize.
- Colors: Go wild! Use two different colors for the two heart pieces. Make striped hearts by changing color every round (more ends to weave!). Try ombre yarn for a gradual color shift. For instance, make rainbow hearts!
- Charms: Add tiny metal charms! Attach them near the keychain hardware. Think initials, tiny animals, or beads. Use a small jump ring for attachment.
- Embroidery: Add simple details! Embroider a tiny initial onto the heart. Use contrasting embroidery floss. A small lazy daisy stitch could be cute.
- Seasonal Themes: Make red/pink hearts for Valentine’s Day. Orange/black for Halloween? Red/green/white for Christmas ornaments! Pastel colors for Easter or spring themes. Undoubtedly, the possibilities are endless.
- Add Beads: String a few pretty beads onto the yarn. Slide them into place between puff stitches during Rnd 2. Or add them near the keychain hardware.
- Different Stitches: While this uses puff stitch, you could adapt the shape concept. Try bobbles or even simple single crochet for a flatter look. (Though the puff is part of its charm!).
More Beginner-Friendly Crochet Projects
Loved making this DIY crochet keychain? Ready for your next adventure? Crochet offers so many possibilities!
Explore Free Crochet Keychain Patterns
The world of crochet keychain patterns is huge! Search online for other free crochet keychain patterns. You’ll find animals, food items, simple shapes, and more. Many use similar basic techniques. Therefore, your skills are transferable! Look for patterns marked “easy” or “beginner-friendly crochet”. Besides keychains, small amigurumi patterns are often great practice. They help you work in rounds and shape items. Just start small and build your confidence. Many designers offer fantastic free resources online.
Gift-Ready Crochet Ideas for Every Skill Level
Beyond keychains, what other handmade crochet gift ideas can you try?
- Coasters: Simple squares or circles are great practice. Granny squares are classic.
- Washcloths/Dishcloths: Cotton yarn makes these practical gifts. Learn simple textures.
- Simple Scarves: Use basic stitches like single or double crochet. Choose a soft, chunky yarn for quick results.
- Headbands/Ear Warmers: Often quick projects using basic stitches.
- Small Baskets: Learn to work in the round and create structure.
- Coffee Cup Cozies: A practical and customizable gift.
As you can see, once you start, you’ll find endless projects. The key is practice and patience. Don’t be afraid to try new things!
Call to Action! Let’s Connect!
I really hope you enjoyed this step-by-step crochet heart keychain guide! This pattern and the original video tutorial come from the talented @TubaCrochet. She shares amazing crochet inspiration!
- Watch the Full Video Tutorial: See every step in action! Watch Tuba’s clear video guide here: https://www.youtube.com/watch?v=tHeIr9j8A0g
- Subscribe for More: Find more wonderful patterns and tutorials on Tuba’s channel: https://www.youtube.com/@TubaCrochet
- Share Your Makes! We absolutely LOVE seeing your finished projects! Did you make this puff stitch heart keychain? Please share a photo!
- Tag @tubacrochet_ on Instagram: https://www.instagram.com/tubacrochet_
- Find her on TikTok: tiktok.com/@tubacrochet
- Connect on Facebook: https://www.facebook.com/tubacrochet/
- Leave a Comment: Did you find this tutorial helpful? What colors did you choose for your crochet heart? Let us know in the comments below (or on the video)! We appreciate your feedback.
Other Crochet Projects You’ll Love
If you enjoyed this easy crochet heart pattern, you might like other quick and cute projects. Explore patterns for simple flowers, coasters, or maybe even a basic beanie. Building your skills step-by-step is so rewarding. Keep practicing those stitches!
Conclusion
To sum up, making this DIY Crochet Heart Keychain is a joy. It’s a simple, quick project perfect for beginners. It uses the delightful puff stitch. It results in a charming handmade item. It’s ideal for gifts or personal use. This crochet heart keychain tutorial provides all the steps. We covered everything from materials to finishing touches. Most importantly, have fun with it! Let your creativity shine through your color choices. Customize it to make it uniquely yours.
Happy Crocheting, everyone! Keep those hooks busy!
Want a printable version of this pattern? You can download the free PDF pattern here: https://crochetstrends.com/wp-content/uploads/2025/03/Crochet-Puff-Stitch-Heart-Keychain.pdf